Assigning/Revoking User Roles (Local)
If the deployment Local user authentication across either the entire platform or in the current tenant (see The User Authentication Screen and Kubernetes Tenant/Project External Authentication), then the process of assigning and revoking user roles varies based on your role, as follows:
- Tenant Administrator: You can use the Assign User screen to assign the Member or Admin roles to users within your own tenant. The appearance and functionality of this screen varies slightly based on your role, as described in Tenant Administrator View.
- Platform Administrator: You can use the Assign User screen to assign the Member or Admin roles to users across all tenants in the deployment and can also assign the Platform Administrator role. The appearance and functionality of this screen varies slightly based on your role, as described in Platform Administrator View.
Tenant Administrator View
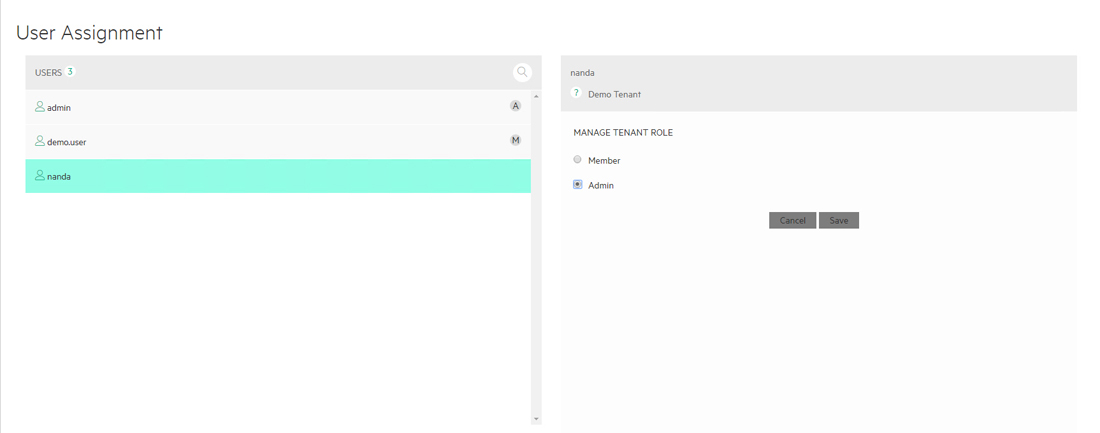
If you are a Tenant Administrator, then clicking the Assign button in the Tenant Details screen or selecting Assign Users in the Quick Access menu opens the Assign Users screen. This screen allows you to assign, change, or revoke user access to the current tenant. The Assign Users screen appears as shown here for a Tenant Administrator.
To assign a user to the current tenant or change the user's role within the current tenant (such as from Member to Tenant Administrator or vice versa):
- On the left side of the screen, select the user you want to assign in the
USERS list. You may also click the Search icon (magnifying
glass) and then start typing the username into the Filter field,
and the list of users will update in real time based on your entry.
- An A icon appears by each user who has the Tenant Administrator role assigned to them for the current tenant. A tenant may have multiple administrators. You may either downgrade the role of that user to Tenant Member or remove access to this tenant altogether.
- An M icon appears by each user who has the Tenant Member role assigned to them for the current tenant. A tenant may have multiple members. You may either upgrade the role of that user to Tenant Administrator or remove access to this tenant altogether.
- Users who do not have any role in the current tenant may be granted either the Tenant Member or Tenant Administrator role. No icon appears next to these users.
NOTE It is possible to revoke all roles from a single user. A user with zero assigned roles will not appear in any of the Tenant Details screens, but will appear in the Assign Users screen. A user must have at least one assigned role in order to be able to log in to the deployment. - Selecting a user enables the User section on the right side of the screen. The name of the tenant to which you are assigning the user also appears below the username.
- Check the appropriate radio button to assign a role to the selected user. The
available options are:
- Member: Makes the user a non-administrative member of the current tenant.
- Admin: Makes the user a Tenant Administrator of the current tenant.
NOTE This function does not store user passwords. The built-in user database or your existing external authentication server will handle user passwords. - If the selected user already has Member or Tenant Administrator access to the current tenant, you will see a Remove from this Tenant button at the bottom right of the Assign Users screen. Clicking this button revokes the user's role and prevents them from being able to access the current tenant.
A confirmation dialog appears; click OK to proceed with the revocation or Cancel to cancel.
Platform Administrator View
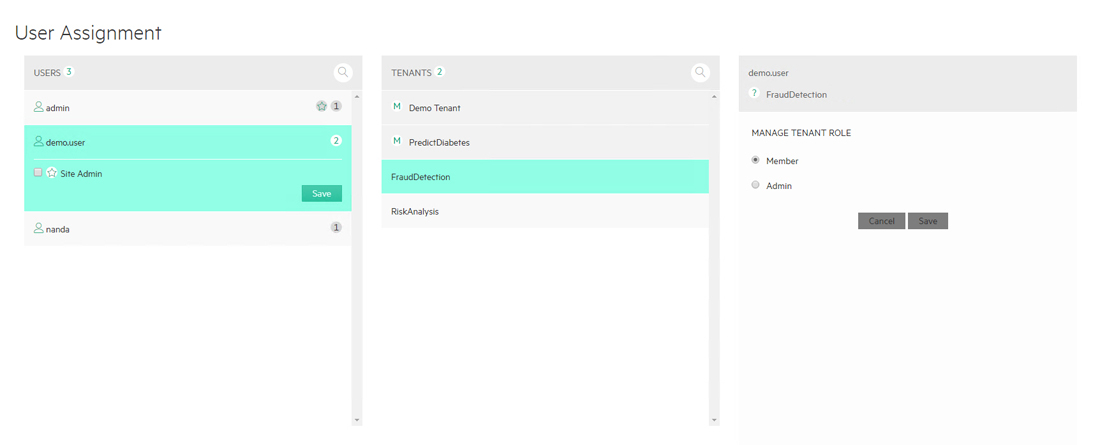
If you are a Platform Administrator, then selecting a user followed by clicking the Assign button in the User Details screen opens the Assign Users screen, which allows you to assign, change, or revoke user access across all tenants and to assign/remove the Site Admin role from one or more users. The Assign Users screen appears as shown here for a Platform Administrator.
This screen enables you to:
- Assign the Member or Tenant Administrator role to users. See Assigning Member/Tenant Administrator Roles.
- Assign the Site Admin role to users. See Assigning the Platform Administrator Role.
Assigning Member/Tenant Administrator Roles
To assign a user role:
- On the left side of the screen, select the user you want to assign in the
USERS list. You may also start typing the username into the
Filter field, and the list of users will update in real time based on
your entry.
- An star icon appears by each user who has the Platform Administrator role assigned to them.
- The TENANTS column displays all of the tenants.
- When you select a user in the USERS column, an A icon appears in the TENANTS column next to each tenant in which the selected user has the Tenant Administrator role assigned to them for that tenant.
- When you select a user in the USERS column, an M icon appears in the TENANTS next to each tenant in which the selected user has the Member role assigned to them for that tenant.
- No icon appears next to any tenant(s) for which the selected user has no role.
NOTE It is possible to revoke all roles from a single user. A user with zero assigned roles will not appear in any of the Tenant Details screens, but will appear in the Assign Users screen. A user must have at least one assigned role in order to be able to log in. - Selecting a user and a tenant enables the User section on
the right side of the screen. Check the appropriate radio button to assign a
role to the selected user. The available options are:
- Member: Makes the user a non-administrative member of the selected tenant.
- Admin: Makes the user a Tenant Administrator of the selected tenant.
NOTE A user may have one role per tenant. Please see Users and Roles for an explanation of the available roles and the privileges associated with each role. - Click Save to save your changes. NOTE This function does not store user passwords. The built-in user database or your existing external authentication server will handle user passwords.
- If the selected user already has Member or Tenant Administrator access to the current tenant, you will see a Remove from this Tenant button at the bottom right of the Assign Users screen. Clicking this button revokes the user's role and prevents them from being able to access the current tenant.
A confirmation dialog appears; click OK to proceed with the revocation or Cancel to cancel.
Assigning the Platform Administrator Role
The role assigned to Platform Administrators is called Site
Admin.
Selecting a user in the USERS section also expands that user and displays a Site Admin check box for that user. This box is checked if the user already has the Site Admin role assigned to them. It is cleared if they do not have this role.
- Checking this check box and then clicking Save assigns the Site Admin role to the selected user, which gives that use Platform Administrator rights. A star icon appears next to this user in the USERS section.
- Clearing this check box and then clicking Save removes the Site Admin role from the selected user. The star icon disappears from this user in the USERS section.