Fabric Deployment Using a Seed Node
Describes how to install the platform using a seed node and the Create Fabric interface.
The first fabric you deploy – whether it is in the cloud or on-premises – must be deployed using a seed node. The seed node creates a lightweight, temporary fabric. The installation sequence uses this temporary fabric to display the interface for fabric creation.
The seed node is needed only for creation of the first fabric. Any additional fabric must be created from your cloud-based or on-premises fabric. The seed node can only be used to create fabrics. Creating volumes, buckets, or other resources from the seed node is not supported. For information about creating additional fabrics, see Creating a Fabric.
Seed Node Deployment Process
To deploy the HPE Ezmeral Data Fabric in your environment, you run a script that starts a Docker container. The Docker container emulates the behavior of a Data Fabric node. This emulated node is the seed node. The seed node enables access to the Create Fabric interface used to create fabrics.

Prerequisites for Fabric Deployment
Before you deploy a fabric, review all of the following requirements:
Seed Node Prerequisites
| Prerequisite | Notes |
|---|---|
| Users | To install using a seed node, you must be root or a user
that can run sudo commands without being prompted for a password.
|
| OS | The seed node has been tested on the following operating systems, but it can
work on other operating systems and in other environments where Docker containers
are hosted:
|
| Connectivity | The seed node that you use to host the Docker container can be a server or
laptop that supports the following, but must have connectivity to all the subnets
and the VPN for the cloud provider:
|
| CPU | 64-bit x86 with a minimum of 16 cores per node. |
| Memory | On the seed node, enough memory must be allocated to Docker to enable the
container to come up and run. Docker must be installed and have the following
memory allocated to it:
|
| Disk Space | If you use a Linux server for the seed node, allocate at least 50 GB of disk space to run the container. |
| Proxy | If the seed node is behind a proxy, update the proxy configuration in
/etc/environment using the following commands. You must do this
before attempting to create a
fabric: |
On-Premises Deployment Prerequisites
See Prerequisites for On-Premises Installation.
Cloud Provider Prerequisites
You must have sufficient permissions to perform tasks in the cloud environment you are using. Hewlett Packard Enterprise recommends the following minimum permissions for installers:| Cloud Provider | Minimum Permissions |
|---|---|
| AWS | AmazonEBSCSIDriverPolicy and AmazonEC2FullAccess |
| Azure | Contributor role |
| GCP | Editor role |
Docker Image Prerequisites
The Docker image that must be used for HPE Ezmeral Data Fabric deployments is:maprtech/edf-seed-container:7.9.0_9.3.1_edf
maprtech/edf-seed-container:latest tag, which is
always the latest version of the image._edf suffix
in the image tag can be used to install the consumption-based, software-as-a-service
platform.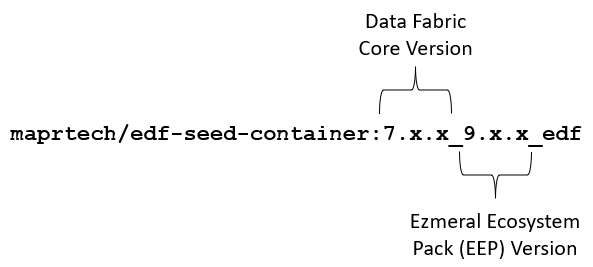
https://hub.docker.com/r/maprtech/edf-seed-container/tags/
docker pull command as described in the following
steps.After you verify that your system and environment meet the listed prerequisites, complete the following steps to deploy the HPE Ezmeral Data Fabric.
Run the Script to Bring up the Container Image on the Seed Node
- Sign in to the seed node host as
rootor a user that can runsudocommands without being prompted for a password. - Download the
datafabric_container_setup.shscript from GitHub. For example, download the script in its raw form by using the followingwgetcommand:wget https://raw.githubusercontent.com/mapr-demos/edf-seednode-790-getting-started/main/datafabric_container_setup.sh - Optional: Use a docker pull command to pre-download a copy of the image from
https://hub.docker.com/r/maprtech/edf-seed-container/tags. Using
docker pullrequiressudoprivileges:docker pull maprtech/edf-seed-container:latestIMPORTANTNote these considerations:- Pre-downloading is optional, but it makes the script run faster and prevents download issues when you run the script. The script checks to see if the image is already present on your system. If the image is present, the script uses the image. If it is not present, the script tries to download it.
- If you want to use the
-i <image>option, you must specify:maprtech/edf-seed-container:7.9.0_9.3.1_edf
- Modify the script so it is
executable:
chmod +x datafabric_container_setup.sh - Before running the script, review the following considerations:
- Running the
datafabric_container_setup.shscript requires sudo privileges. - The script can take 5-10 minutes to run the first time you run it. Unless you pre-downloaded the image, the script downloads the latest Docker image from the Docker repository. For a list of available tags, see https://hub.docker.com/r/maprtech/edf-seed-container/tags.
- The script supports the
-ioption for specifying an image other than the latest image. The script also supports a-poption that must be used if the seed node is a cloud instance. To view the command line help for the script, see Help for datafabric_container_setup.sh.
- Running the
- Run the script to deploy the container for the Data Fabric
image:
The script downloads the latest image. When the Docker image is running, you see the following output:./datafabric_container_setup.sh
If the services do not come up, see Troubleshooting Seed Node Installation../datafabric_container_setup.sh RAM NEEDED : AVAILABLE DOCKER STATUS : RUNNING PORTS NEEDED : AVAILABLE PROCEEDING FORWARD WITH DEPLOYING SEED NODE Please enter the local sudo password for root latest: Pulling from maprtech/edf-seed-container Digest: sha256:b863f487de7eaa809b66f923aaec297ae1cab4fdb9441950fbe5c68328235a7a Status: Downloaded newer image for maprtech/edf-seed-container:latest docker.io/maprtech/edf-seed-container:latest Developer Sandbox Container 8935a11fb7d6 is running.. services required for Ezmeral Data fabric are coming up services required for Ezmeral Data fabric are coming up services required for Ezmeral Data fabric are coming up Client has been configured with the docker container. Please click on the link https://<hostname>:8443/app/dfui to deploy data fabric For user documentation, see https://docs.ezmeral.hpe.com/datafabric/home/installation/installation_main.html - Navigate to the link specified in the Docker output message in step 6. The Data Fabric UI displays the Create your first fabric form.
Create the Fabric
Bringing up the seed node automatically displays the fabric-creation interface. To create your first permanent fabric, complete the following steps.
- On the Create your first fabric form, fill in the configuration
parameters for the type of fabric you want to create. For more information, see the
following topics:
- AWS Fabric Configuration Parameters
- Azure Fabric Configuration Parameters
- GCP Fabric Configuration Parameters
- On-Premises Fabric Configuration Parameters

- Click Create. The Fabric details dialog
box is displayed. For example:

- To monitor the progress of fabric creation, check the status bar in the
Fabric details dialog box, or click See
details. Fabric creation can take 20 minutes or more.
While the installation is in progress, you can Cancel the installation at any time. If you click Cancel, a confirmation box asks for your credentials based on the provider type (AWS, GCP, Azure, or on-premises). Once you provide your credentials and click Continue, you cannot resume the current installation. However, you can use the Re-initiate button later to trigger a new installation request.
If fabric creation is successful, the Data Fabric UI displays a message with the endpoint link for the new fabric. For example:
- Using a browser, navigate to the endpoint link, and sign in to the Data Fabric UI for the newly created fabric using user name
adminand passwordp@ssw0rd. These credentials are the default user name and password for Keycloak.IMPORTANTHewlett Packard Enterprise recommends that you change the default Keycloak password immediately after installation. See Changing the Keycloak admin Password.
- If fabric creation is successful, use the following steps to activate and register the
fabric. NOTEAfter you have successfully created a cloud-based or on-premises fabric, you can kill the container that hosts the
edf-installer.hpe.comfabric. For example, at the Docker command line type:% docker kill <seed-node-container-ID> - If an error occurs during fabric creation, see Troubleshoot Fabric Creation later on this page.
Activate and Register the Fabric
- Add the activation key for the fabric. See Adding an Activation Key.
- Register the fabric. See Registering a Fabric.
- Set the billing model. See Setting the Billing Model.
- Configure single sign-on. See SSO Using Keycloak.
Troubleshoot Fabric Creation

To view the log information, click See details. For example:
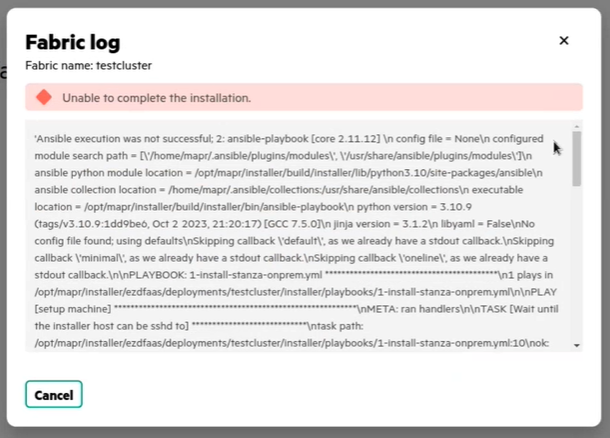
Review the log information to determine if the failure is correctable. If you can resolve the failure condition, you can retry creating the fabric.
- Click Reinitiate. The Reinitiate fabric form is displayed.
- Fill in the required fields in the form.
- Click Create. The Fabric details dialog box is displayed.
- Monitor the progress of fabric creation as described in Create the Fabric.
If you are not able to resolve the issue that caused fabric creation to fail, contact HPE Support.