Extending a Cluster by Adding Nodes
This section describes how to add capacity to a cluster by adding nodes.
About this task
You add nodes to a cluster by using the web-based Installer (version 1.6 or later) or Installer Stanzas. The nodes are added to a pre-existing group online without disturbing the running cluster. You can add nodes to on-premise clusters or to cloud-based clusters.
You can add multiple nodes to a group in the same operation, and you can add nodes to custom groups. You can also add the same node to multiple groups. The Installer installs the new nodes with the same patch level as the existing nodes.
Restrictions
About this task
- The cluster must already be installed before nodes can be added.
- You cannot add a node to a MASTER group, since these services can run only on one node.
- If you add a node to a CONTROL group that has a CLDB, you must do a manual, rolling restart of the entire cluster.
- If you add a node to a group that has OpenTSDB, you must add the same node to the group that contains AsyncHBase (currently, the Installer does not check to ensure that this dependency is met).
- You cannot add services.
- You cannot change the EEP version or Core version.
- You cannot add new service groups.
- New nodes are added automatically to the DEFAULT group.
- A node added to a secure cluster will be configured for security automatically. If the cluster is custom secure, you cannot use the Installer. See Customizing Security in HPE Ezmeral Data Fabric.
Before Adding Nodes
Procedure
-
Determine the group(s) to which new nodes will be added.
You can add nodes to the following types of groups:
- CLIENT
- DATA
- CONTROL
- MULTI_MASTER
- MONITORING_MASTER
To gather information about groups, see Getting Information About Services and Groups.NOTEIf you add a node to a group containing a CLDB, you must restart all the nodes except for the new node. If you add a node to a group containing Zookeeper (but not CLDB), you must restart Zookeeper on all the Zookeeper nodes except for the new node. And you must restart the lead Zookeeper last. - Ensure that the node(s) to be added meet the installation prerequisites described in the Installer Prerequisites and Guidelines.
Adding Nodes Using the Installer Web Interface
Procedure
-
Use a browser to connect to the cluster using the Installer URL:
https://<Installer Node hostname/IPaddress>:9443 -
On the status screen, click the Extend Cluster
button. The Installer displays the
Extend Cluster screen showing the currently
configured groups and services.
NOTEIf the Extend Cluster button is not visible, you might need to clear your browser cache and refresh the browser page.
-
Specify the nodes to be added:
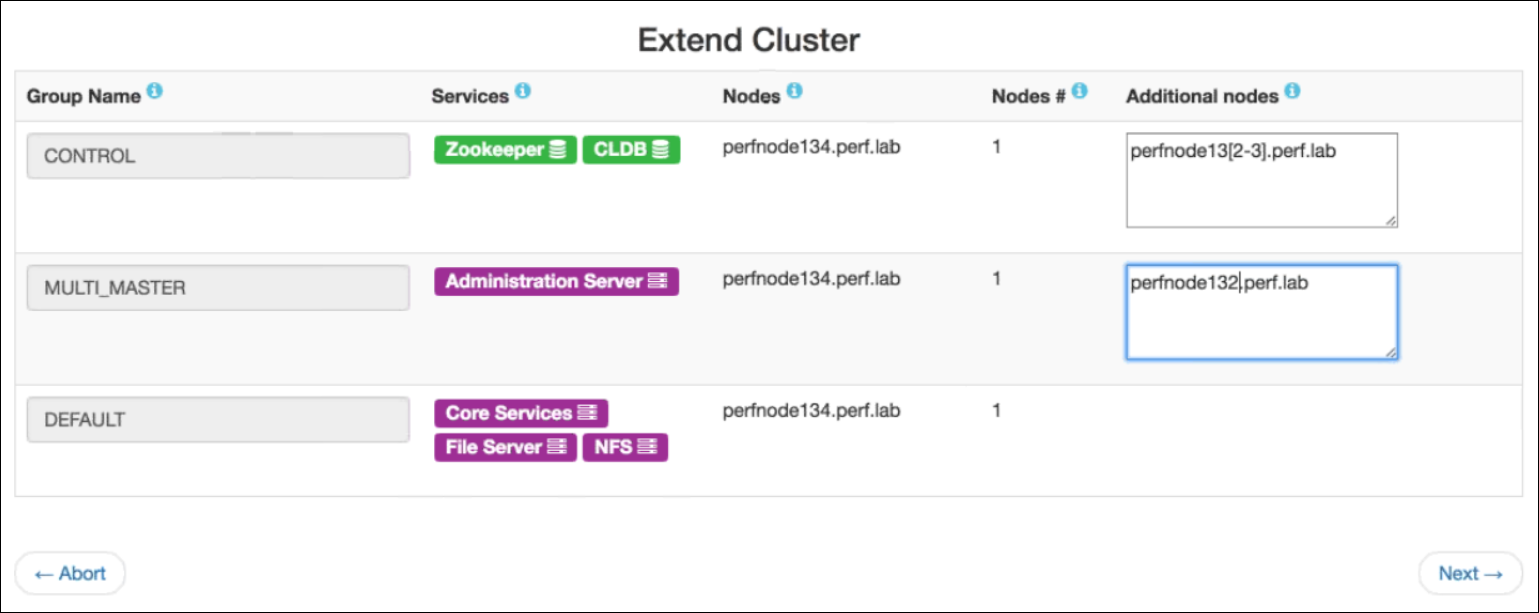
- On-Premise ClusterIn the Additional Nodes column, specify the host name(s) or IP address(es) of the nodes to be added. If you are adding multiple nodes, you can specify an array. The following example adds perfnode132.perf.lab and perfnode133.perf.lab to the CONTROL group and perfnode132.perf.lab to the MULTI_MASTER group:

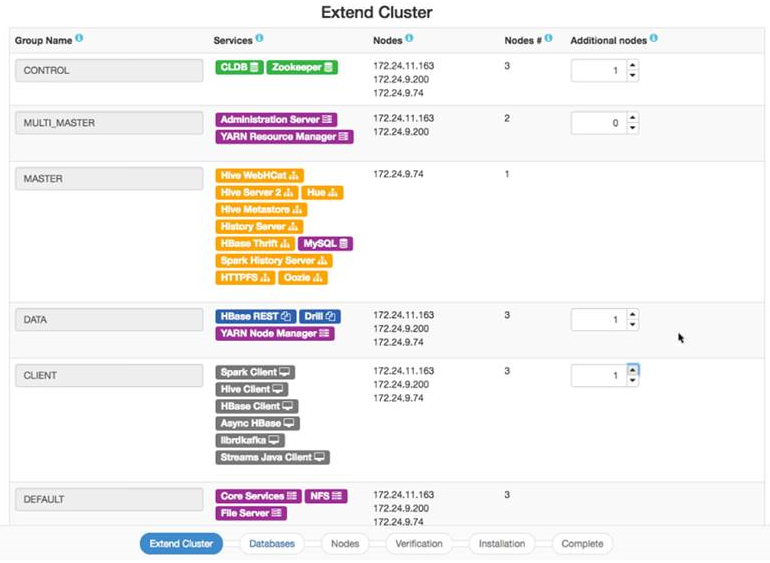
- Cloud-Based ClusterIn the Additional Nodes column, specify the number of nodes to be added. You do not need to specify the host name or IP address. The following example adds a node to each of the CONTROL, DATA, and CLIENT groups:

- On-Premise Cluster
- Click Next. The Installer checks the nodes to ensure that they are ready for installation and displays the Authentication screen.
-
Enter your SSH password and other authentication information as needed, and
click Next. The installer displays the
Verify Nodes screen.
NOTEFor a cloud-based cluster, the Authentication screen requests information that is specific to the type of cluster (AWS or Azure). Use the tooltips to learn more about the authentication information needed for your cluster.
-
Click a node icon to check the node status and see warnings or error
information in the right pane. The node-icon color reflects the installation
readiness for each node:
- Green (ready to install)
- Yellow (warning)
- Red (cannot install)
NOTEIf there are warnings or errors, hold your cursor over the warning or error in the right pane to see more information.IMPORTANTIf node verification fails, try removing the node and retrying the operation. If node verification fails and you abort the installation, you must use the Import State command to reset the cluster to the last known state. Otherwise, you will not be able to perform subsequent Installer operations. See Importing or Exporting the Cluster State. - When you are satisfied that the nodes are ready to be installed, click Next. The Installer adds the nodes. After the nodes are added, you can use the control system to view the nodes in the cluster.
-
Perform any post-expansion steps. Post-expansion steps are necessary only
if you added a node to a group containing a CLDB or Zookeeper.
If you added a node to a group containing . . . Do this Zookeeper only One node at a time, stop and restart the Zookeeper service on all Zookeeper nodes, restarting the master Zookeeper node last. You do not need to restart the Zookeeper node that was added. See Post-Expansion Steps for Extending a Cluster. Zookeeper and CLDB or
CLDB only
One node at a time, restart all services on all nodes following the order prescribed in Manual Rolling Upgrade Description. You do not need to restart the node that was added. See Post-Expansion Steps for Extending a Cluster.
Adding Nodes Using a Installer Stanza
About this task
scaled_hosts2: parameter
(on-premise clusters) or the scaled_count: parameter (cloud-based
clusters) to the Stanza file for the group that you want to scale. Then you run the
Stanza using the install command. The services contained in the
group are configured for the added node.mapr-core-5.2.x service, the first group
containing mapr-core-5.2.x will automatically get
scaled.Procedure
-
In the Stanza file, add the
scaled_hosts2:orscaled_count:parameter:- On-Premise Cluster
Add the
scaled_hosts2:parameter to the group that you want to scale, specifying the host name(s) or IP address(s) of the nodes to be added. In the following example, the perfnode132.perf.lab node is added to the CLIENT group:Stanza Before Scaling Modified Stanza with scaled_hosts2 Parameter (On-Premise Cluster) groups: - hosts: - perfnode131.perf.lab label: CLIENT - services: - mapr-spark-client-2.0.1 - mapr-hive-client-1.2 - mapr-hbase-1.1 - mapr-asynchbase-1.7.0 - mapr-kafka-0.9.0groups: - hosts: - perfnode131.perf.lab label: CLIENT scaled_hosts2: - perfnode132.perf.lab - services: - mapr-spark-client-2.0.1 - mapr-hive-client-1.2 - mapr-hbase-1.1 - mapr-asynchbase-1.7.0 - mapr-kafka-0.9.0 - Cloud-Based Cluster
Add the
scaled_count:parameter to the group that you want to scale. Include a number after the parameter to indicate the number of additional nodes to be added to the group. You do not need to specify the host names or IP addresses of the nodes to be added. In the following example, one additional node is added to the CLIENT group:Stanza Before Scaling Modified Stanza with scaled_count Parameter (Cloud-Based Cluster) groups: - hosts: - perfnode131.perf.lab label: CLIENT - services: - mapr-spark-client-2.0.1 - mapr-hive-client-1.2 - mapr-hbase-1.1 - mapr-asynchbase-1.7.0 - mapr-kafka-0.9.0groups: - hosts: - perfnode131.perf.lab label: CLIENT scaled_count: 1 - services: - mapr-spark-client-2.0.1 - mapr-hive-client-1.2 - mapr-hbase-1.1 - mapr-asynchbase-1.7.0 - mapr-kafka-0.9.0
- On-Premise Cluster
-
Run the Stanza file using the
installcommand. See Installing or Upgrading Core Using an Installer Stanza. The Installer SDK detects the new scaled_host(s) and gives you the option to proceed with the installation or cancel. -
Perform any post-expansion steps. Post-expansion steps are necessary only
if you added a node to group containing a CLDB or Zookeeper.
If you added a node to a group containing . . . Do this Zookeeper only One node at a time, stop and restart the Zookeeper service on all Zookeeper nodes, restarting the master Zookeeper node last. You do not need to restart the Zookeeper node that was added. See Post-Expansion Steps for Extending a Cluster. Zookeeper and CLDB or
CLDB only
One node at a time, restart all services on all nodes following the order prescribed in Manual Rolling Upgrade Description. You do not need to restart the node that was added. See Post-Expansion Steps for Extending a Cluster.