Creating Spark Applications
This topic describes how to create Spark applications using the HPE Ezmeral Runtime Enterprise new UI.
Prerequisites
- Install Spark Operator on your Kubernetes cluster. See Spark Operator.
About this task
Create and submit Spark applications using the Spark Operator on HPE Ezmeral Runtime Enterprise new UI.
Procedure
-
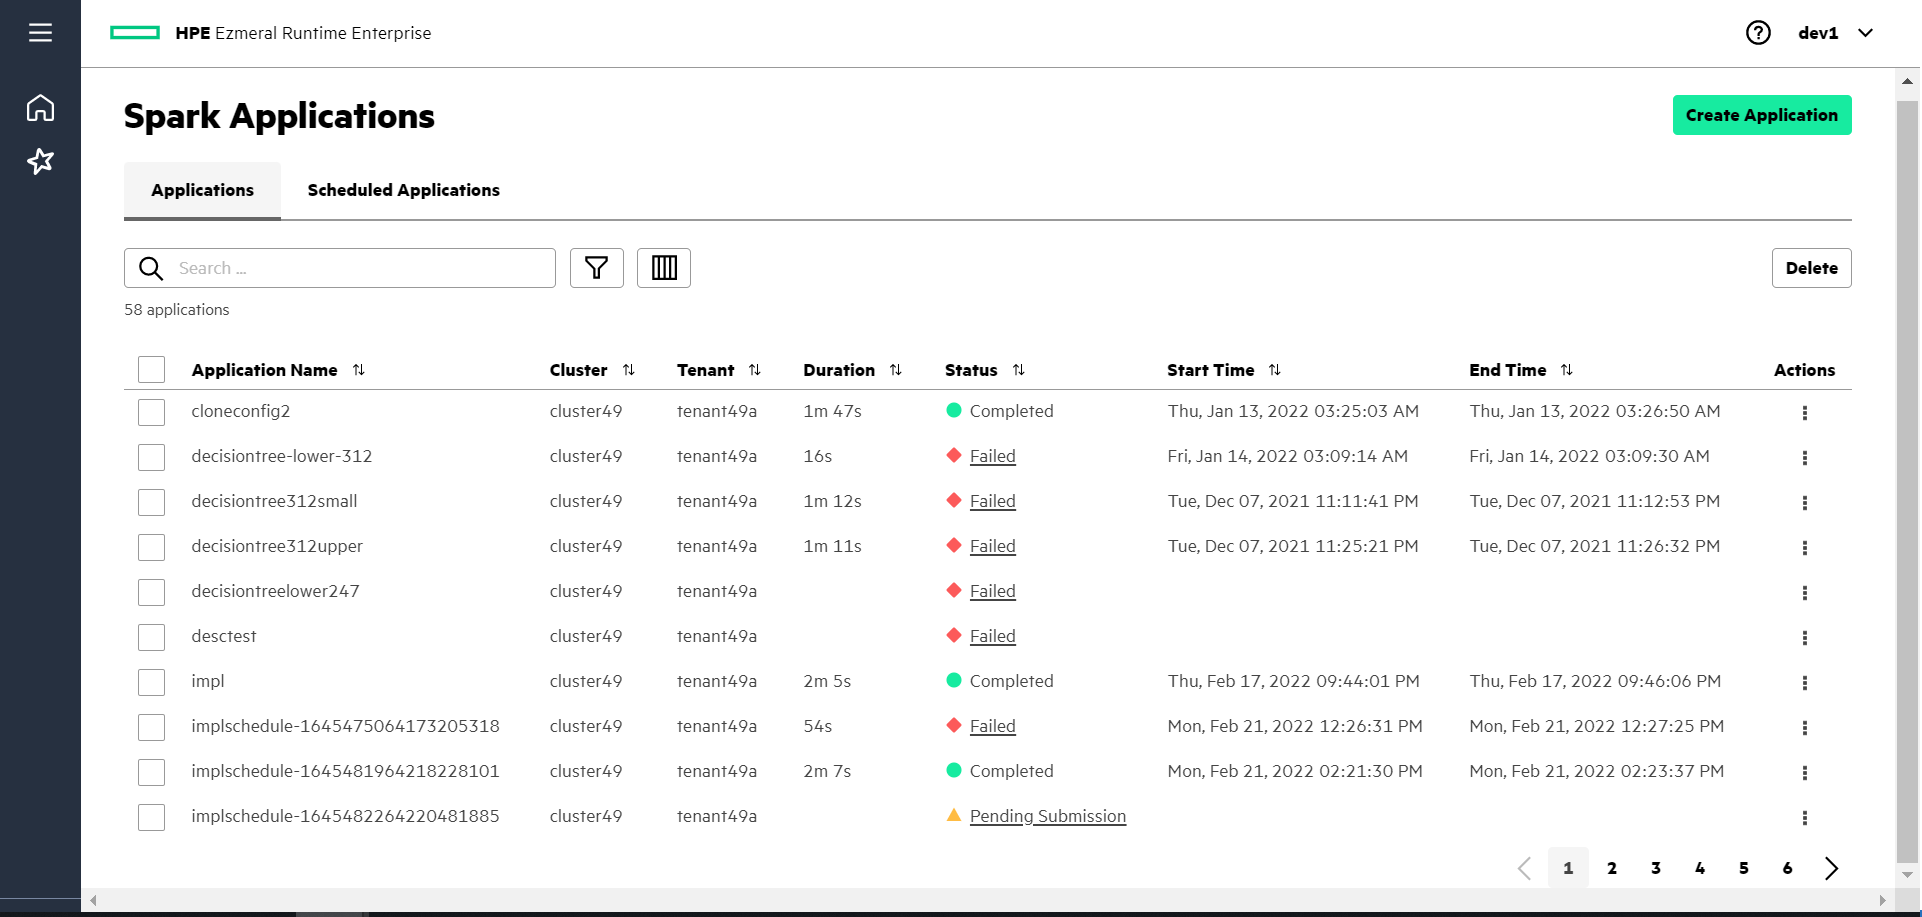
To start creating Spark applications, click Create
Application on the HPE Ezmeral Runtime Enterprise new UI screen or Spark Applications screen. Navigate through each step
within the Create Application wizard:
-
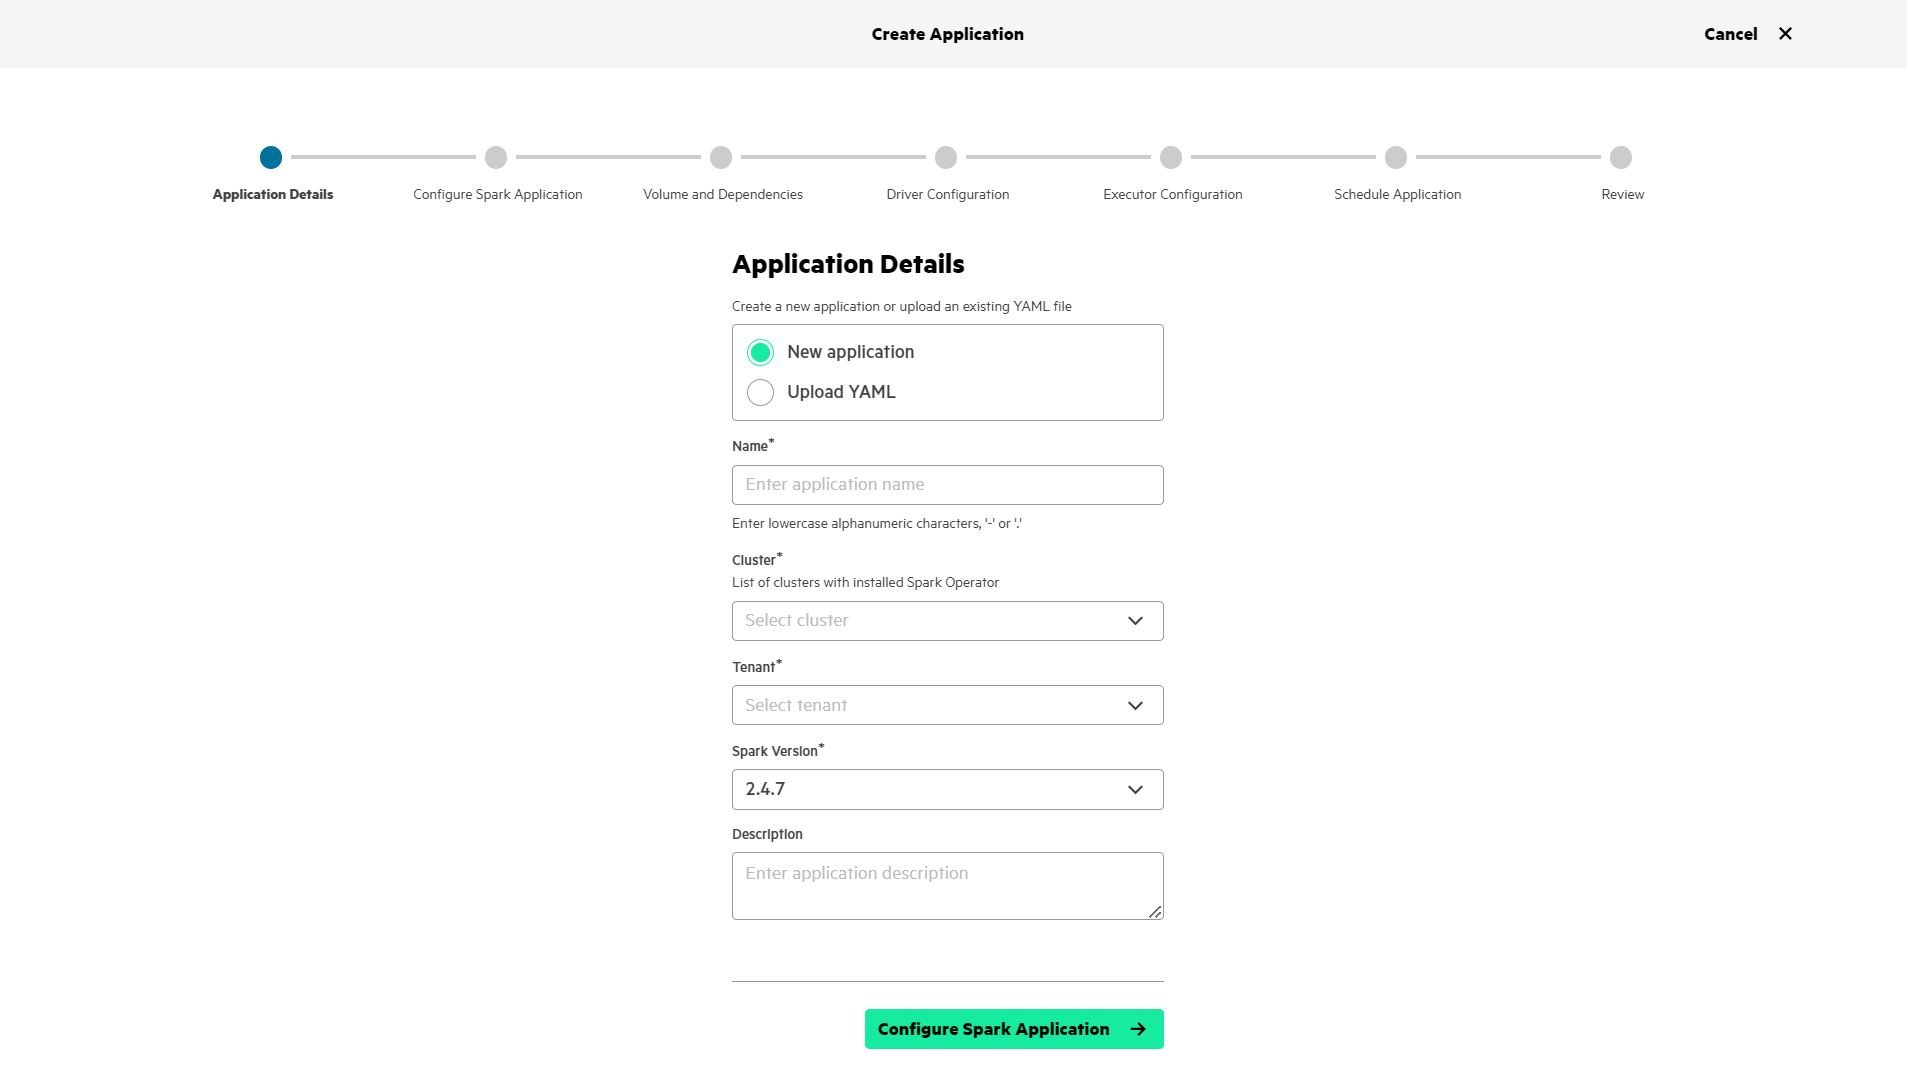
Application Details: Create an application or
upload a preconfigured YAML file. Set the following boxes:
- YAML File
- When you select the Upload YAML, you can upload a preconfigured YAML file from your local system. Click Select File to upload the YAML.
- The fields in the wizard are populated with the information from YAML.
- Name
- Enter the application name.
- Cluster:
- Select the cluster. The drop-down menu lists the clusters on which the Spark Operator is installed.
- Tenant:
- Select the tenant. Your Spark applications will run on this tenant.
- Spark Version:
- Select your preferred Spark version.
- Description:
- Enter the application description.
-
Configure Spark Application: Set the following
boxes:
- Type:
- Select the application type from Java, Scala, Python, or R.
- Image:
- Image is auto filled based on the selected Type and Spark Version. There are different images for Spark, and different application types (Java or Scala, Python, and R). See Spark Images.
- Image Pull Secret:
- Image Pull Secret is preconfigured to
the default value of
imagepull. - Source:
-
Select the data source from MapRFS, DataTap, S3, and Other.NOTEOpen-source Spark images do not support MapRFS.
Select Other as the data source to reference other locations of the application file.
For example, to refer to a file inside the specific Spark image, use the
localschema. - To use S3 as the data source, enter the S3 endpoint and (optional) Secret. To create a Secret containing the S3 credentials (user name and password), see Adding S3A Credentials Using a Kubernetes Secret.
- Filename:
- Enter location and file name of the application.
- For example:
s3a://apps/my_application.jar - Class Name:
- Enter main class of the application for Java or Scala applications.
- Arguments:
- Click + Add Argument to add input parameters as required by the application.
- Log Spark Events:
-
To enable logging of Spark events, check Log Spark Events check box. You can view the Spark events log by using Spark History Server.
To disable the logging of Spark events, clear the check box. You must disable logging in the following scenarios:- When you have not installed Spark History Server in tenants.
- When you are using open-source Spark images and
have configured
maprfsas the event log storage for Spark History Server.
-
Volume and Dependencies: Configure a volume and
add dependencies in Volume and Dependencies
step.
To configure a volume accessed by your application, toggle Configure Volume.
Set the following boxes:- Name
- Enter volume name.
- Type
- Choose a volume type:
- ConfigMap: Enter ConfigMap name in ConfigMap Name box.
- PersistentVolumeClaim: Enter PersistentVolumeClaim name in PersistentVolumeClaim Name box.
To configure multiple volumes of different type, upload the preconfigured YAML file in the Application Details step or edit the YAML file in the Review step.
NOTEWhen you upload a YAML file, the volume configurations are preserved and you can view it on Review step. If you choose to configure volume using the Configure Volume, it will override any previous volume configurations in the YAML file.To add dependencies required to run your applications, click Add Dependency. Select a dependency type from excludePackages, files, jars, packages, pyfiles, or repositories, and enter the value of the dependency.
For example:- Enter the package names as the values for the excludePackages dependency type.
- Enter the locations of file, for example, dtap://<path-to-file>, s3://<path-to file>, local://<path-to-file> as the values for files, jars, pyfiles, or repositories.
-
Driver Configuration: Configure the number of
cores, core limits, memory, and service account. The number of cores
must be less than or equal to the core limit.
If a Platform Administrator configured a tenant with a CPU quota, you must set the core limit for the driver pods.
If a Platform Administrator configured a tenant with a memory quota, you must set the memory for the driver pods. See Configuring Memory for Spark Applications.
If you configured a volume in Volume and Dependencies step, you get an option to mount the volume in Driver Configuration step. To mount the volume, toggle Configure Volume Mount.- Name
- Set with volume name from Volume and Dependencies step.
- Path
- Enter the mount path for the volume in the driver pod.
-
Executor Configuration: Configure the number of
executors, number of cores, core limits, memory, and service account.
The number of cores must be less than or equal to the core limit.
If a Platform Administrator configured a tenant with a CPU quota, you must set the core limit for the executor pods.
If a Platform Administrator configured a tenant with a memory quota, you must set the memory for the executor pods. See Configuring Memory for Spark Applications.
If you configured a volume in Volume and Dependencies step, you get an option to mount the volume in Executor Configuration step. To mount the volume, toggle Configure Volume Mount.- Name
- Set with volume name from Volume and Dependencies step.
- Path
- Enter the mount path for the volume in the executor pods.
-
Schedule Application: To schedule a Spark
application to run at a certain time, toggle Schedule to
Run. You can configure the frequency intervals and set
the concurrency policy, successful run history limit, and failed run
history limit.
Set the Frequency Interval in two ways:
- To choose from predefined intervals, select Predefined Frequency Interval and click Update to open a dialog with predefined intervals.
- To set the frequency interval, select Custom
Frequency Interval. The Frequency
Interval accepts any of the following values:
- CRON expression with
- Field 1: minute (0–59)
- Field 2: hour (0–23)
- Field 3: day of the month (1–31)
- Field 4: month (1–12, JAN - DEC)
- Field 5: day of the week (0–6, SUN - SAT)
- Example:
0 1 1 * *,02 02 ? * WED, THU
- Predefined macro
- @yearly
- @monthly
- @weekly
- @daily
- @hourly
- Interval using @every <duration>
- Units: nanosecond (ns), microsecond (us, µs), millisecond (ms), second (s), minute (m), and hour (h).
- Example:
@every 1h,@every 1h30m10s
- CRON expression with
-
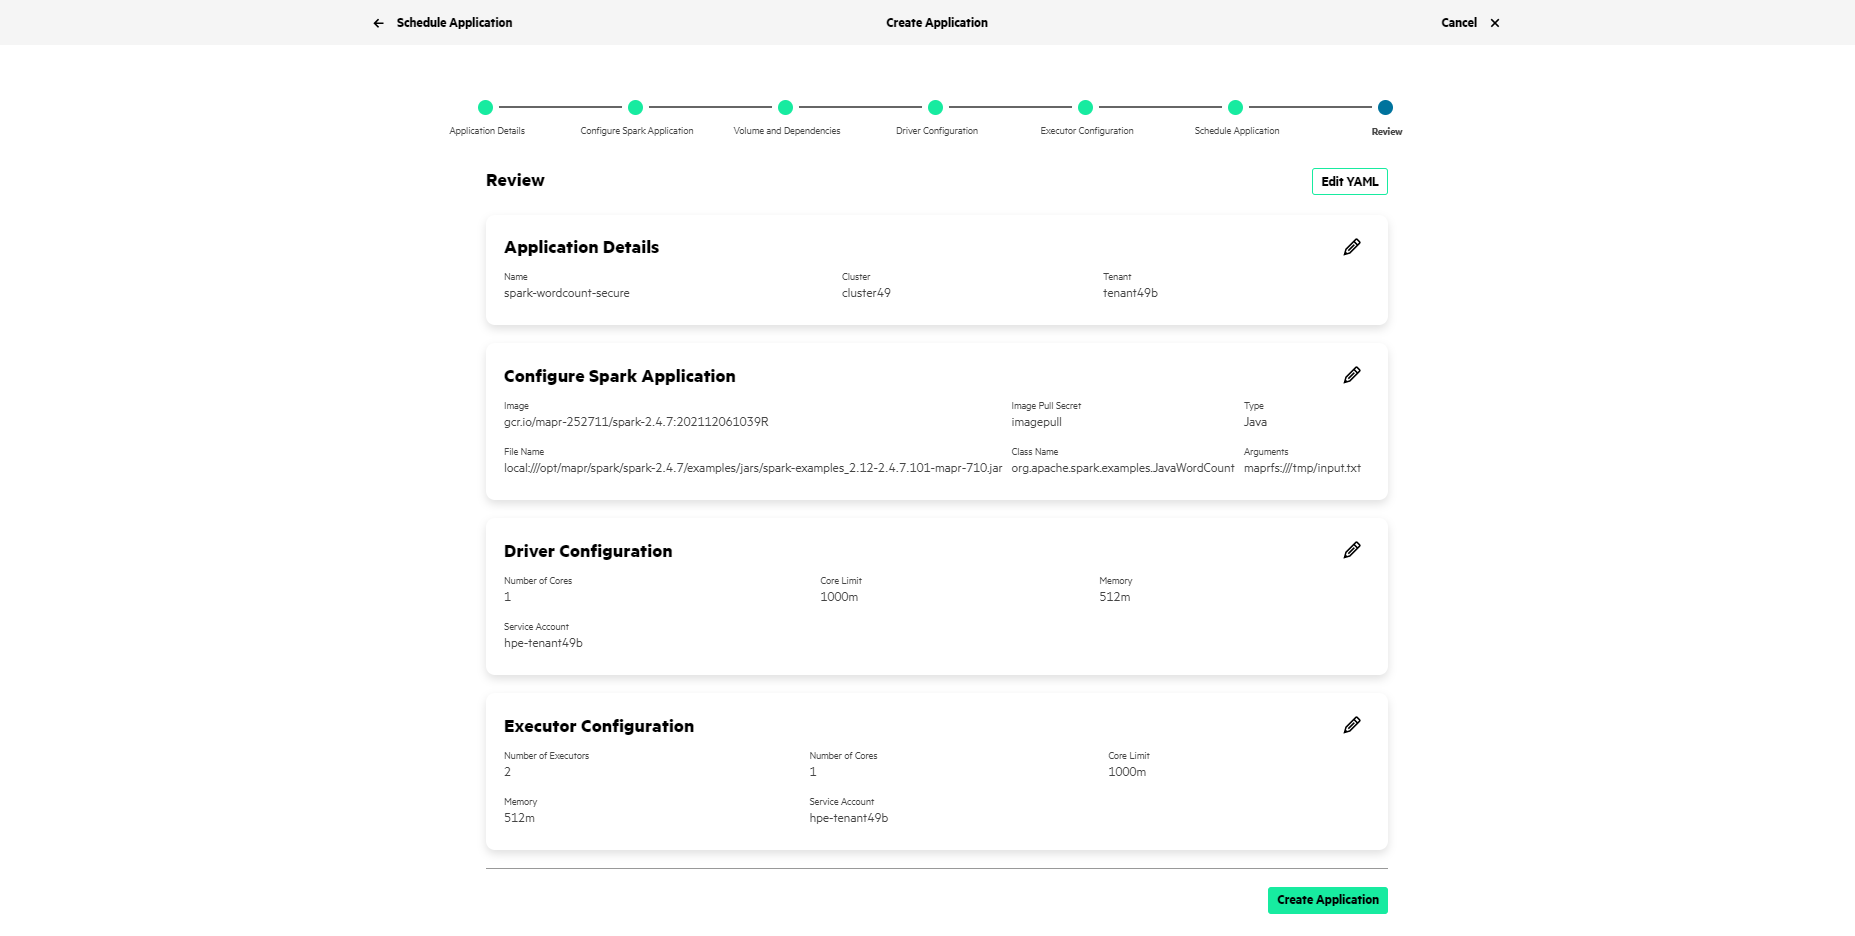
Review: Review the application details. Click
the pencil icon in each section to navigate to
the specific step to change the application configuration.
To open an editor to change the application configuration using YAML in the GUI, click Edit YAML. You can use the editor to add the extra configuration options not available through the application wizard. To apply the changes, click Save Changes. To cancel the changes, click Discard Changes.
-
Application Details: Create an application or
upload a preconfigured YAML file. Set the following boxes:
- To submit the YAML to run on a selected tenant, click Create Application on the bottom right of the Review step.
Results