Notebook Magic Functions
Jupyter notebook magic functions, also known as magics, are special commands that provide notebook functions that might not be easy for you to program using Python. HPE Ezmeral Unified Analytics Software supports line magics and cell magics.
Jupyter notebook Magic functions, also known as magic commands or
magics, are commands that you can execute within a code cell. Magics are not Python
code. They are shortcuts that extends the capabilities of a notebook. Magic commands start
with the % character.
HPE Ezmeral Unified Analytics Software supports built-in magic functions and the custom magics that are described in this topic. HPE Ezmeral Unified Analytics Software supports line magics and cell magics.
Line magic commands do not require a cell body and start with a single %
character.
Cell magic commands start with %% and require additional lines of input (a
cell body).
To use these magic functions, you must create a notebook. See Creating and Managing Notebook Servers.
%commands
%commands command lists the magic commands and SDKs that are
customized by Hewlett Packard Enterprise and are available in this
notebook.%createKernel
The %createKernel command creates a custom Python kernel in the notebook.
The custom Python kernel can be selected as the kernel for a notebook session to work within a specific virtual environment with its own set of dependencies and configurations. By using the custom Python kernel, you can isolate your Python packages and dependencies from other projects or applications such that each project has its own environment and is not affected by changes made to other environments.
- Create a notebook with at least 4 Gi memory. See Creating and Managing Notebook Servers.
- (Optional) If the cluster is behind proxy, set the following proxy environment
variables.
You can retrieve the proxy settings from the%env https_proxy=<your-https-proxy> %env http_proxy=<your-http-proxy> %env no_proxy=<your-no-proxy>ezua-cluster-configconfigmap in theezua-systemnamespace.NOTEIf you are using the AWS or Azure environment, do not set the proxy environment variables. - Enter the
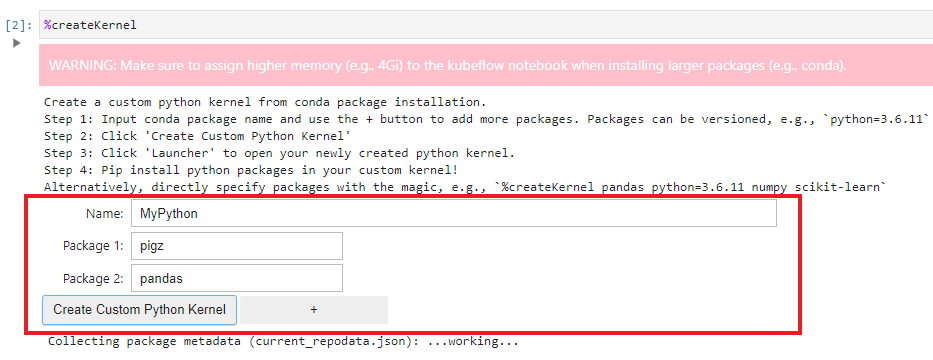
%createKernelcommand in a notebook.You can also directly enter packages as arguments with
%createKernelmagic function.For example:%createKernel pigz pandas - Enter the name for your Python kernel in the Name box. In this example, we use MyPython as the custom Python kernel name.
- Enter the conda package name in the Package 1 box. To enter additional packages, click the + button.
- Click the Create Custom Python Kernel button.

- Click the New Launcher button.

- You can now see your custom Python kernel -MyPython kernel
among the available kernels.
%manage_spark
The %manage_spark command enables you to connect to the Livy server and
start a new Spark session. You must use Spark-related kernels such as
PySpark, Spark, or SparkR to use sparkmagic. When
you run the %manage_spark command in a notebook cell, a new user interface
(UI) widget is displayed, which allows you to configure and manage a Spark cluster. You can
use different tabs in this UI widget to manage sessions, create sessions, add endpoints, and
manage endpoints.
- Auth type: The default authentication for the internal Livy endpoint is Single Sign-On. To connect to other Livy clusters, select the authentication type of your choice.
- Address: Enter endpoint address.
- Endpoint: Select endpoint for your session.
- Name: Enter session name.
- Language: Choose either Scala or Python as a runtime.
- Properties: Edit the Spark configurations.
%config_spark
You can use the %config_spark magic command to customize the Spark jobs
submitted from the PySpark kernel. You can add or delete the Spark configurations when
submitting a Livy session.
- Run
%config_spark. - Click the +Add Spark Configuration Key-Value Pair button.
- Enter the key and value for Spark configurations in their respective boxes.
- After you have finished adding the key-value pairs, click Submit.
- Restart the PySpark kernel and run
%manage_sparkto see the changes applied in the Properties section of the Create Session tab.
You can also edit the values for other Spark configurations or delete any configurations using this magic command.
For example: To learn more about customizing Spark configurations when enabling the GPU support for Livy sessions, see Enabling GPU Support for Livy Sessions Created Using Notebooks.
%git_clone
The %git_clone magic enables you to clone your private GitHub repository
from the notebook.
After you have finished cloning the repository, you can use the Git extension in the notebook for version control.
%sql and %%sql
You can use the %sql magic command in Jupyter Notebook to interactively
work with SQL databases. To learn more about how to connect to databases, see connecting to a database.
You must use Python kernels to use %sql and %%sql magic
commands. You can directly write and execute SQL queries within a notebook cell. When you
run the notebook cell containing %sql and your SQL query, the magic command
sends the query to the database, runs it, and retrieves the result.
%sql magic as
follows:%sql SELECT * FROM cache.information_schema.columnsYou can use the %%sql magic command to define and run an entire SQL script
or block. This means you can write and run a series of SQL statements in the same cell using
%%sql magic.
%update_token
The %update_token magic function updates the cached auth token. If you
encounter a JWT token expiration error while running cells in the notebbok, you can resolve
it by running the %update_token magic function. This function updates the
JWT in environment variables and any other locations where the token is utilized.
%update_token to refresh tokens for the following
cases:- Authentication when establishing a connection with PrestoDB.
- Authentication with local s3 minio object storage.
- Authentication with KServe external API.
Getting Help
?
(question mark). For example:%manage_spark?