Enabling Kale Extension in Kubeflow Notebook
Describes how to enable and use the Kale extension, and specify GPU resources using Kale extension in a Kubeflow notebook.
Enabling Kale Extension
To enable the Kale extension in Kubeflow notebook, follow these steps:
- Sign in to HPE Ezmeral Unified Analytics Software.
- Connect to the notebook server. See Creating and Managing Notebook Servers.
-
Once the notebook is launced, you can enable the Kale extension.
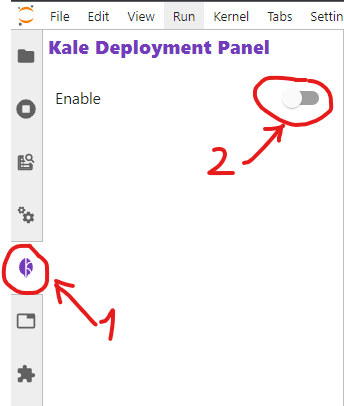
- Click the Kale icon on the left navigaton bar.
- Toggle the Enable button.

-
Once you enable the Kale extension, you can view the Kale extension layout as next:

- Pipeline Metadata
-
Define the name of the experiment and pipeline, description.
- Run
-
Enable the Katib feature for this pipeline and setup appropriate hyper-parameters.
- Advanced Settings
-
Click Advanced Settings to open this section. Here you can set a Docker image, which is used for all steps of the current pipeline. Currently, the Rok snapshot feature is not supported. However, you can manually create or use the existing volume for this pipeline.
- Click the pencil icon to edit the cell.

Here, you can edit the information about the cell for Kale.
Specifying GPU Resources in the Kale Extension
To specify the GPU resources in the Kale extension, follow these steps:
- Create GPU-enabled notebook server. See Creating GPU-Enabled Notebook Servers.
- Enable Kale extension. See Enabling Kale Extension.
- Click the pencil icon to edit the cell.

- Click GPU.
- Specify the GPU resources as:
- GPU Count: 1NOTEWith MIG configuration, only one GPU can be assigned per application. To learn more on what happens when you assign more than one GPU to the Kale extension, see GPU. For details regarding GPU, see GPU Support.
- GPU Vendor: Nvidia
- GPU Count: 1

