Tenant Storage Tab
The Tenant Storage tab enables the Platform Administrator to designate a storage service (and, optionally, a path below the root directory) for use as tenant storage.
A unique subdirectory is created for each new tenant in the tenant storage when that tenant is created, as is a special DataTap pointing to that subdirectory. The properties of this DataTap cannot be edited, and the DataTap cannot be deleted until the tenant is deleted. The nodes in a tenant may not access the Tenant Storage service outside of this subdirectory.
If Tenant Storage is placed on local HDFS, then you may also assign a quota to the tenant to restrict how much data can be stored under this subdirectory.
Changing the tenant storage settings will affect tenants created after the change is made, but will not affect existing tenants. Once a tenant storage DataTap is created, it is never modified.
The Tenant Storage tab of the System Settings screen (see The System Settings Screen) enables the Platform Administrator to designate a storage service (and, optionally, a path below the root directory) for use as tenant storage.
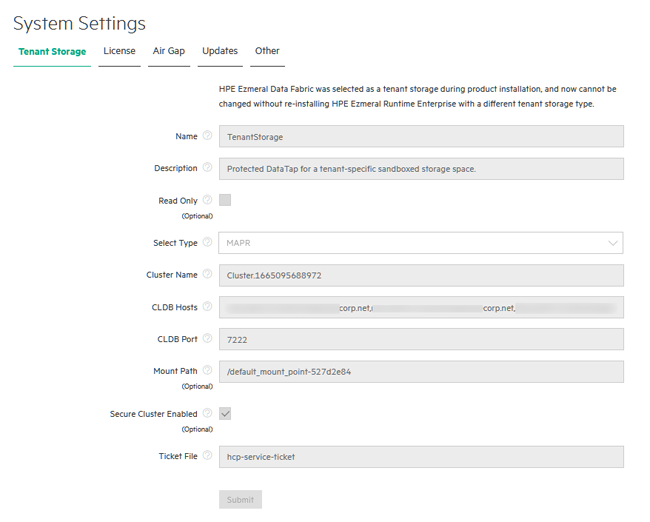
To change the tenant storage settings:
- In the Name field, enter a name to be used when creating the special tenant storage DataTaps.
- In the Description field, enter the description to display for those DataTaps.
- If you want to be able to read but not write to the tenant storage, then check the Read Only check box. This only applies to access from within the virtual nodes in the tenant. You can still upload files using the DataTap browser or other external means.
- Select the file system type to use (MAPR, HDFS, or
NFS). If there are no
existing tenants, then you may also select None to remove
any existing tenant storage.
HPE Ezmeral Runtime Enterprise Essentials supports NFS only.
- Enter the cluster name, CLDB hosts, CLDB port, mount path, and ticket in the appropriate fields. You may also check the HPE Ezmeral Data Fabric Secure check box to enable HPE Ezmeral Data Fabric security.
- If desired, enter the username that will be used to access the HDFS in the Username field.
- Click Submit to make your changes.
MAPR Parameters
If you selected MAPR in Step 4, above, then enter the following parameters::
- Cluster Name: Name of the MapR cluster. See the MapR articles Creating the Cluster and Creating a Volume articles.
- CLDB Hosts: DNS name or address of the service providing access to the storage resource. For example, this could be the namenode of a MapR cluster. See the MapR article Viewing CLDB Information.
- Port: Port for the namenode server on the host used to access the MapR file system. See the MapR article Specifying Ports.
- Mount Path: Complete path to the directory containing the data within the specified MapR file system. You can leave this field blank if you intend the Data Source to point at the root of the specified share/volume/file system. See the MapR articles Viewing Volume Details and Creating a Volume.
- MapR Secure: Checking this check box enables the MapR Secure feature. MapR includes both the MapR Data Platform and MEP components, and is secure out-of-the-box on all new installations. All network connections require authentication, and all moving data is protected with wire-level encryption. MapR allows applying direct security protection for data as it comes into and out of the platform without requiring an external security manager server or a particular security plug-in for each ecosystem component. The security semantics are applied automatically on data being retrieved or stored by any ecosystem component, application, or users. See the MapR article Security.
- Ticket: Enter the complete path to the MapR ticket. MapR uses tickets for authentication. Tickets contain keys that are used to authenticate users and MapR servers. In addition, certificates are used to implement server authentication. Every user who wants to access a cluster must have a MapR user ticket (maprticket_<uid>), and every node in the cluster must have a MapR server ticket (maprserverticket). Tickets are encrypted to protect their contents. See the MapR articles Tickets and How Tickets Work.
- Ticket Type: Select the ticket type. This will be one of the
following:
- User: Grants access to individual users with no impersonation support. The ticket UID is used as the identity of the entity using this ticket.
- Service: Accesses services running on client nodes with no impersonation support. The ticket UID is used as the identity of the entity using this ticket.
- Service
(with impersonation): Accesses services running on client nodes
to run jobs on behalf of any user. The ticket cannot be used to
impersonate the
rootormaprusers. - Tenant: Allows tenant users to access tenant volumes in a multi-tenant environment. The ticket can impersonate any user.
- Ticket User: Username to be used by the ticket for authentication.
- MapR Tenant Volume: Volume to be accessed by the Data Source. See the MapR article Enabling and Restricting Access to Tenant Volume and Data.
- Enable Impersonation: Enable user impersonation.
Continue from Step 5, above, after entering the MAPR parameters.
HDFS Parameters
If you selected HDFS in Step 4, above, then enter the following parameters:
- Host: Enter either the hostname or IP address of the HDFS NameNode in the Host field.
- Standby NameNode Host: Enter the hostname or IP address of the HDFS standby NameNode, if any, in the Standby NameNode Host field.
- Port: Enter the NameNode port number in the Port field. Leave blank to use the default HDFS NameNode port.
- Path: Enter the HDFS directory under the share to use for the Data Source in the Path field. You may also click the Browse button to open an explorer window to navigate to the desired directory. You can leave this field blank if you intend the Data Source to point the root of the specified file system.
- Username: If needed, you can enter a valid username for accessing the HDFS.
Continue from Step 5, above, after entering the HDFS parameters.
NFS Parameters
If you selected NFS in Step 4, above, then enter the following parameters:
- Host: Enter either the hostname or IP address of the file system host in the Host field.
- Share: Enter the name of the share in the Share field.
- Path: This field specifies where the top of the Data Source's file system is rooted. For manually created Data Sources, this field must either be empty, or it must point to an existing subdirectory of the indicated storage system. For an automatically created tenant default Data Source, then HPE Ezmeral Runtime Enterprise will automatically create the indicated subdirectory if necessary, whenever any writes are done to that Data Source. Either enter the directory under the share to use for the Data Source in the Path field (click the Browse button to open an explorer window to navigate to the desired directory, if desired), or leave this field blank to point the Data Source to point the root of the specified share.
Also, be sure to configure the storage device to allow access from each host and each Controller and Worker that will using this Data Source.
Continue from Step 5, above, after entering the NFS parameters.