Kubernetes Host: Select Hard Drives
Prerequisites
You have prepared the hosts as described in Kubernetes Host: Add the Hosts.
About this task
This first phase of Kubernetes Worker host installation prepared the host with the hypervisor agent and Docker. The second phase of the host addition installs the HPE Ezmeral Data Fabric filesystem as a container running the MFS service using the persistent disks. Other system services, such as Nagios and monitoring containers, are installed.
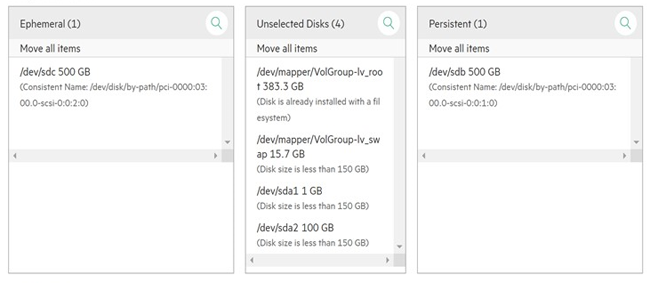
Before proceeding to this second phase, you must allocate the disks on the host for persistent and ephemeral storage.
By default, the disks on a Kubernetes hosts are equally split between ephemeral storage and persistent storage. If the host has an odd number of disks, then the ephemeral storage receives the higher number of discs. For example, if the Kubernetes Worker host has five disks, then ephemeral storage receives three disks and persistent storage receives two by default.
If you do not want to install the HPE Ezmeral Data Fabric on Kubernetes-based persistent storage, then you can leave disks in the Unselected Disks section. The key use case for this scenario is if you want to install either a third party software-defined storage product or a native Kubernetes orchestrated storage product after creating a Kubernetes cluster.
Procedure
- Click the Edit Disks icon (pencil) for the host you want to edit in the
Kubernetes Host(s) Status table of the
Kubernetes Hosts Installation screen.
The Edit Disk Allocation popup for that Kubernetes Worker appears, displaying the suggested disk allocation.
- Hover the mouse over the disk you want to select.
One or more arrows appear, depending on whether or not the selected disk is in the Unselected Disks area or the Ephemeral/Persistent areas.NOTE The Persistent area is only available if the host has a
Datafabrictag. - Move the mouse to the desired arrow, and then click that arrow.
The selected drive moves one space in the indicated direction. For example, clicking the left arrow of an unselected disk moves that disk to the Ephemeral column.
- Use the Posix Client Type pull-down menu to select the Posix type to use. The available options are Basic or Platinum.
- Click the Set Disk button to close the popup and add the selected drives.
- Proceed to Kubernetes Host: Enter Lockdown Mode.