Istio Service Mesh
This topic describes Istio Service Mesh and its implementation and versions in HPE Ezmeral Runtime Enterprise.
Shifting to a microservice-based architecture delivers numerous benefits for building distributed fault-tolerant applications. However, this approach also introduces many challenges, such as security, network tracing, and traffic routing that are often left to the application developer to code. This approach can lead to inconsistent and fragmented implementation. A service mesh is designed to solve these problems.
A service mesh is a network of microservices that consists of applications and interactions between those applications. Istio provides both a transparent open-source service mesh that overlays onto existing distributed applications and a platform that includes APIs for integration with any logging, telemetry, or policy system.
For a detailed description of Istio features, see What is Istio? (link opens an external website in a new browser tab or window).
To deploy Istio in a Kubernetes cluster in HPE Ezmeral Runtime Enterprise, see Deploying Istio Service Mesh. You can enable or disable Istio Service Mesh and enable mTLS for each tenant within the cluster.
To access Kiali visualization for Istio Service Mesh, see Accessing Kiali Visualization for Istio Service Mesh.
Istio Service Mesh is not supported on HPE Ezmeral Data Fabric on Kubernetes clusters.
Istio Versions
For information about the versions of Istio that are supported for this release of HPE Ezmeral Runtime Enterprise, see Support Matrixes.
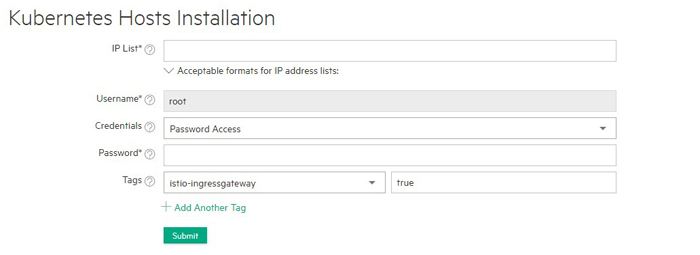
Step One: Add or Assign Istio Ingress Gateway Nodes
All Istio-enabled Kubernetes clusters require one or more Istio Ingress gateways to be configured to allow incoming traffic into the mesh. To add one or more Istio Ingress Gateway nodes, you may either:
- Add new nodes: Select the
istio-ingressgatewaytag during Kubernetes Host Step 2: Select the Hosts, and then assign the valuetrueto that tag. - Assign existing nodes: Select one or more existing
Kubernetes nodes in the Kubernetes Host Installation
screen (see The
Kubernetes Installation Screen), and then assign the
istio-ingressgateway=truetag, as described in Assigning Tags to a Host.
mtls mode must have a valid value even if Istio is not
enabled.
Adding an Istio Ingress Gateway node automatically creates a key value pair for that node, if you added a public SSH key when adding the node. See Kubernetes Host Step 1: Add the Public SSH Key.
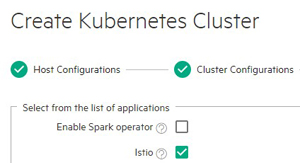
Step Two: Create or Edit a Kubernetes Cluster
While creating or editing a Kubernetes cluster, check the Istio check box in the Application Configurations screen. See Creating a New Kubernetes Cluster and Editing an Existing Kubernetes Cluster.
Do not select the Istio application when creating or editing an HPE Ezmeral Data Fabric on Kubernetes cluster.
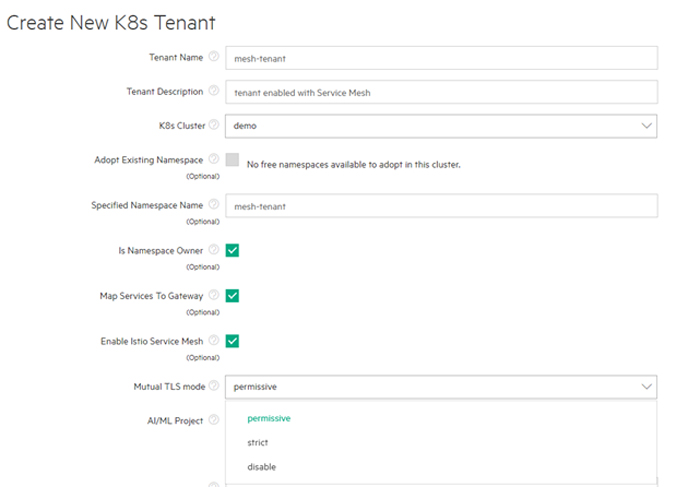
Step Three: Enable/Disable Istio Injection
While creating or editing a Kubernetes tenant:
-
Check the Enable Istio Service Mesh check box in the Create New Kuberentes Tenant or Edit K8s Tenant screen. See Creating a New Kubernetes Tenant and Editing an Existing Kubernetes Tenant.
The Manual TLS Mode pull-down menu appears, which allows you to specify the security level to apply to envoy communications.
- Select one of the following options:
- Disable: Service mesh communication will not be encrypted.
- Permissive: Envoys will accept either plain or TLS-enabled communications. This is the default setting. You can use this setting while creating or migrating workloads and then switch to the Strict level later.
- Strict: Envoys only accept TLS-enabled communications.
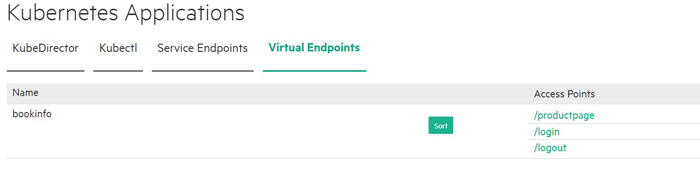
Step 4: Add Applications
After creating the Kubernetes cluster and tenant:
- You may add applications as described in Deploying Applications and Onboarding Applications.
- You can then access Istio virtual services using the Virtual Services tab of the Kubernetes Applications screen. See Virtual Services Tab.
Visualization Using Kiali
To access Kiali visualization for the Istio service mesh:
- Open the Service Endpoints tab of the Kubernetes Applications screen. See Service Endpoints Tab.
-
Click the endpoint you want to add.
The Kiali dashboard... popup appears.
- Copy the token to your clipboard.
-
Click the Proceed to Kiali Dashboard button.
The Log in Kiali screen appears.
-
Paste the token you copied into the Token field, and then click the Log In button.
The Kiali Overview screen appears.
For information about using Kiali, see the Kiali documentation (link opens an external website in a new browser tab/window).