Creating a New Kubernetes Tenant or Project
You can create Kubernetes tenants that are associated with a Kubernetes cluster. Each Kubernetes tenant corresponds to a namespace on the cluster, an optional resource quota, and a set of privileges for various user roles within that namespace. Specific users can be assigned to have roles in Kubernetes tenants, or entire AD/LDAP groups can be mapped to Kubernetes tenant roles.
After creating a tenant, you can do the following:
-
Use the web interface to send Kubernetes API requests for resource creation, modification, or deletion using using the privileges of the logged-in user's role.
-
Use the web interface to access a Kubernetes a web terminal (see Kubernetes Web Terminal) to access a Linux environment set up with the kubectl CLI and a configuration appropriate for your user role.
-
Download materials to configure kubectl on your own local workstation so that it can access the Kubernetes cluster using the privileges assigned to your role.
To create a new Kubernetes tenant, click the Create button in the Kubernetes Tenants screen to open the Create New K8s Tenant screen.
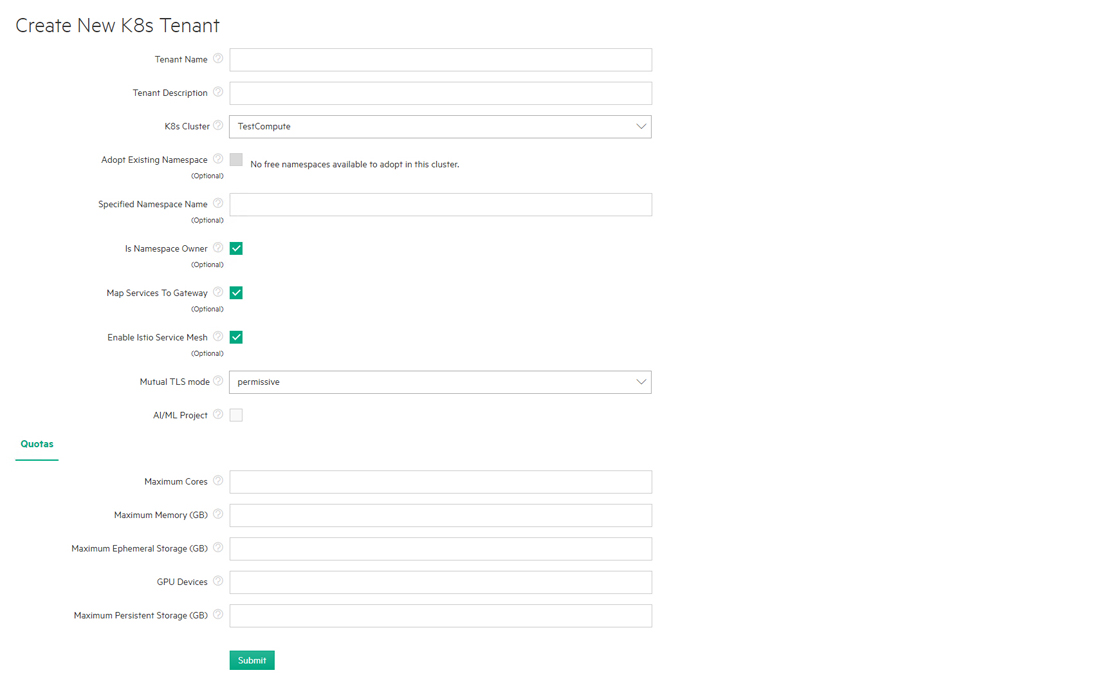
Create the Kubernetes tenant as follows:
- Create at least one Kubernetes cluster, as described in Creating a New Kubernetes Cluster.
- Enter a name for the new tenant in the Tenant Name field.
- Enter a brief description for the new tenant in the Tenant Description field.
- Use the K8s Cluster pull-down menu to select the Kubernetes cluster to associate with this tenant.
-
If you want to associate the tenant with an existing namespace, then check the Adopt Existing Namespace check box and use the Existing Namespaces pull-down menu to select the desired namespace.
If not, then leave this check box blank and either enter a unique namespace name in the Specified Namespace Name field or leave this field blank to auto-generate a namespace name.
- If you want the namespace and all of its contents to be deleted when the tenant is deleted, then check the Is Namespace Owner check box. If not, then leave this check box blank.
- If you want to map the service endpoints that will exist in this tenant to Gateway host ports, then check the Map Services to Gateway check box. Leaving this check box blank will not map services to a Gateway host, and you will need to access service endpoints by SSHing directly into containers. See Gateway Hosts.
- If the cluster supports Istio (see Creating a
New Kubernetes Cluster and Istio), then you may check the Enable Istio Service Mesh check box
and then use the Mutual TLS Mode pull-down menu to select one of the
following:
- disable: TLS encryption will not be used in the Istio service mesh.
- permissive (default): The Istio service mesh will support both encrypted and unencrypted traffic.
- strict: Only TLS-encrypted traffic will be accepted in the Istio Service mesh.
- Either:
-
Tenant: If you are not creating an AI/ML project, then leave the AI/ML Project check box cleared.
-
Project: If you are creating an AI/ML project, then check the AI/ML Project check box. (Not available in HPE Ezmeral Runtime Enterprise Essentials.)
See HPE Ezmeral ML Ops.
-
-
Specify vCPU (cores), RAM, GPU, and/or storage quotas using the Quotas tab. When AI/ML Project is selected, an entry in Maximum Cores is required. Other Quotas fields are optional.
-
If applicable, specify the tenant-independent settings or LDAP/AD groups that will be able to access this tenant using the External Authentication tab.
See Kubernetes Tenant External Authentication. This tab does not appear when the deployment is configured for platform-wide local authentication.
- When you have finished creating the tenant, click Submit to save your changes.
A default DataTap is automatically created for the new tenant. See About DataTaps.
There are several things you should do to prepare the new tenant for use. See After Creating the Kubernetes Tenant, below.
After Creating the Kubernetes Tenant
Once the new Kubernetes tenant has been created, you should do all of the following:
-
Assign at least one user to the tenant with either the Tenant Administrator or Platform Administrator role, as appropriate.
See Assigning/Revoking User Roles (Local) or Assigning/Revoking User Roles (LDAP/AD), as appropriate.
-
Add DataTaps or FS Mounts to the tenant. FS mounts are not available for imported Kubernetes Clusters.
See Creating a New DataTap or Creating a New FS Mount. For information about imported clusters, see Importing an External Kubernetes Cluster.
-
Download Kubectl to your system via the Dashboard screen for your assigned role.
-
Access the Kubernetes Web Terminal.
-
Deploy or onboard one or more applications.