Creating a New DataTap
Tenant Administrators can create DataTaps. Clicking the Create button in the DataTaps screen opens the Create New DataTap screen.
DataTaps are created on a per-tenant basis. This means that a DataTap created in Tenant A is not available to Tenant B. You may, however, choose to create DataTaps in different tenants that point to the same storage path; in this situation, jobs in different tenants can access the same storage simultaneously. Also, multiple jobs within a tenant may use a given DataTap simultaneously. While such sharing can be useful, be aware that the same cautions and restrictions apply to these use cases as for other types of shared storage: multiple jobs modifying files at the same location may lead to file access errors and/or unexpected job results.
This article contains generic instructions for creating a DataTap. Please see the following for more specific examples:
To create a DataTap:
- Please see About DataTaps for important limitations on where you can create DataTaps.
- Enter a name for the DataTap in the Name field. This name may contain letters (A-Z or a-z), digits (0-9), and hyphens (-), but may not contain spaces.
- Enter a brief description for the DataTap in the Description field.
- You can make a DataTap read only by checking the Read Only check box. Clearing this check box allows read/write access.
- Select the file system type using the Select Type pull-down menu. The
available options are:
- MAPR: See MAPR Parameters, below.
- HDFS: See HDFS Parameters, below.
- NFS: See NFS Parameters, below. This option is not available for Kubernetes tenants.
- GCS: See GCS Parameters, below.
- Review the entries you made in Steps 1-6 to make sure they are accurate.
When you have finished modifying the parameters for the DataTap, click Submit to create the new DataTap.
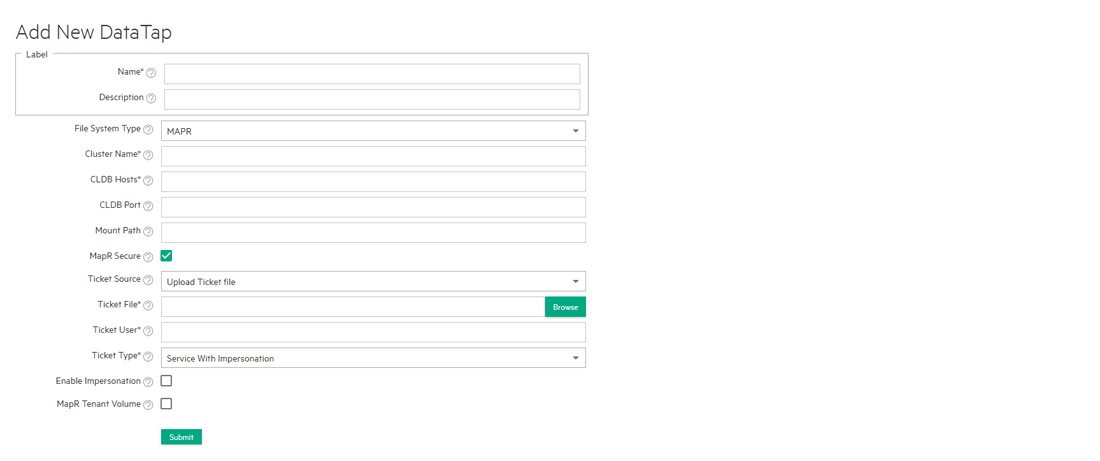
MAPR Parameters
If you selected MAPR in Step 5, above, then enter the following parameters:
- Cluster Name: Name of the MapR cluster. See the MapR articles Creating the Cluster and Creating a Volume articles.
- CLDB Hosts: DNS name or address of the container location database of a MapR cluster. See the MapR article Viewing CLDB Information.
- Port: Port for the CLDB server used to access the MapR file system. See the MapR article Specifying Ports.
- Mount Path: Complete path to the directory containing the data within the specified MapR file system. You can leave this field blank if you intend the DataTap to point at the root of the MapR cluster. See the MapR articles Viewing Volume Details and Creating a Volume.
- MapR Secure: Checking this check box if MapR cluster is secured. When the MapR cluster is secured, all network connections require authentication, and all moving data is protected with wire-level encryption. MapR allows applying direct security protection for data as it comes into and out of the platform without requiring an external security manager server or a particular security plug-in for each ecosystem component. The security semantics are applied automatically on data being retrieved or stored by any ecosystem component, application, or users. See the MapR article Security.
- Ticket: Enter the complete path to the MapR ticket. MapR uses tickets for authentication. Tickets contain keys that are used to authenticate users and MapR servers. In addition, certificates are used to implement server authentication. Every user who wants to access a secured cluster must have a MapR ticket. Tickets are encrypted to protect their contents. See the MapR articles Tickets and How Tickets Work.
-
- Ticket Source: Select the ticket source. This will be one of the
following:
- Upload Ticket File: This is enabled when Ticket source is selected as Use Existing File.
- Use the existing one: To use the existing ticket details.
- Ticket file: This will be one of the following:
- When Upload Ticket File is selected, Browse button is enabled to select the tiket file.
- When Use the Existing One is selected, it is the name of the existing ticket file.
- Enable Impersonation: Enable user impersonation. To enable user impersonation, user authentication, such as AD/LDAP should be configured at the MapR cluster side.
- Select Ticket Type: Select the ticket type. This will be one of
the following:
- User: Grants access to individual users with no impersonation support. The ticket UID is used as the identity of the entity using this ticket.
- Service: Accesses services running on client nodes with no impersonation support. The ticket UID is used as the identity of the entity using this ticket.
- Service (with impersonation): Accesses services running
on client nodes to run jobs on behalf of any user. The ticket
cannot be used to impersonate the
rootormaprusers. - Tenant: Allows tenant users to access tenant volumes in a multi-tenant environment. The ticket can impersonate any user.
- Ticket User: Username to be included in the ticket for authentication.
- MapR Tenant Volume: Indicates whether or not the mount path is a MapR tenant volume. See the MapR article Setting Up a Tenant.
- Enable Passthrough: Check this check box to enable Passthrough mode.
See the following examples for additional information:
- Ticket Source: Select the ticket source. This will be one of the
following:
HDFS Parameters
If you selected HDFS in Step 5, above, then enter the following parameters:
- Host: DNS name or IP address of the server providing access to the storage resource. For example, this could be the host running the namenode service of an HDFS cluster.
- Standby NameNode: DNS name or IP address of a standby namenode host that an HDFS DataTap will try to reach if it cannot contact the primary host. This field is optional; when used, it provides high-availability access to the specified HFDS DataTap.
- Port: For HDFS DataTaps, this is the port for the namenode server on the host used to access the HDFS file system.
- Path: Complete path to the directory containing the data within the specified HDFS file system. You can leave this field blank if you intend the DataTap to point at the root of the specified file system.
- Kerberos parameters: If the HDFS DataTap has Kerberos enabled, then you
will need to specify additional parameters. HPE Ezmeral Runtime Enterprise
supports two modes of user access/authentication.
- Proxy mode permits a “proxy user” to be configured to have access to the remote HDFS cluster. Individual users are granted access to the remote HDFS cluster by the proxy user configuration. Mixing and matching distributions is permitted between the compute Hadoop cluster and the remote HDFS.
- Passthrough mode passes the credentials of the current user to the remote HDFS cluster for authentication.
- HDFS file systems configured with TDE encryption as well as cross-realm Kerberos authentication are supported. See HDFS DataTap TDE Configuration and HDFS DataTap Cross-Realm Kerberos Authentication for additional configuration instructions.
Continue from Step 6, above, after entering the HDFS parameters.
NFS Parameters
If you selected NFS in Step 5, above, then enter the following parameters:
- Host: DNS name or IP address of the server providing access to the storage resource.
- Share:This is the exported share on the selected host.
- Path: Complete path to the directory containing the data within the specified NFS share. You can leave this field blank if you intend the DataTap to point at the root of the specified share.
Also, be sure to configure the storage device to allow access from each host and each Controller and Worker that will using this DataTap.
Continue from Step 6, above, after entering the NFS parameters.
GCS Parameters
An GCS DataTap is configured as follows:
- Bucket Name: Specify the bucket name for GCS.
- Credential File Source: This will be one of the following:
- When Upload Ticket File: is selected, Browse button is enabled to select in the Credential File. The credential file is a JSON file that contains the service account key.
- When Use the Existing One: is selected, enter the name of the previously uploaded credential file. The credetial file is a JSON file that contains the service account key.
- Proxy: This is optional. Specify http proxy to access GCS.
- Mount Path:Enter a path within the bucket that will serve as the starting pointfor the DataTap. If the path is not specified, the starting point will default to the bucket.