HDFS DataTap Kerberos Security
DataTaps that reference Kerberos-protected HDFS services are supported.

To configure a DataTap for Kerberos-protected HDFS:
- If you are either adding a new Kerberos-protected DataTap with Proxy access mode for the first time or editing an existing DataTap with Proxy access mode and changing the Kerberos principal name then proceed to Step 2; otherwise, skip to Step 4.
- Add the unique Kerberos principal name that will be used to register the DataTap
(such as
bluedata) as a super user by adding the following code snippet to thecore-site.xmlfile of the remote HDFS:<property> <name>hadoop.proxyuser.bluedata.groups </name> <value>*</value> </property> <property> <name>hadoop.proxyuser.bluedata.hosts </name> <value>*</value> </property> - Restart the remote HDFS for the new configuration to take effect.
- Set the permissions of the base HDFS directory to
777and then open the web interface for the remaining steps. - Check the Kerberos Protected check box.
- Enter the following parameters:
- KDC Host: Name or IP address of the Kerberos hosts. You may enter multiple hosts separated by commas. If you enter more than one host, then the first host in the list as the primary Kerberos host. If the primary host is unreachable, then another host will be used.
- KDC Port: Post used by the Kerberos hosts. Leave this field blank if not known. If you enter a value in this field, then all of the Kerberos hosts must use the same port.
- HDFS Service ID: Name of the service, as defined by your Kerberos administrator. This is optional; if you leave this field blank, then HPE Ezmeral Runtime Enterprise will automatically detect the HDFS service ID.
- Realm: Name space that helps define access permissions. Obtain this from your Kerberos administrator.
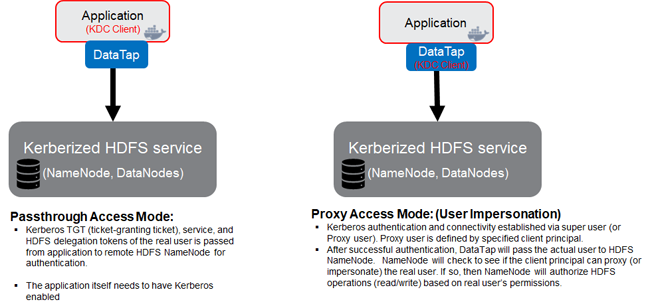
Access Method: Select either Passthrough or Proxy, as appropriate.
Selecting Proxy passes the specified client principal's credential to the namenode for authentication. In this case, the name of the real user who is accessing the DataTap from within a virtual node is also passed to the namenode for authorization.
Selecting Passthrough passes the credentials of the user who is accessing the DataTap from within a virtual node to the namenode for authentication and authorization. In this case, the virtual cluster needs to be kerberized and the application (kubeadm-dind-cluster (KDC) client) must have Kerberos enabled.
In both cases, the namenode authorizes the access based on the real user.
If you select Proxy, then Proceed to Step 7.
If you select Passthrough, then skip to Step 8.
- Enter the following information:
- Keytab Source: Use this pull-down menu to select either Upload Keytab File or Use Existing, as appropriate.
- Keytab File: If you need to upload a keytab file, then place this file on your local computer and then click the Browse button in the Keytab File field to browse to the file and securely upload it . If you need to use a keytab file that was previously uploaded either via the interface or manually, then enter the name of that file in the Keytab File field.
- Client Principal: This is a unique identity to which Kerberos can assign tickets (such as bluedata). Enter the appropriate value in this field.
Skip to Step 9.
NOTE Your organization security policies may not allow you to upload keytab files via the web interface. If you need to manually upload keytab files, then place keytab files used for local HDFS tenant storage in the/srv/bluedata/keytab/site_admindirectory on the Controller node. Keytabs used in DataTap definitions are in subdirectories associated with the tenant ID, such as/srv/bluedata/keytab/3. - Enter the following information:
- Use Keytab File for Browsing: Use this pull-down menu to select either Yes or No, as appropriate. If you select Yes, then enter the following information. The proxy option only applies when users are accessing the DataTap from directly within a virtual node. If you want this DataTap to be available to users who are accessing the web interface, then you will need to select Yes and provide all of the following information. In this case, DataTap access will function as a passthrough when the DataTap is accessed from the web interface and will pass individual user credentials when the user is accessing the virtual node directly. If you select No, then the DataTap will not be available from within the web interface; skip to Step 9.
- Keytab Source: Use this pull-down menu to select either Upload Keytab File or Use Existing, as appropriate.
- Keytab File: If you need to upload a keytab file, then place this file on your local computer and then click the Browse button in the Keytab File field to browse to the file and securely upload it . If you need to use a keytab file that was previously uploaded either via the interface or manually, then enter the name of that file in the Keytab File field.
- Client Principal: This is a unique identity to which Kerberos can assign tickets (such as bluedata). Enter the appropriate value in this field.
- Continue creating or editing the DataTap, as appropriate. See Creating a New DataTap and Editing an Existing DataTap.