The Kubernetes Tenants Screen
Selecting Tenants in the main menu opens the Kubernetes Tenants screen, which allows you to manage Kubernetes tenants.

This screen contains the following buttons:
- Create: Clicking this button opens the Create New Tenant screen. See Creating a New Kubernetes Tenant.
- Delete: Selecting one or more tenant(s) and then clicking this button deletes the selected tenant(s), if they are eligible for deletion. See Deleting a Kubernetes Tenant. This button only appears if you select one or more Kubernetes tenant(s).
The table on this screen contains the following information and functions:
-
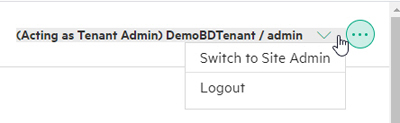
Tenant Name: Name of the tenant. Clicking a tenant name opens the Kubernetes Tenant Administrator Dashboard screen for the selected tenant and displays the Kubernetes Tenant Administrator menu for the selected tenant. This allows you to work directly within the selected tenant as a Kubernetes Tenant Administrator. The message Acting as Tenant Admin appears in the Toolbar at the top of web interface screens while you are in this mode. Hovering the mouse over this message opens a menu that allows you to return to the Site Admin tenant. See Toolbar & Main Menu - Kubernetes Tenant Administrator for articles on using the Kubernetes Tenant Administrator interface.
- Tenant Description: Brief description of the tenant.
- Cluster: Name of the Kubernetes cluster where this tenant is located.
- Details: Detailed information about the tenant, including:
- Resources: Resource quotas assigned for the tenant,
compared to the total available resources in the system, such as
Cores=8/16. Resource quotas can be assigned for virtual CPU cores, RAM, node storage, GPU devices (if the deployment is running RHEL/CentOS 7.x and has one or more GPU device(s) installed) and persistent tenant storage. If the tenant has no quota for a resource, then the display will show the resources being used (such asCores=8) and the messageNo Quota.
- Resources: Resource quotas assigned for the tenant,
compared to the total available resources in the system, such as
- Actions: The following actions are available for each tenant:
- Users: Clicking the Users icon (person) in the Actions opens the Tenant Details screen for that tenant, which allows you to either assign and revoke user roles or delete a user. See Viewing User Assignments.
- Edit: Clicking the Edit icon (pencil) in the Actions column opens the Edit Tenant screen for the tenant. See Editing an Existing Kubernetes Tenant. You cannot edit the Site Admin tenant.
- Delete: This icon (trash can) appears if the tenant is eligible for deletion. See Deleting a Kubernetes Tenant.