Kubernetes Cluster Usage Examples
This article presents the following three sample Kubernetes cluster usage examples:
Example 1: Hello World
This example is based on the Hello-World sample scenario, available here (link opens an external web site in a new browser tab/window).
Begin by creating the hello-world service manifest YAML file with HPE Ezmeral Runtime Enterprise annotation.
# kubectl apply -f https://k8s.io/examples/service/access/hello-application.yaml
deployment.apps/hello-world created
# kubectl get deployments hello-world
NAME          READY   UP-TO-DATE   AVAILABLE   AGE
hello-world   2/2     2            2           36s
The contents of cr-hello-world-app-service-epic-lb.yaml are:
apiVersion: v1
kind: Service
metadata:
  name: hello-world-service-epic-lb
  labels:
    hpecp.hpe.com/hpecp-internal-gateway: "true"
spec:
  selector:
    run: load-balancer-example
  ports:
  - name: http-hello
    protocol: TCP
    port: 8080
    targetPort: 8080
type: NodePortlabel
generates a service port on the Gateway host.
# kubectl create -f ./cr-hello-world-app-service-epic-lb.yaml
service/hello-world-service-epic-lb created
# kubectl describe services
Name:                     hello-world-service-epic-lb
Namespace:                default
Labels:                   hpecp.hpe.com/hpecp-internal-gateway: true
Annotations:              hpecp-internal-gateway/8080: mip.storage.enterprise.net:10003  - Note the Gateway host IP address.
Selector:                 run=load-balancer-example
Type:                     NodePort
IP:                       10.96.60.29
Port:                     http-hello  8080/TCP
TargetPort:               8080/TCP
NodePort:                 http  31996/TCP
Endpoints:                10.244.1.5:8080,10.244.2.4:8080
Session Affinity:         None
External Traffic Policy:  Cluster
Events:                   <none>
# curl http://mip.storage.enterprise.net:10003
Hello Kubernetes!
http://
in the cURL command above with
https://
.
If you cannot perform the mapping and receive Error 409 when executing the command
kubectl -n <namespace> logs
                    kubedirector-<port_number>
, be sure that HPE Ezmeral Runtime Enterprise is not in Lockdown mode. See Lockdown Mode.
Example 2: PHP Guestbook Application with Redis
The following example is based on the PHP Guestbook sample scenario described here (link opens an external web site in a new browser tab/window).
Begin by launching the Redis services.
# kubectl apply -f https://kubernetes.io/examples/application/guestbook/redis-master-deployment.yaml
deployment.apps/redis-master created
# kubectl get pods
NAME                            READY   STATUS    RESTARTS   AGE
redis-master-7db7f6579f-s5llz   1/1     Running   0          79s
# kubectl logs -f -c master redis-master-7db7f6579f-s5llz
                _._
           _.-``__ ''-._
      _.-``    `.  `_.  ''-._           Redis 2.8.19 (00000000/0) 64 bit
  .-`` .-```.  ```\/    _.,_ ''-._
 (    '      ,       .-`  | `,    )     Running in stand alone mode
 |`-._`-...-` __...-.``-._|'` _.-'|     Port: 6379
 |    `-._   `._    /     _.-'    |     PID: 1
  `-._    `-._  `-./  _.-'    _.-'
 |`-._`-._    `-.__.-'    _.-'_.-'|
 |    `-._`-._        _.-'_.-'    |           http://redis.io
  `-._    `-._`-.__.-'_.-'    _.-'
 |`-._`-._    `-.__.-'    _.-'_.-'|
 |    `-._`-._        _.-'_.-'    |
  `-._    `-._`-.__.-'_.-'    _.-'
      `-._    `-.__.-'    _.-'
          `-._        _.-'
              `-.__.-'
[1] 28 Nov 03:08:51.748 # Server started, Redis version 2.8.19
[1] 28 Nov 03:08:51.749 # WARNING: The TCP backlog setting of 511 cannot be enforced because /proc/sys/net/core/somaxconn is set to the lower value of 128.
[1] 28 Nov 03:08:51.749 * The server is now ready to accept connections on port 6379
<CTRL-C>
# kubectl apply -f https://kubernetes.io/examples/application/guestbook/redis-master-service.yaml
service/redis-master created
# kubectl get service
NAME                          TYPE        CLUSTER-IP     EXTERNAL-IP   PORT(S)          AGE
kubernetes                    ClusterIP   10.96.0.1      <none>        443/TCP          5h21m
redis-master                  ClusterIP   10.96.79.194   <none>        6379/TCP         41s
# kubectl apply -f https://kubernetes.io/examples/application/guestbook/redis-slave-deployment.yaml
deployment.apps/redis-slave created
# kubectl get pods
NAME                            READY   STATUS    RESTARTS   AGE
redis-master-545d695785-w2827   1/1     Running   0          12m
redis-slave-546fc99d45-5ffm2    1/1     Running   0          29s
redis-slave-546fc99d45-766rt    1/1     Running   0          29s
# kubectl apply -f https://kubernetes.io/examples/application/guestbook/redis-slave-service.yaml
service/redis-slave created
# kubectl get services
NAME                          TYPE        CLUSTER-IP     EXTERNAL-IP   PORT(S)          AGE
kubernetes                    ClusterIP   10.96.0.1      <none>        443/TCP          5h26m
redis-master                  ClusterIP   10.96.79.194   <none>        6379/TCP         5m16s
redis-slave                   ClusterIP   10.96.55.128   <none>        6379/TCP         42s
Next, set up the Guestbook front-end service.
# kubectl apply -f https://kubernetes.io/examples/application/guestbook/frontend-deployment.yaml
deployment.apps/frontend created
# kubectl get pods
NAME                            READY   STATUS              RESTARTS   AGE
frontend-678d98b8f7-754zv       0/1     ContainerCreating   0          40s
frontend-678d98b8f7-g5jtf       0/1     ContainerCreating   0          40s
frontend-678d98b8f7-l6xw9       0/1     ContainerCreating   0          40s
redis-master-545d695785-w2827   1/1     Running             0          18m
redis-slave-546fc99d45-5ffm2    1/1     Running             0          6m6s
redis-slave-546fc99d45-766rt    1/1     Running             0          6m6s
# kubectl get pods -l app=guestbook -l tier=frontend
NAME                        READY   STATUS    RESTARTS   AGE
frontend-678d98b8f7-754zv   1/1     Running   0          2m47s
frontend-678d98b8f7-g5jtf   1/1     Running   0          2m47s
frontend-678d98b8f7-l6xw9   1/1     Running   0          2m47s
# kubectl apply -f https://kubernetes.io/examples/application/guestbook/frontend-service.yaml
service/frontend created
# kubectl get services
NAME                          TYPE        CLUSTER-IP      EXTERNAL-IP   PORT(S)          AGE
frontend                      NodePort    10.96.165.194   <none>        80:31809/TCP     2m44s
kubernetes                    ClusterIP   10.96.0.1       <none>        443/TCP          5h36m
redis-master                  ClusterIP   10.96.79.194    <none>        6379/TCP         15m
redis-slave                   ClusterIP   10.96.55.128    <none>        6379/TCP         10m
Label the service so that the front-end NodePort service will be exposed via the Gateway host. This step is not necessary if the service was created in the namespace of a tenant that has the Map Services To Gateway option enabled. See Creating a New Kubernetes Tenant or Project and Editing an Existing Kubernetes Tenant or Project.
# kubectl label svc frontend hpecp.hpe.com/hpecp-internal-gateway=true
service/frontend labeled
# kubectl describe services frontend
Name:                     frontend
Namespace:                default
Labels:                   app=guestbook
  hpecp.hpe.com/hpecp-internal-gateway=true
  tier=frontend
Annotations:              hpecp-internal-gateway/80: mip.storage.enterprise.net:10004 - Note the URL.
Selector:                 app=guestbook,tier=frontend
Type:                     NodePort
IP:                       10.96.165.194
Port:                     <unset>  80/TCP
TargetPort:               80/TCP
NodePort:                 <unset>  31809/TCP
Endpoints:                10.244.1.6:80,10.244.1.7:80,10.244.2.7:80
Session Affinity:         None
External Traffic Policy:  Cluster
Events:
  Type    Reason   Age   From          Message
  ----    ------   ----  ----          -------
  Normal  Service  38s   kubedirector  Created HPECP K8S service
Finally, the connection to the service using your browser. In this case, the port
does not have an "http-" name prefix and the Gateway host is not doing SSL
termination. You can therefore navigate to http://<url_described_above>.

Example 3: WordPress with Persistent Volume
The following example is based on the WordPress and MySQL with Persistent Volume described here (link opens an external web site in a new browser tab/window).
MySQL and WordPress each require a Persistent Volume to store data. Their Persistent Volume Claims will be created at the deployment step. HPE Ezmeral Data Fabric is used as the default persistent volume.
Begin by adding a Secret generator in kustomization.yaml by
executing the following command, being sure to replace YOUR_PASSWORD with the password you want to use.
# mkdir wordpress
# cd wordpress
#
secretGenerator:
  - name: mysql-pass
      literals:
  - password=YOUR_PASSWORD
EOF
Next, use either of the following methods to download the following two YAML manifest files for the MySQL and WordPress services, respectively (links open an external website in a new browser tab/window):
- https://kubernetes.io/examples/application/wordpress/mysql-deployment.yaml
- https://kubernetes.io/examples/application/wordpress/wordpress-deployment.yaml
# curl -kO https://kubernetes.io/examples/application/wordpress/mysql-deployment.yaml
  % Total    % Received % Xferd  Average Speed   Time    Time     Time  Current
                                 Dload  Upload   Total   Spent    Left  Speed
100  1238  100  1238    0     0   1430      0 --:--:-- --:--:-- --:--:--  1429
# curl -kO https://kubernetes.io/examples/application/wordpress/wordpress-deployment.yaml
  % Total    % Received % Xferd  Average Speed   Time    Time     Time  Current
                                 Dload  Upload   Total   Spent    Left  Speed
100  1323  100  1323    0     0   1441      0 --:--:-- --:--:-- --:--:--  1441
# ls -al
total 9
drwxr-xr-x    1 leedavid UsersGrp         0 Nov 28 16:50 .
drwx------    1 leedavid UsersGrp         0 Nov 28 16:46 ..
-rw-r--r--    1 leedavid UsersGrp       137 Nov 28 16:49 kustomization.yaml
-rw-r--r--    1 leedavid UsersGrp      1238 Nov 28 16:47 mysql-deployment.yaml
-rw-r--r--    1 leedavid UsersGrp      1323 Nov 28 16:50 wordpress-deployment.yaml
If you installed HPE Ezmeral Runtime Enterprise with tenant storage, then HPE Ezmeral Data Fabric will already be registered as the default Storage Class in this namespace.
# kubectl get StorageClass
NAME                PROVISIONER        AGE
default (default)   com.mapr.csi-kdf   39h
# kubectl describe StorageClass
Name:                  default
IsDefaultClass:        Yes
Annotations:           storageclass.kubernetes.io/is-default-class=true
Provisioner:           com.mapr.csi-kdf
Parameters:            cldbHosts=192.168.20.131:7222,cluster=epic.mapr.cluster,csi.storage.k8s.io/provisioner-secret-name=mapr-user-secret,csi.storage.k8s.io/provisioner-secret-namespace=mapr-csi,csiNodePublishSecretName=mapr-ticket-secret,csiNodePublishSecretNamespace=mapr-csi,mountPrefix=/mapr-csi,namePrefix=k8s-1-,platinum=true,restServers=192.168.20.131:8443,securityType=secure
AllowVolumeExpansion:  <unset>
MountOptions:          <none>
ReclaimPolicy:         Delete
VolumeBindingMode:     Immediate
Events:                <none>
In these two manifest files, both the WordPress service and MySQL are requesting a persistent volume (PV):
-
MySQL Deployment:
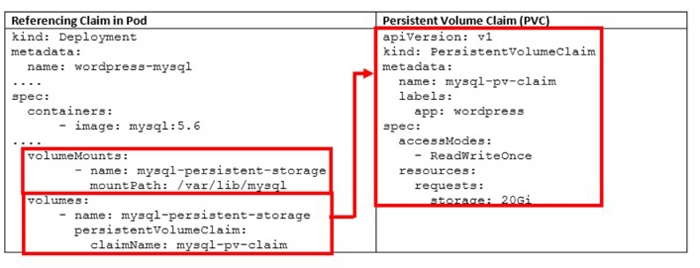
-
WordPress Deployment:
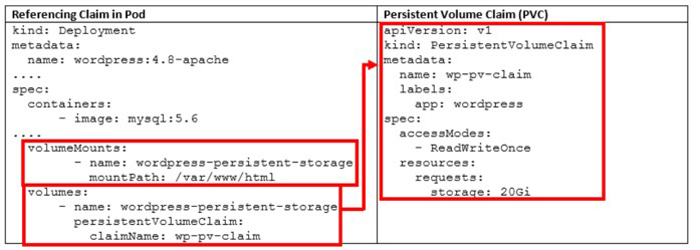
Neither pod makes any explicit request for a specific storageClassName. Hence, they will use the default HPE Ezmeral Data Fabric StorageClass.

NodePort Service
Edit the WordPress manifest YAML to use the NodePort service instead of LoadBalancer service. This needs to be done for port mapping to occur.
# vi wordpress-deployment.yaml
# cat wordpress-deployment.yaml
apiVersion: v1
kind: Service
metadata:
  name: wordpress
  labels:
    app: wordpress
spec:
  ports:
    - port: 80
  selector:
    app: wordpress
    tier: frontend
  type: NodePort - Ensure this is set to NodePort.
---
apiVersion: v1
kind: PersistentVolumeClaim
metadata:
  name: wp-pv-claim
  labels:
    app: wordpress
spec:
  accessModes:
    - ReadWriteOnce
  resources:
    requests:
      storage: 20Gi
---
apiVersion: apps/v1 # for versions before 1.9.0 use apps/v1beta2
kind: Deployment
metadata:
  name: wordpress
  labels:
    app: wordpress
spec:
  selector:
    matchLabels:
      app: wordpress
      tier: frontend
  strategy:
    type: Recreate
  template:
    metadata:
      labels:
        app: wordpress
        tier: frontend
    spec:
      containers:
      - image: wordpress:4.8-apache
        name: wordpress
        env:
        - name: WORDPRESS_DB_HOST
          value: wordpress-mysql
        - name: WORDPRESS_DB_PASSWORD
          valueFrom:
            secretKeyRef:
              name: mysql-pass
              key: password
        ports:
        - containerPort: 80
          name: wordpress
        volumeMounts:
        - name: wordpress-persistent-storage
          mountPath: /var/www/html
      volumes:
      - name: wordpress-persistent-storage
        persistentVolumeClaim:
          claimName: wp-pv-claim
Continue by adding these two manifests to the kustomization.yaml file.
# cat <<EOF >>./kustomization.yaml
resources:
  - mysql-deployment.yaml
  - wordpress-deployment.yaml
EOF
The kustomization.yaml contains all of the resources for deploying a
WordPress site and a MySQL database. You can apply the directory, and then verify
both the HPE Ezmeral Data Fabric volumes and the services, as
follows:
# kubectl apply --kustomize ./
secret/mysql-pass-9tt65k5fgm created
service/wordpress-mysql created
service/wordpress created
deployment.apps/wordpress-mysql created
deployment.apps/wordpress created
persistentvolumeclaim/mysql-pv-claim created
persistentvolumeclaim/wp-pv-claim created
Confirm that PVC is using the HPE Ezmeral Data Fabric StorageClass (see highlighted text below).
# kubectl get pvc
NAME             STATUS   VOLUME                                         CAPACITY   ACCESS MODES   STORAGECLASS   AGE
mysql-pv-claim   Bound    mapr-pv-16f97a33-b8dd-488a-b6db-1d94a84286e2   20Gi       RWO            default        48s
wp-pv-claim      Bound    mapr-pv-896b3504-e9ba-4593-b9a0-88a9ece392b5   20Gi       RWO            default        48s
# kubectl get pv
NAME                                           CAPACITY  ACCESS MODES  RECLAIM POLICY  STATUS  CLAIM                     STORAGECLASS  REASON  AGE
mapr-pv-32850109-ef66-42db-9522-b563fbc01eae   10Gi      RWO           Delete          Bound   bdwebterm/pvc-kd-977sb-0  default               41h
mapr-pv-a24b1733-39db-40d2-bdaf-0be7c22ed83b   10Gi      RWO           Delete          Bound   bdwebterm/pvc-kd-nbwhn-0  default               31h
mapr-pv-dbf96aed-dafd-47b7-87d4-7d343f182d8b   20Gi      RWO           Delete          Bound   default/mysql-pv-claim    default               69s
mapr-pv-e3c1db71-2865-425c-971e-c01466e9d295   20Gi      RWO           Delete          Bound   default/wp-pv-claim       default               69s
mapr-pv-ed5f1be3-9be2-4470-83cf-67f9b31e9dbf   10Gi      RWO           Delete          Bound   bdwebterm/pvc-kd-dl26j-0  default               32h
Label the WordPress service so that the front-end NodePort service will be exposed via the Gateway host. This step is not necessary if the service was created in the namespace of a tenant that has the Map Services To Gateway option enabled. See Creating a New Kubernetes Tenant or Project and Editing an Existing Kubernetes Tenant or Project.
# kubectl get services
NAME                          TYPE        CLUSTER-IP     EXTERNAL-IP   PORT(S)          AGE
kubernetes                    ClusterIP   10.96.0.1      <none>        443/TCP          26h
wordpress                     NodePort    10.96.98.248   <none>        80:30996/TCP     24s
wordpress-mysql               ClusterIP   None           <none>        3306/TCP         24s
# kubectl label svc wordpress hpecp.hpe.com/hpecp-internal-gateway=true
service/wordpress labeled
# kubectl describe service wordpress
Name:                     wordpress
Namespace:                default
Labels:                   app=wordpress
  hpecp.hpe.com/hpecp-internal-gateway=true
Annotations:              hpecp-internal-gateway/80: mip.storage.enterprise.net:10006
Selector:                 app=wordpress,tier=frontend
Type:                     NodePort
IP:                       10.96.98.248
Port:                     <unset>  80/TCP
TargetPort:               80/TCP
NodePort:                 <unset>  30996/TCP
Endpoints:                10.244.2.11:80
Session Affinity:         None
External Traffic Policy:  Cluster
Events:
  Type    Reason   Age   From          Message
  ----    ------   ----  ----          -------
  Normal  Service  26s   kubedirector  Created HPECP K8S service
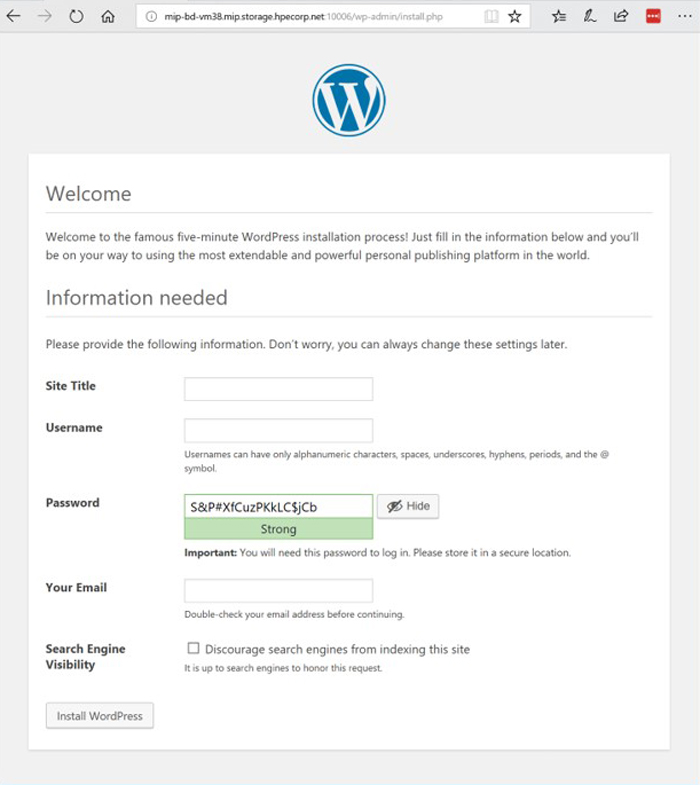
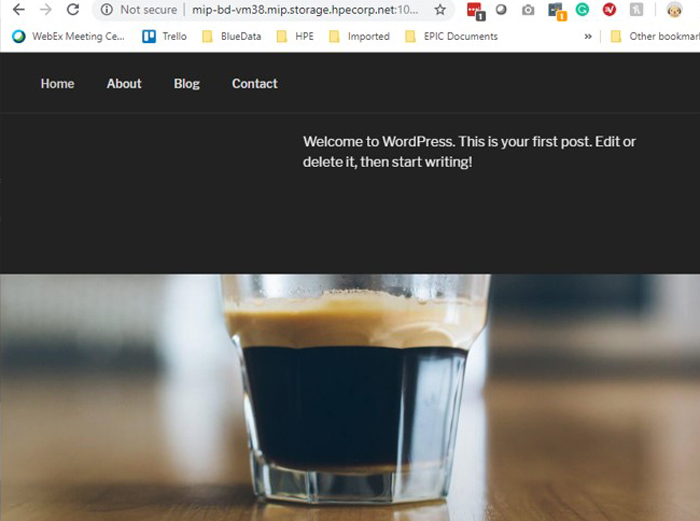
Copy the IP address and port number (see highlighted text above) to your browser. You should see set-up page similar to the following screenshot:
Destroy the application deployments (e.g. pods) and restart the deployments, making sure to preserve the WordPress application information and still preserved.
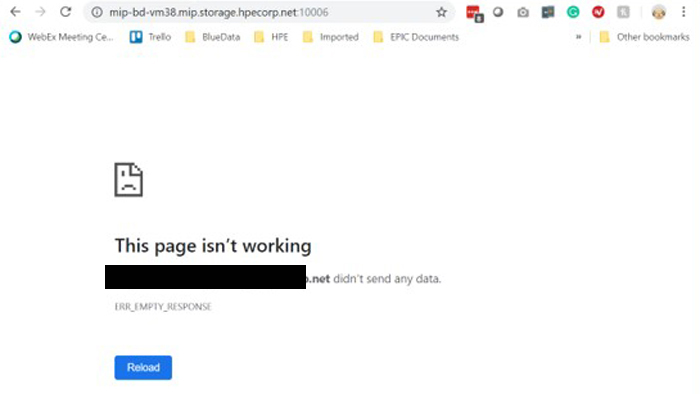
# kubectl delete deployment wordpress
deployment.extensions "wordpress" deleted
# kubectl delete deployment wordpress-mysql
deployment.extensions "wordpress-mysql" deleted
# kubectl get pods
No resources found.
# kubectl get deployments
No resources found.
The service is gone, as expected.
Reapply the same deployment, and reconnect to persistent storage.
# kubectl apply -k ./
secret/mysql-pass-9tt65k5fgm unchanged
service/wordpress-mysql unchanged
service/wordpress unchanged
deployment.apps/wordpress-mysql created
deployment.apps/wordpress created
persistentvolumeclaim/mysql-pv-claim unchanged
persistentvolumeclaim/wp-pv-claim unchanged
# kubectl get pods
NAME                               READY   STATUS    RESTARTS   AGE
wordpress-594759d7f6-jdnvp         1/1     Running   0          27s
wordpress-mysql-847b7b996d-dwf6s   1/1     Running   0          28s
# kubectl describe service wordpress
Name:                     wordpress
Namespace:                default
Labels:                   app=wordpress
                          Hpecp.hpe.com/hpecp-internal-gateway=true
Annotations:              hpecp-internal-gateway/80: mip.storage.enterprise.net:10006
Selector:                 app=wordpress,tier=frontend
Type:                     NodePort
IP:                       10.96.35.129
Port:                     <unset>  80/TCP
TargetPort:               80/TCP
NodePort:                 <unset>  31589/TCP
Endpoints:                10.244.1.18:80
Session Affinity:         None
External Traffic Policy:  Cluster
Events:
  Type    Reason   Age   From          Message
  ----    ------   ----  ----          -------
  Normal  Service  12m   kubedirector  Created HPECP K8S service
The WordPress service is restored.
Finally, you will need to delete the entire deployment in order to free up all of the resources, including the persistent storage.
# kubectl delete -k ./
secret "mysql-pass-9tt65k5fgm" deleted
service "wordpress-mysql" deleted
service "wordpress" deleted
deployment.apps "wordpress-mysql" deleted
deployment.apps "wordpress" deleted
persistentvolumeclaim "mysql-pv-claim" deleted
persistentvolumeclaim "wp-pv-claim" deleted