The KubeDirector Images Screen
Clicking the Next button in the KubeDirector Workspace screen (see The KubeDirector Workspace Screen) opens the KubeDirector Images screen, which is where you assign container images to application roles.
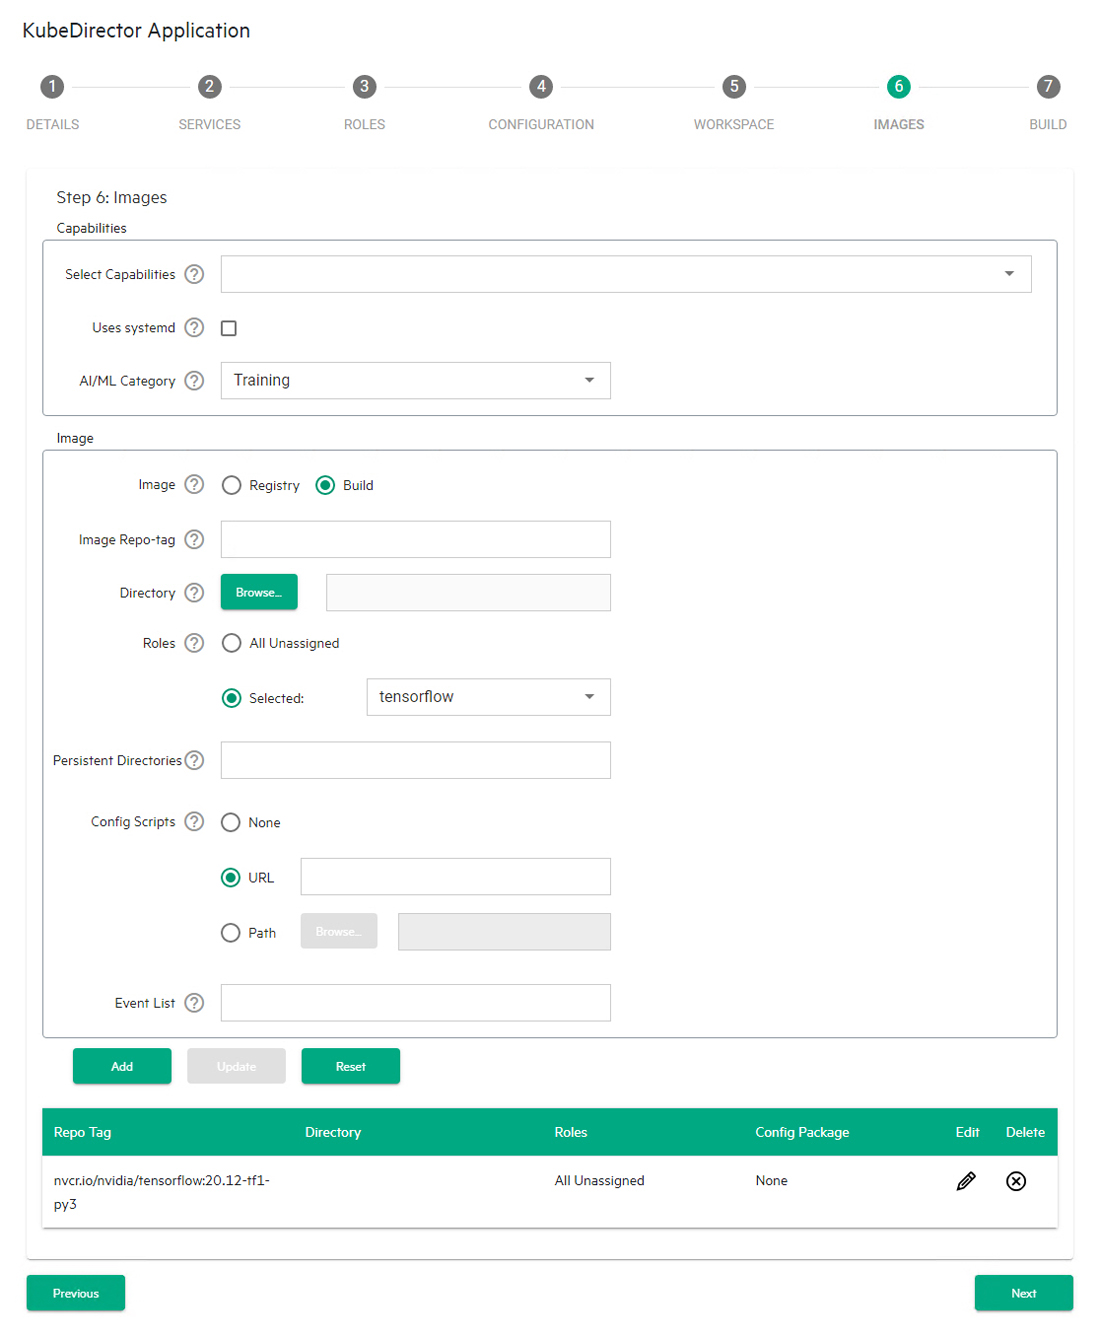
This screen allows you to:
- Add a new container image: See Adding a New Image.
- View container images: See Viewing Images.
- Edit an existing image: See Editing an Existing Image.
- Remove an image: See Removing an Image.
When you have finished mapping container images to roles, click Next to proceed to the KubeDIrector Build screen. See The KubeDIrector Build Screen.
Adding a New Image
To add a new container image and map that image to a role:
- Use the Select Capabilities pull-down menu to expand a list of Linux capabilities, and then check the checkbox(es) that correspond to the Linux capability or capabilities you need this application to have.
- If the application uses
systemdto control its services, then check the Uses systemd checkbox. - If the application is an AI/ML application, then use the AI/ML Category pull-down menu to select the Kubernetes Project App Store screen tab where the application will appear in the HPE Ezmeral Runtime Enterprise web interface. For example, if you select Training, then the application will appear in the Training tab.
- Check the appropriate Image radio button to determine the location of a
source container image to use for the application you are creating.
- Registry: Checking this radio button means that the
source container image is stored in a registry, such as
docker.io. - Build: Checking this radio button means that the source container image will be sourced locally. Selecting this option exposes the Directory field and Browse button. Either use the Browse button to navigate to the location of the source image, or enter the complete path in the field.
- Registry: Checking this radio button means that the
source container image is stored in a registry, such as
-
Provide the image repository information in the Image Repo-tag field, in the format:
.<repository_url>/<repository>/<name>:<tag> - Use the Roles radio buttons to select the role(s) for which this
container image applies.
- All Unassigned: Checking this radio button assigns this container image to all roles that do not have another image specified.
- Selected: Checking this radio button and then selecting one or more role(s) using the pull-down menu assigns this container image to the specified role(s). Checking a checkbox next to a role name assigns the image to that role; clearing a checkbox unassigns that image from the role.
- Select any needed config scripts by checking the appropriate radio button:
- None: No config script is needed.
- URL: If the config script is available online, then check this radio button and then enter the complete URL to the application configuration script in the field.
- Path: If the configuration script is available locally, then check this radio button, and then use the Browse button and/or field to specify the directory where the script is located.
- Enter the lifecycle event(s) for that KubeDirector should invoke for this role in the Event List field.
- Click Add to finish adding the image.
You may now:
- View the image/role mapping, as described in Viewing Images.
- Edit the image/role mapping, as described in Editing an Existing Image.
- Remove the image/role, as described in Removing an Image.
Viewing Images
The table at the bottom of the KubeDirector Images screen appears when you have defined at least one image/role mapping for this application. This table displays the following information for each image/role mapping:
- Repo Tag: Repo tag of the image/role mapping.
- Directory: If the container image is sourced locally, this is the path to that image.
- Roles: Role(s) to which this container image has been mapped.
- Config Package: Any config script defined for this image/role mapping.
- Edit: Clicking the Edit icon (pencil) for a service allows you to edit that role. See Editing an Existing Role.
- Delete: Clicking the Delete icon (X) for a service removes that role. See Removing a Role.
Editing an Existing Image
To edit an existing image/role mapping:
- In the table at the bottom of the KubeDirector Images screen, click the Edit icon (pencil) for the image/role mapping you want to edit.
- The top of this section populates with the current information for the selected image/role mapping.
- Make your desired changes. See Adding a New Image for information on what to place in the fields.
- Either:
- Click Add to save your changes as a new image/role mapping.
- Click Update to save your changes to the existing image/role mapping.
- Click Reset to cancel your changes without modifying the image/role mapping.
Removing an Image
To remove an image/role mapping, click the Delete icon (X) for the mapping you want to remove in the table at the bottom of the KubeDirector Images screen.