The KubeDirector Workspace Screen
Clicking the Next button in the KubeDirector Configuration screen (see The KubeDirector Configuration Screen) opens the KubeDirector Workspace screen, which is where you can build a Docker file from scratch, and/or add or edit scripts.
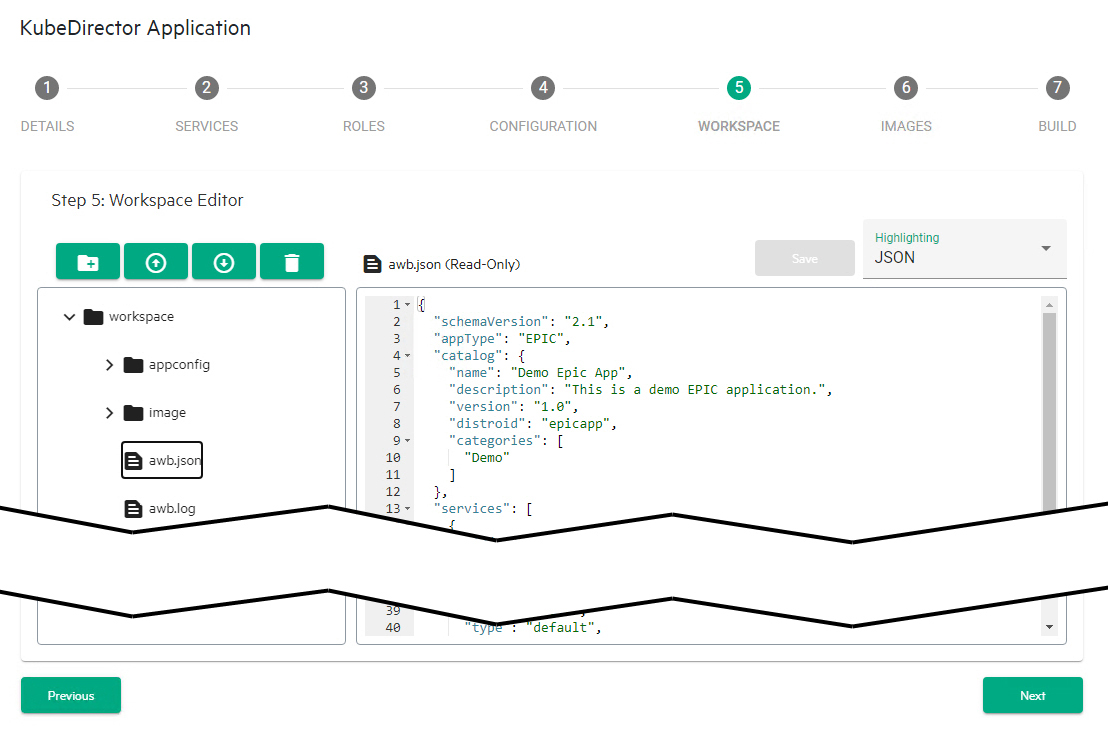
The top left of this screen contains the following four buttons
- Add a directory: See Adding a Directory.
- Upload a file: See Uploading a File.
- Download a file: See Downloading a File.
- Delete: See Deleting Files and Directories.
The left side of this screen beneath the buttons displays the current directory tree and contents.
- Click a collapsed directory to expand and view its contents.
- Click an expanded directory to collapse and hide its contents.
- Click a file to view its contents on the right side of the screen.
The right side of the screen contains a text editor that populates with the contents of a file when you select that file in the directory tree.
- The Highlighting pull-down menu automatically selects a text highlighting schema based on the detected syntax (e.g. JSON, Markdown, or Python). You can override this setting by selecting a different schema using this menu.
- The filename appears above the file contents. If the notation (Read-Only) does not appear, then you may edit this file using the script editor. See Editing a File.
When you have finished setting up the workspace for your application, click Next to proceed to the KubeDIrector Images screen. See The KubeDIrector Images Screen.
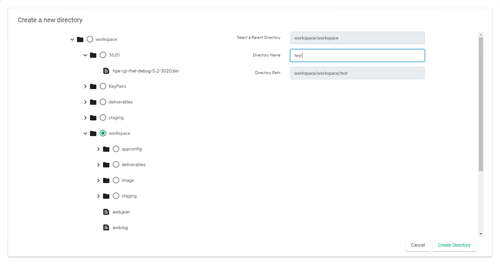
Adding a Directory
To add a new directory:
-
Click the Add Directory button (folder with a + sign).
The Create a new directory popup appears.
-
Check the radio button of the parent directory under which you want to create the new directory.
The Select a Parent Directory and Directory Path fields populate. These fields are read-only.
- Enter the name for the new directory in the Directory Name field.
- Click the Create Directory button.
The popup closes and returns you to the KubeDirector Workspace screen, and the new directory appears in the directory tree on the left side of the screen.
Uploading a File
To upload a file ot the workspace:
-
Click the Upload File button (circle with an up arrow).
The Upload a file popup appears.

-
Check the radio button that corresponds to the directory to where you want to upload the file.
The Select a Parent Directory field populates. This field is read-only.
-
Click the Browse button to open a standard Open dialog, and then navigate to and select the file you want to upload.
The File Path field populates. This field is read-only.
- Click the Upload File button.
The popup closes and returns you to the KubeDirector Workspace screen, and the new file appears in the directory tree on the left side of the screen.
Downloading a File
To download a file:
-
Click the Download File button (circle with a down arrow).
The Download a file pop-up appears.
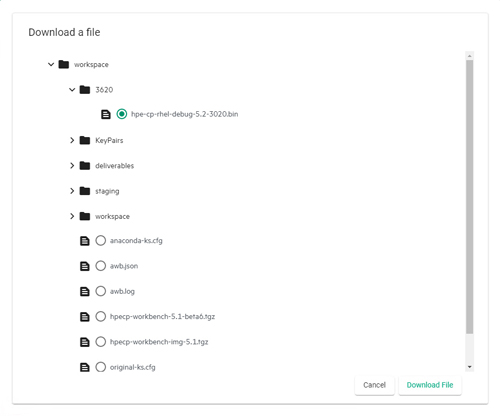
- Check the radio button that corresponds to the file you want to download.
- Click the Download button.
The file downloads to your local computer. The download location and behavior will vary based on your browser configuration.
Editing Files
To edit a file:
-
Select the file you want to edit in the directory tree.
The contents of that file automatically appear in the text editor on the right side of the screen.
- If desired, you may use the Highlight pull-down menu to change the text highlighting schema. This only affects how the text is displayed; it does not modify the file in any way.
- Make your desired edits directly in the file.
When you have completed your edits, click the Save button.
Deleting Files and Directories
To delete a file or directory:
-
Click the Delete button (trash can).
The Delete a file or directory popup appears.
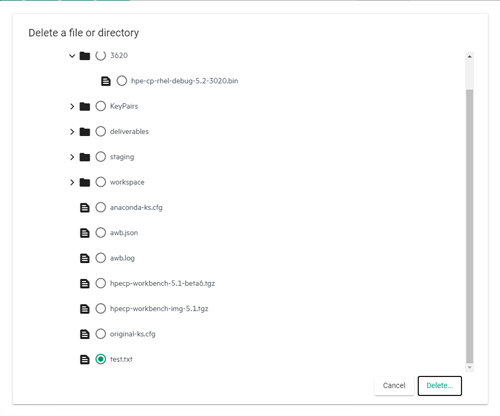
- Check the radio button that corresponds to the file or directory you want to
delete. CAUTIONDELETING A DIRECTORY REMOVES ALL OF THE CONTENTS (SUBDIRECTORIES AND FILES) OF THE DELETED DIRECTORY.
-
Click the Delete button.
A confirmation dialog appears.
- Click Confirm to finish the deletion.