Configuring User Authentication Settings
The deployment can be configured to authenticate users on a platform-wide basis. You may also configure user authentication on a per-Kubernetes-cluster basis. User authentication may be handled by the authentication server or by one or more LDAP/AD severs across one or more domains. The following user authentication settings are thus supported:
- Platform: The entire deployment uses the same authentication settings, which
may be configured as follows:
- Local: The deployment uses the internal authentication server to authenticate users.
- Single LDAP/AD domain, with no failover protection: The deployment uses a single LDAP/AD domain with a single server to authenticate users. There is no failover protection.
- Single LDAP/AD domain, with failover protection: The deployment uses a single LDAP/AD domain with two or more servers configured, which provides failover protection in case a server goes down or becomes unreachable.
- Multiple LDAP/AD domains: The deployment uses two or more LDAP/AD domains to authenticate users. Each domain may be configured to use either one server (no failover protection) or multiple servers (for failover protection).
- Kubernetes cluster: An individual Kubernetes cluster uses custom
authentication settings, which may be configured as follows:
- Single LDAP/AD domain, with no failover protection: The Kubernetes cluster uses a single LDAP/AD domain with a single server to authenticate users. There is no failover protection.
- Single LDAP/AD domain, with failover protection: The Kubernetes cluster uses a single LDAP/AD domain with two or more servers configured, which provides failover protection in case a server goes down or becomes unreachable.
- Multiple LDAP/AD domains: The Kubernetes cluster uses two or more LDAP/AD domains to authenticate users. Each domain may be configured to use either one server (no failover protection) or multiple servers (for failover protection).
Locating Authentication Settings
Configuring user authentication options takes place in one or more of the following locations in the web interface, depending on the configuration:
-
The User Authentication screen (see The User Authentication Screen) allows the Platform Administrator to specify the following settings:
- Whether or not multiple LDAP/AD domains are supported.
- If multiple LDAP/AD domains are supported, whether or not the Domain for Authentication pull-down menu will appear on the Login screen.
- If LDAP/AD is enabled, then the External Authentication tab will appear in the Kubernetes Edit Tenant screen (see Editing an Existing Kubernetes Tenant or Project). Any changes you make here will only apply to the current tenant/project. See External Authentication Tab.
- In the Step 3: Authentication screen when creating a new Kubernetes cluster. See Creating a New Kubernetes Cluster and Step 3: Authentication Screen (Kubernetes Clusters).
External Authentication Tab
The External Authentication tab of the Create Tenant or Edit Tenant screen enables you to configure the user authentication options for the current tenant/project when HPE Ezmeral Runtime Enterprise uses platform-wide LDAP/AD user authentication (see Tenant Groups).

Tenant Groups
The External Authentication tab of the Create Tenant or Edit Tenant screen enables you to specify the LDAP/AD groups that can access the tenant or project, if any.
To assign one or more groups to a tenant, enter the group information in the External User Groups field, and then use the menu to select Member (if members of the group should have Member access to the tenant/project), or Admin (if members of the group should have Administrator access to the tenant/project). Each LDAP/AD group may have one tenant/project role. If needed, you may:
- Click the Add Group icon (plus sign) to add another LDAP/AD group.
- Click the Remove Group icon (minus sign) to remove an LDAP/AD group.
- To remove all LDAP/AD groups, click the Remove Group icon (if applicable), and then highlight the final remaining group and press [DEL].
When you have finished specifying group settings, continue creating or editing the tenant or project.
Step 3: Authentication Screen (Kubernetes Clusters)
The Step 3: Authentication screen allows the Kubernetes Administrator to specify whether the new Kubernetes cluster will use the same user authentication process configured for the HPE Ezmeral Runtime Enterprise deployment, or whether a different user authentication process will be configured for this particular Kubernetes cluster.

On this tab:
- Clicking Next applies the platform-wide user authentication configuration to the Kubernetes cluster.
- Clicking the Copy from Platform Authentication button copies the platform-wide authentication settings to this screen and allows you to edit these parameters as needed for this Kubernetes cluster.
- Manually entering user authentication parameters allows you to specify a completely different configuration to apply to this Kubernetes cluster.
If you are configuring user authentication options for this Kubernetes cluster, then see Configuring User Authentication Options, below.
Configuring User Authentication Options
These instructions apply as follows:
- If the deployment is configured to authenticate users on the platform level, then modifying these settings on the User Authentication screen (see The User Authentication Screen) will modify the user authentication settings across the entire deployment.
- If the deployment is configured to authenticate users on a per-Kubernetes-cluster basis, then modifying these settings on the Step 3: Authentication screen (see Creating a New Kubernetes Cluster) will modify the user authentication settings for this specific Kubernetes cluster.
To change the user authentication method:
- If you want to use two or more authentication domains for authentication, then proceed to Step 2. Otherwise, skip to Step 8.
-
Check the Enable Multi Domain check box.
A tab will appear for each domain. Each tab will be labeled either undefined (if the domain has not been configured) or with the name of the domain. Selecting a tab allows you to configure settings on a per-domain basis.
 NOTE The configuration process described in this section is the same whether or not multiple domains are enabled. The only difference is that the tabs will appear when multiple domains are enabled, and selecting a tab will allow you to configure settings for that domain only. Modifying the settings for one domain will not affect the settings for any other domains.
 - If you want the Login page to display the
Domains for Authentication pull-down menu in the
Login screen (see Launching and Signing In), then check the Show
Domain in Login Page check box. If this check box is blank,
then:
- The user may enter their username as
<username>@<domain>, where<username>is their username and<domain>is the domain to use for authentication. If this box is checked and the user adds the domain when logging in, then this will override any selection they make with the Domain for Authentication menu. - The user may enter their username simply as
<username>and HPE Ezmeral Runtime Enterprise will search for that user across all of the domains configured for the platform or Kubernetes cluster, as appropriate.
- The user may enter their username as
- If desired, enter the domain regex in the Domain Regex
field. This is a perl-like entry that extracts name and domain information from
a login username. Click here for additional information (link
opens an external website in a new browser tab/window). The regex entries are as
follows:
- LDAP:
'(?P<name>[^@]+)@?(?P<domain>[^@]*$)' - AD:
'(((?P<domain>[^\\]+)\\(?P<name>.+$))|((?P<name>[^@]+)@(?P<domain>.+$))|(^(?P<name>[^@\\]+)$))'
- LDAP:
- Select the domain to configure, as follows:
- If you are configuring the first domain (where there is only one tab labeled undefined), then proceed to Step 7.
- If you are configuring an existing domain, then click the desired tab to begin editing that domain, and then proceed to Step 7.
- If you need to add a domain, then click the Add Domain icon (plus sign) on one of the existing tabs, and then proceed to Step 7.
- If you need to remove a domain, then click the Remove Domain icon (minus sign) on the tab that corresponds to the domain you are removing. For example, to delete the LDAPS One domain, click the Remove Domain icon on the LDAPS One tab.
CAUTION You cannot undelete a domain. If you remove a domain by accident, then you will need to reconfigure that domain, and users assigned to the removed domain will not be able to access container platform. - Enter a name that will be used to identify the service in the Auth Service Identifier Name field.
- Select the desired type of authentication use using the
Authentication Type pull-down menu. The available
options are:
- Local: Selecting this option configures the platform or Kubernetes cluster to use the built-in user database for user authentication. See The User Management Screen for information on managing the local user database. This option is not available if multiple domains were enabled in Step 2. Skip to Step 15.
- LDAP: Selecting this option configures the platform, or Kubernetes cluster to use an existing external LDAP server. Proceed to Step 9.
- Active Directory: Selecting this option configures the platform, or Kubernetes cluster to use an existing external Active Directory (AD) server. Proceed to Step 9.
- Use the Security Protocol pull-down menu to select the security protocol that will be used to access the authentication server (None, LDAPS, or Start TLS). If you select LDAPS or Start TLS, ensure that the AD server supports TLS 1.3.
-
You must configure at least one authentication server to use with this domain.
 If desired, you may configure two or more servers for this domain, which will help ensure successful user logins if a server goes down or becomes unreachable. To configure the authentication servers to use with this domain:
- All of the servers that you are configuring must meet all of the requirements listed in Server Failover Requirements.
- Enter the hostname or IP address of the external LDAP/AD host in the left field of the Service Locations area.
- Enter the port of the external LDAP/AD host in the right field of the Service Locations area.
- To add another server, click one of the Add Service Location icons, and then add the hostname/IP address and port for that server in the appropriate fields.
- To remove a server, click the Remove Service Location icon (minus sign) for the server that you want to remove.
- If you check the Reorder on Failover check box, then the deployment will reorganize the list of configured servers to always try the last server that responded first. For example, assume four servers set up in the order A, B, C, D with this option enabled. Server A does not respond in a timely fashion, but B does. The server list will now appear in the order B, A, C, D. If A, B, and C do not respond but D does, then the new order will be D, B, A, C. Essentially, the first server to respond will be moved to the front of the list. Clearing this check box forces the deployment to check each server in the order in which it appears in this list. In this example, authentication will always proceed in the order A, B, C, D.
- The binding type determines how the entered username is translated into a string
that is understood by the LDAP/AD server. Select how the LDAP/AD user will be
determined using the Bind Type pull-down menu. The
available options are:
- Direct Bind: This option derives the user's LDAP/AD name, also known as a user's distinguished name (DN), from the entered username and then attempts to authenticate the user using the entered password.
- Search Bind: This option establishes a connection to the LDAP/AD server either anonymously or using a fixed account, searches for the authenticating user's DN, and then attempts to authenticate the user using the entered password.
- Enter the LDAP/AD attribute used to retrieve user profiles in the
User Attribute field. This will typically be
cnfor LDAP servers orsAMAccountNamefor AD servers.
See Direct Bind (LDAP), Direct Bind (AD), or Search Bind (LDAP/AD) for configuration instructions based on your selected server/binding options. Complete the appropriate configuration before proceeding to Step 12.
- If you selected LDAPS or Start TLS in Step 9, then checking the TLS Verify Peer check box instructs the deployment to verify that the certificate of the LDAP/AD server has been signed by a known Certificate Authority (CA). When this option is selected,the entire user authentication certificate chain will be verified, and all applicable Certificate Revocation Lists (CRLs) will be scanned. If any portion of the certificate chain has been revoked at any level, then the affected LDAP/AD servers will not be queried, affected users will not be able to log in via any affected LDAP/AD servers and no certificates will be transmitted or received certificates. If you are copying global authentication when this option is enabled, you will need to re-upload the CA certificate.
- Verify the authentication settings by clicking the Verify
button at the top of the User Authentication tab or
External Authentication tab to open the
Verify Authentication Settings popup, entering a test
username and password in the appropriate fields, selecting the domain to verify
using the Domain for Authentication pull-down menu if
multiple domains are configured, and then clicking
Submit. A green bar with the message
User
                        authorized successfully
appears if the configuration is correct. If the selected domain has multiple servers configured, then the verification process will stop as soon as one of those servers sends a response. - If you have Search Bind selected for LDAP or AD and want to enable SAML SSO, then check the Enable SAML SSO check box. See SSO for configuration instructions. Otherwise, proceed to Step 14.
- When you have finished configuring your authorization options, click Submit to save your changes. Your settings will be automatically verified.
Server Failover Requirements
The servers that are being used for failover protection in a single LDAP/AD domain must meet all of the following requirements:
- All servers must be online.
- All servers must be reachable from HPE Ezmeral Runtime Enterprise.
- All server certificates must be issued by the same Root Certificate Authority (CA).
- All servers must use the same security protocol (LDAPS, Start TLS, or None).
- All servers must either use the same user to bind or be anonymous.
- All servers must have the same search base.
- All servers must have the same username element (cn or sAMAccount).
- All servers must use the same bind type (Search or Direct).
- If this is an Active Directory (AD) domain, then all servers must have the same NT Domain.
Return to Step 10, above.
Direct Bind (LDAP)
Direct Bind for an LDAP server will always compose the user DN at login time by
combining the given user name with the specified User Attribute and specified User
Subtree DN. For example suppose the User Attribute is cn and the
User Subtree DN is dc=mycompany,dc=com. When a user
bob attempts to login, the authentication to the LDAP server
will be attempted with the DN cn=bob,dc=mycompany,dc=com. If users
have DNs that differ in portions other than just the user attribute, then Direct
Bind is not a usable configuration.
Direct Bind is only desirable if the LDAP server does not support anonymous search and there is no designated "service" user account that could be used to do searches for user objects. Search Bind is preferable for many LDAP configurations and also is preferable if LDAP will be used for container (virtual node) login authentication.
If you are using direct binding with an LDAP server, then you will need to specify the following parameters:
- Enter the LDAP attribute used to retrieve user profiles (such as cn) in the User Attribute field. Contact your LDAP Administrator for this information, if needed.
- Enter the LDAP subtree that will be used when searching for users in the User Subtree DN field. This is used to compose user object DNs at login time, as described above. It is also used as a "search base" that defines the scope which will be searched for user objects, when the object for an authenticated user is later fetched (using the credentials of that user) to determine the user's group memberships.
This image shows sample direct bind LDAP settings.

Return to Step 12, above.
Direct Bind (AD)
If the Yes radio button for the NT Domain
Enabled option is checked, then the NT Domain
field must also be specified. In this configuration, the user DN will be formed from
the username and the specified domain, as username@domain. If the
No radio button is checked for NT Domain
Enabled, then the user DN will be composed by combining the given
user name with the specified User Attribute and specified
User Subtree DN, in the same manner as described for
Direct Bind (LDAP),
above.
Direct Bind is only desirable if the AD server does not support anonymous search and there is no designated "service" user account that could be used to do searches for user objects. Search Bind is preferable for many AD configurations and also is preferable if AD will be used for container (virtual node) login authentication. Also, if NT Domain Enabled is not selected and users have DNs that differ in portions other than just the user attribute, then Direct Bind is not a usable configuration.
Regardless of whether NT Domain Enabled is enabled, you will need to specify the following additional parameters to use direct binding with an AD server:
- Enter the Active Directory attribute used to retrieve user profiles (such as sAMAccountName) in the User Attribute field. Contact your AD Administrator for this information, if needed.
- Enter the Active Directory subtree that will be used when searching for users in the User Subtree DN field. This is used to compose user object DNs at login time if NT Domain Enabled is not selected. It is also used as a "search base" that defines the scope which will be searched for user objects, when the object for an authenticated user is later fetched (using the credentials of that user) to determine the user's group memberships.
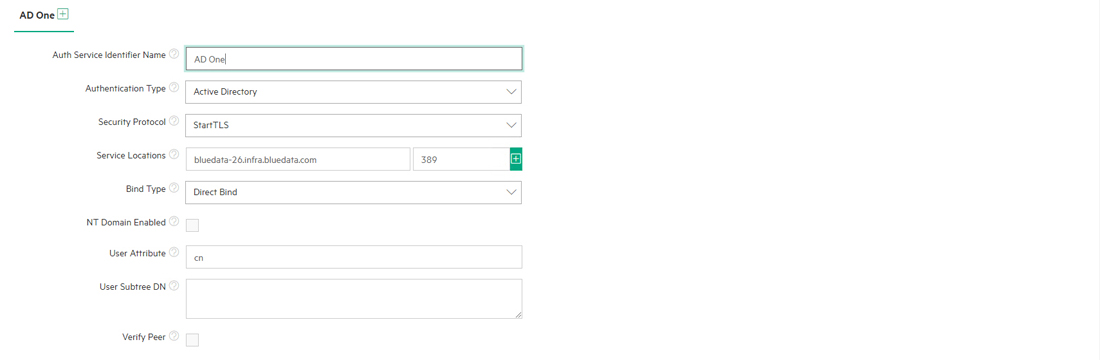
This image shows sample direct bind AD settings:
Return to Step 12, above.
Search Bind (LDAP/AD)
The Search Bind configuration for AD/LDAP integration does not make assumptions about the form of user DNs; however, this does require searching for a user object to find its DN, before that particular user's credentials can be authenticated. Therefore, the AD/LDAP server must either support anonymous searches of the directory scope that contains the user objects, or there must exist general service account credentials that can be used to bind to the server and search for users. Search Bind provides the most flexibility in the arrangement of user objects that can be supported. Search Bind is also necessary for container (virtual node) login authentication, unless the AD/LDAP server supports anonymous searches.
If you are using search binding with either LDAP or AD, then you will need to specify the following parameters:
- User Attribute: Enter the LDAP/AD attribute used to retrieve user profiles (such as cn for LDAP or sAMAccountName for AD) in this field.
- Base DN: Subtree in the LDAP/AD hierarchy within which to search for users.
The following parameters are either optional (if the LDAP/AD server supports anonymous searches) or required (if the LDAP/AD server does not support anonymous searches):
- Bind DN: If the server does not allow anonymous binds, then enter the DN to bind to inside LDAP/AD to obtain permission to search for users.
- Bind Password: If the Bind DN requires a password, then enter that password (case sensitive) in this field.
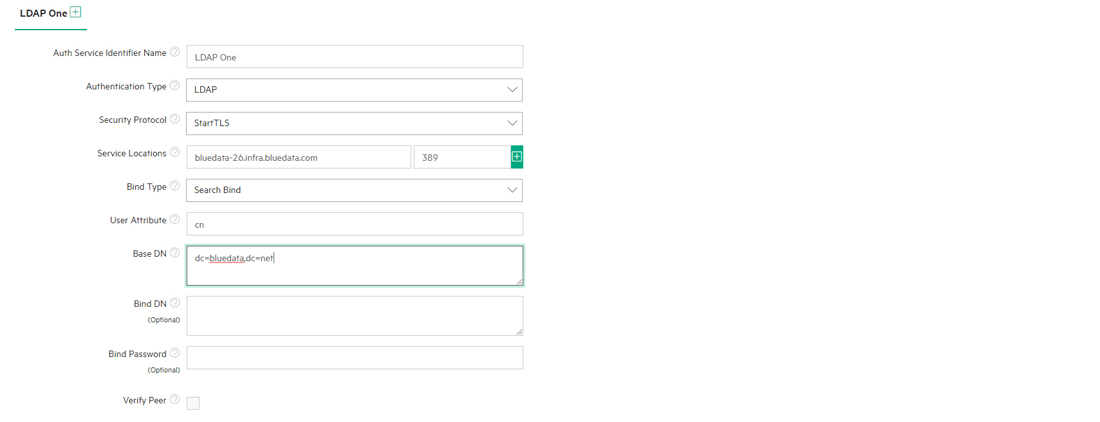
This image shows sample search bind LDAP settings.
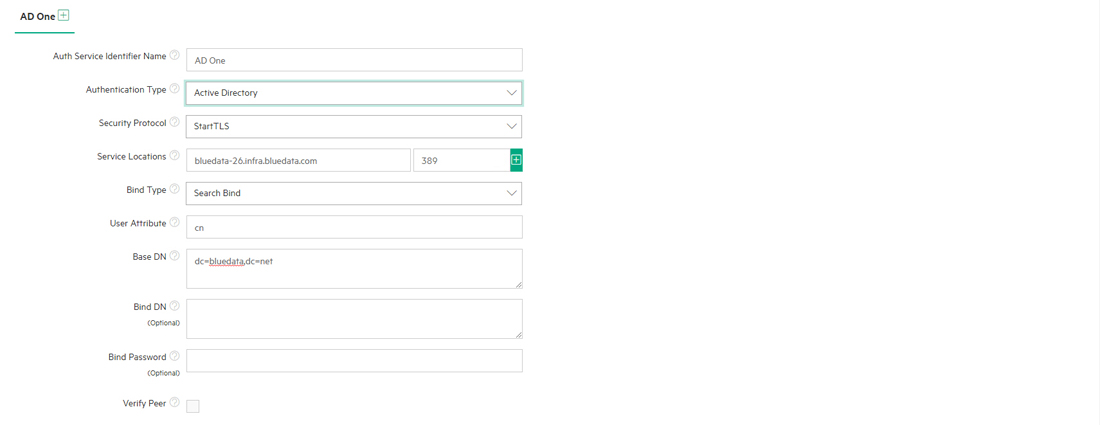
This image shows sample search bind AD settings.
Return to Step 12, above.
SSO
Single Sign On (SSO) allows a user to enter their credentials once (such as when arriving at the office in the morning), and then access all authorized resources without having to enter their credentials every time. If all of the following conditions are met, then you can configure the platform or Kubernetes cluster to allow users to log in to the interface without needing to enter their username and password:
- Hosts are running on RHEL/CentOS 7.x.NOTE SLES SUSE operating system is not supported.
- Either:
- The platform or Kubernetes cluster has been configured to use Search Bind with either LDAP or AD, as described in Search Bind (LDAP/AD).
- Your organization has enabled SSO based on the Security Assertion Markup Language (SAML) version 2.0 or later.
When the platform or Kubernetes cluster is configured to use SSO, an authorized user who accesses the web interface IP address will bypass the Login screen and go directly to the Dashboard screen for the tenant or project they most recently accessed. The SSO login process does forward the user to the Identity Provider (IdP) before forwarding them to the deployment. If the user already has an active IdP session, then they will see the appropriate Dashboard screen. If not, then they will see an IdP login screen and will be forwarded to the Dashboard screen after they provide their credentials. Users will access the web interface by navigating to either the hostname or IP address of one of the following:
- Controller host, if platform HA is not enabled.
- Cluster, if platform HA is enabled (see High Availability).
To allow SSO access:
- Configure the Identity Provider (IdP) to allow SSO access: See either Configuring the Identity Provider.
- Configure the deployment to allow SSO access by authorized users: See SSO, below.
Configuring the Identity Provider
- Provide the following information to your IdP:
- Audience: This field is not required; however, providing the base URL of the SAML server is more secure than a blank entry. If you do enter a URL, then this URL must exactly match the SAML Application Name that you will specify in the deployment.
- Recipient: Enter
<name-or-ip>/bdswebui/login, where:- If platform HA is not enabled,
<name-or-ip>is either the hostname (FDQN) or the IP address of the Controller host, if platform HA is not enabled. - If platform HA is enabled,
<name-or-ip>is either the cluster hostname (FQDN) or IP address.For HPE Ezmeral Runtime Enterprise 5.3.5 and later releases, to use SAML SSO with Jupyterhub Notebooks, you must specify the Controller gateway FDQN for
<name-or-ip>. Do not specify an IP address.
- If platform HA is not enabled,
- Consumer URL Validator: Enter
<name-or-ip>/bdswebui/login/, where<name-or-ip>is one of the following:.*- This is a valid generic entry, but is less secure. For example,.*/bdswebui/login/.- Either the FQDN or IP address of the Controller host, Controller
gateway, or cluster, as described in
Recipient. This entry is more secure
than the generic entry. For example,
10.32.0.75/bdswebui/login/orMyPlatform-01.organization.com/beswebui/login/.
- Consumer URL: Enter
<name-or-ip>/bdswebui/saml_login/, where<name-or-ip>is either a generic or specific entry, as described above. This may also be described by your IdP as the Single Sign On URL, the SAML Assertion Consumer Service URL, or the ACS URL. - SAML domain: If users must be authenticated against a specified domain, then you must configure the IdP to send the domain in the SAML Assertion. A SAML Assertion is an XML document that can contain arbitrary data. HPE Ezmeral Runtime Enterprise can use that arbitrary data for group assignment. However, because these "groups" and "roles" come over in the assertion, HPE Ezmeral Runtime Enterprise cannot guarantee them beforehand.
NOTE Your IdP may use different labels for these parameters. Contact them for assistance, if required. - Your IdP will provide a SAML IdP XML metadata file. You will use this file when configuring HPE Ezmeral Runtime Enterprise for SSO, as described below.
- Configure the deployment for SSO, as described in SSO.
Configuring HPE Ezmeral Runtime Enterprise for SSO
To configure the deployment for SSO:
- Configure your IdP as described in Configuring the Identity Provider, above.
-
In the web interface, configure either LDAP or AD for Search Bind, and then check the Enable SAML SSO check box.
The User Authentication tab or External Authentication tab expands to display the SSO options.
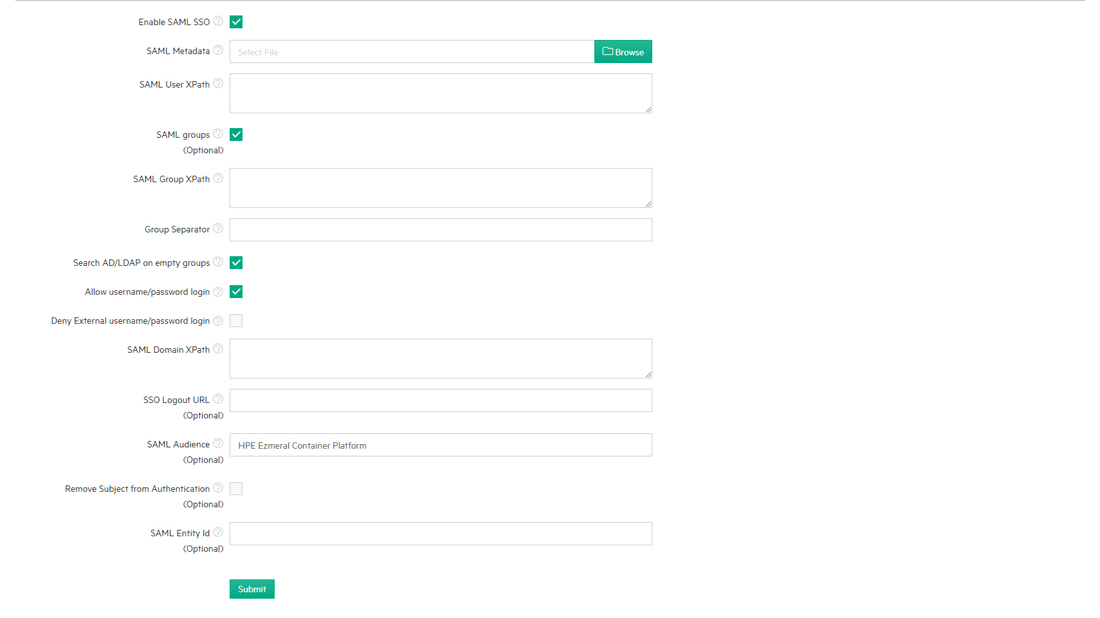
- In the SAML Metadata field, either enter the complete path to the SAML IdP XML metadata file that you obtained from your IdP, or click the Browse button to open a standard File Upload popup that allows you to navigate to and select the file.
- Enter the SAML user XPath in the SAML User XPath field.
This path will have a format that may look like
//saml:Subject/saml:NameID/text(). - If desired, enter an XPath in the SAML Group XPath field. This XPath points to a text-style field in the SAML Assertion that contains a single group or a list of groups separated by the string defined in the Group Separator field.
- If desired, enter a list of characters in the Group Separator field that will separate group names in the SAML Authenticator. This should always be seen as a list of separators, and any separator in this list will never appear in the extracted group names.
- Check the Search AD/LDAP on empty groups check box to have HPE Ezmeral Runtime Enterprise search the configured LDAP or AD server to determine user privileges if the user has already been authenticated via SAML and if that user did not have any groups in the SAML Assertion.
- If you want to allow users to log in directly without the need to go through the
SSO process, then check the Allow username/password login
check box. This is a safety feature that ensures access if the SSO server goes
down. It also allows you to log in if you make a mistake when configuring the
platform or tenant/project for SSO. When this feature is enabled, you may
access the web interface by navigating to
<controller_name-or-ip>/bdswebui/login?local, and then entering either your local or LDAP/AD username and password.CAUTION Hewlett Packard Enterprise strongly recommends allowing username and password logins, especially when performing the initial sso configuration. Failure to enable this option may result in all users being locked out of hpe ezmeral container platform. Only disable this option once you have verified that sso is properly configured and working properly. - If you want SAML to be the only method by which LDAP/AD users can log in, then check the Deny External username/password login check box. This is only recommended if users have been exclusively using SAML to authenticate to HPE Ezmeral Runtime Enterprise for a significant period of time.
- If desired, define where to find the domain in the SAML Assertion using in the
SAML Domain XPath field. For example, if the domain
is in an Attribute field where the
Name attributed is defined as
Domain, then the XPath would look like this://saml:AttributeStatement/saml:Attribute[@Name="Domain"]/saml:AttributeValue/text() - If desired, you may enter the complete URL (including the
http://orhttps://prefix) to where a user will be directed when they log out in the SSO Logout URL field. If this field is left blank, then logged-out users will be redirected to a SAML-specific logout page. - If you provided the base URL of the SAML server in the IdP Audience field, then enter that exact URL in the SAML Audience field. If this field is left blank, then the Audience portion of the SAML assertion will not be validated.
- If instructed by Hewlett Packard Enterprise Technical Support, then check the Remove Subject from Authn check box. Do not enable this option unless instructed to do so.
- If needed, enter the entity ID to be used in authentication requests in the SAML Entity Id field. Leaving this field blank will use the machine (Controller host) name.
- Return to Step 14, above.