Creating an Airflow Cluster Automatically
Describes how to create an Airflow Kubernetes cluster from a Git repository through the HPE Ezmeral Runtime Enterprise UI. This is the recommended method of Airflow cluster creation.
Prerequisites
-
For system, computation, and storage requirements, see Airflow Requirements.
-
Required access rights: Platform Administrator or Tenant Administrator/Member
- Airflow is enabled on the Kubernetes cluster, as described in Installing Airflow.
About this task
Procedure
-
Perform one of the following:
- If you are creating an Airflow cluster in an HPE Ezmeral ML Ops
project:
Create a new tenant with the ML Ops Project check box selected. Alternatively, select the ML Ops Project check box on an existing tenant.
- If you are creating an Airflow cluster for Spark in a non-HPE Ezmeral ML
Ops project:
Access the HPE Ezmeral Runtime Enterprise new UI, as described in Submitting and Managing Spark Applications Using HPE Ezmeral Runtime Enterprise new UI.
On the Home page of the new UI select View All on the Projects panel. The Projects screen opens. Select the name of your project.
- If you are creating an Airflow cluster in an HPE Ezmeral ML Ops
project:
-
If your environment has a web proxy, and your HPE Ezmeral Runtime Enterprise
tenant or ML Ops project has Istio Service Mesh enabled, perform
the following:
To allow the
git clonefunction in the Airflowgit-synccontainer, create an IstioServiceEntryobject with the following web proxy details:cat << EOF | kubectl -n <tenant namespace> apply -f - apiVersion: networking.istio.io/v1alpha3 kind: ServiceEntry metadata: name: proxy spec: hosts: - web-proxy.corp.hpecorp.net # ignored addresses: - 16.85.88.10/32 ports: - number: 8080 name: tcp protocol: TCP location: MESH_EXTERNAL EOF - Log in to HPE Ezmeral Runtime Enterprise as a Tenant Administrator to create Source Control templates. If you already have Source Control templates available, you can log in to HPE Ezmeral Runtime Enterprise as a Project Member.
- Select the ML Workbench tab. The HPE Ezmeral Runtime Enterprise new UI opens on the Overview tab of the Project details screen in a new browser tab.
- On the Source Control Configurations pane, click the name of a tenant or click View All. The Source Control Configurations screen opens.
-
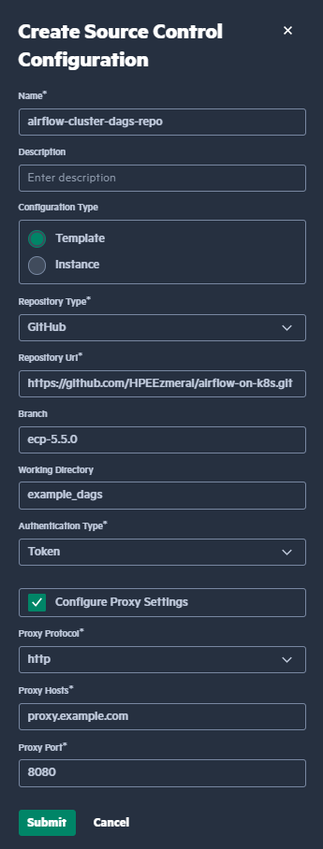
Click the Add Source Control Configuration button. The
Create Source Control Configuration form opens.

-
In the form, fill the required fields as follows:
- Name: Enter the string
airflow-cluster-dags-repo. This source control will create a new Airflow cluster instance in this tenant. - Configuration Type: NOTEYou must log in to HPE Ezmeral Runtime Enterprise as a Tenant Administrator to create Templates.
If you are using a public Git repository, select Template.
If you are using a private Git repository, create a Template with the name
airflow-cluster-dags-repo-template. Then, create an Instance with the nameairflow-cluster-dags-repo, and theairflow-cluster-dags-repo-templateSource Control as its template. - Repository URL: Enter the public or private Git repository where your DAGs are stored.
- Branch: Enter the name of the branch in the Git repository that you want to use.
- Working Directory: Enter the path to the directory where DAGs are located in the Git repository.
- Name: Enter the string
-
If Git is accessible behind a proxy, select the Configure Proxy
Settings check box, and fill in the following fields:
- Proxy Protocol: The protocol of the proxy (http or https).
- Proxy Host: The hostname (FQDN) of the proxy server.
- Proxy Port: The port of the proxy server.
-
If the Git repository is private, and you have selected Configuration
Type as Instance, fill in the following fields:
- Username: The username of the user with access to the repository.
- Email: The email of the user with access to the repository.
- Token/Password: The token or password of the user with access to the repository.
- After filling in all necessary fields, click Submit. Wait for about 5 to 10 minutes.
- Reload the page and return to the Tenant details page. The Workflow Engine link appears in the Training and Workflow area.