Data Source Connectivity and Exploration
Provides basic steps for using the Data Engineering space within HPE Ezmeral Unified Analytics Software.
- Data Sources – View and access connected data sources; create new data source connections.
- Data Catalog – Select data sets (tables and views) from one or more data sources and query data across the data sets. You can cache data sets. Caching stores the data in a distributed caching layer within the data fabric for accelerated access to the data.
- Query Editor – Run queries against selected data sets; create views and new schemas.
- Cached Assets – Lists the cached data sets (tables and views).
- Airflow Pipelines – Links to the Airflow interface where you can connect to data sets created in HPE Ezmeral Unified Analytics Software and use them in your data pipelines.
Tutorial Objective
- Connect data sources
- Select predefined data sets in data sources
- Join data across data sets/data sources
- Create a view
- Run a query against the view
This tutorial takes approximately 10 minutes to complete.
A – Sign in to HPE Ezmeral Unified Analytics Software
Sign in to HPE Ezmeral Unified Analytics Software with the URL provided by your administrator.
B – Connect Data Sources
Connect HPE Ezmeral Unified Analytics Software to external data sources that contain the data sets (tables and views) you want to work with. This tutorial uses MySQL and Snowflake as the connected data sources.
- In the left navigation column, select Data Engineering > Data
Sources. The Data Sources screen appears.
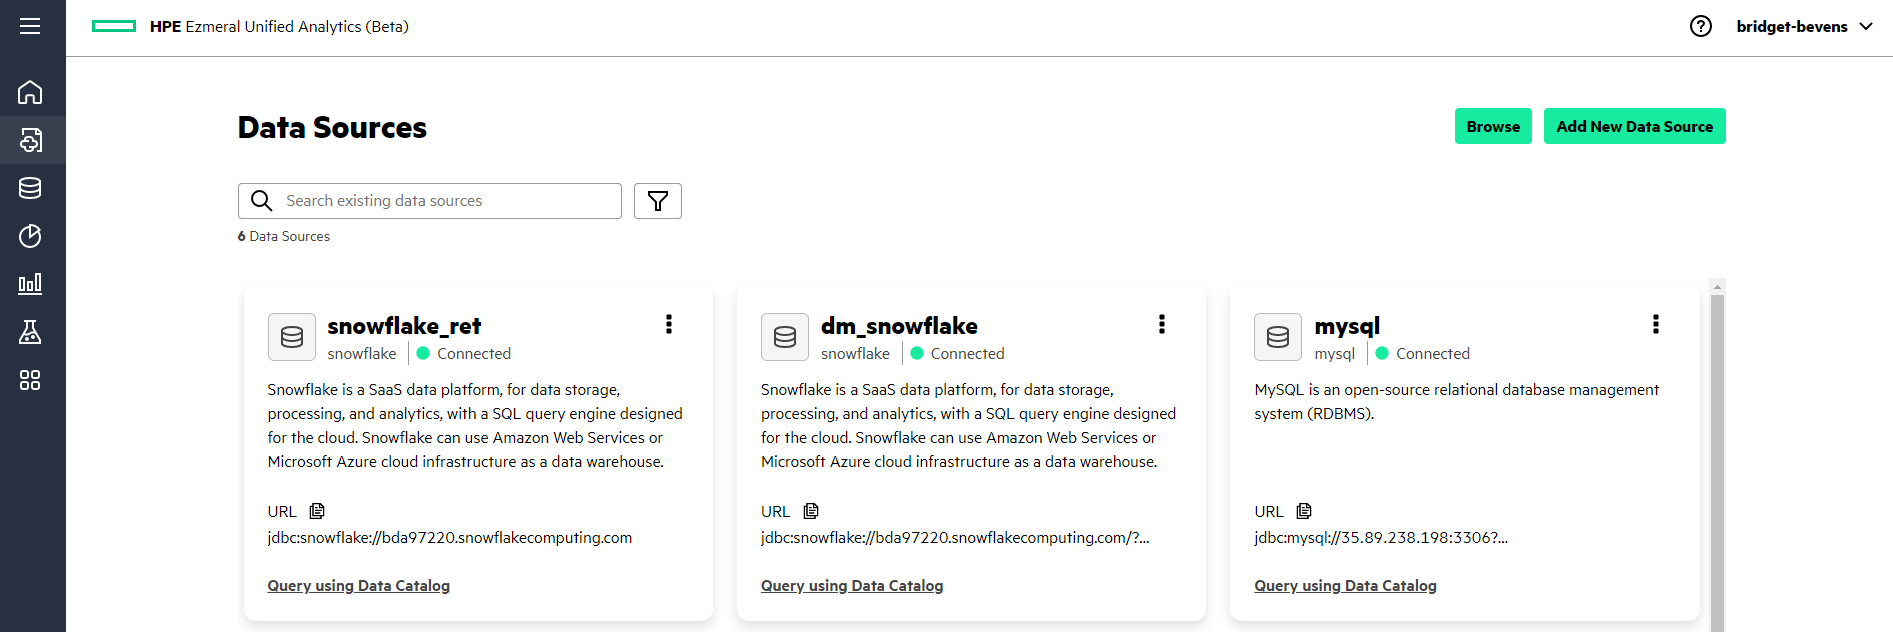
- Click Add New Data Source.
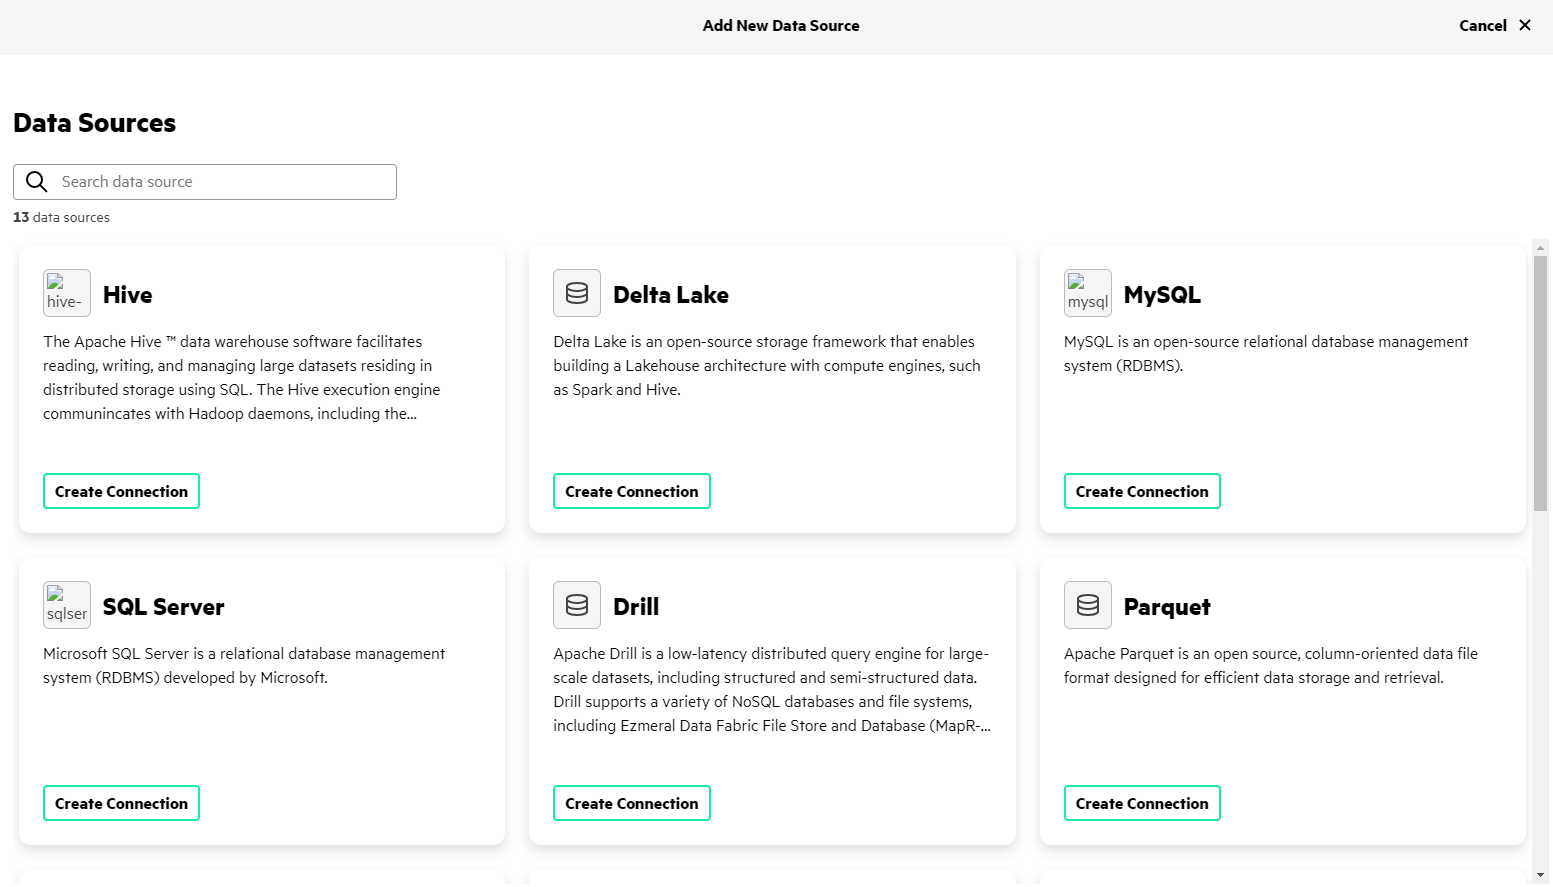
- Complete the steps required to connect to the MySQL, Snowflake, and Hive data
sources:NOTEWhen you create a data source connection, do not include an underscore ( _ ) in the data source name. EzPresto does not support underscores ( _ ) in data source names. For example, my_sql is not supported; instead, use something like mysql.
- Connecting to MySQL
-
- In the Add New Data Source screen, click Create Connection in the MySQL tile.
- In the drawer that opens, enter the required information in the respective
fields:NOTEThe information used here is for example purposes only.
- Name: mysql
- Connection URL: jdbc:mysql://<ip-address>:<port>
- Connection User: demouser
- Connection Password: moi123
- Enable Local Snapshot Table: Select the check boxTIPWhen Enable Local Snapshot Table is selected, the system caches remote table data to accelerate queries on the tables. The cache is active for the duration of the configured TTL or until the remote tables in the data source are altered.
- Click Connect. Upon successful connection, the system returns the
following
message:
Successfully added data source "mysql".
- Connecting to Snowflake
-
- In the Add New Data Source screen, click Create Connection in the Snowflake tile.
- In the drawer that opens, enter the following information in the respective
fields:
- Name: snowflakeret
- Connection URL: jdbc:snowflake://mydomain.com/
- Connection User: demouser
- Connection Password: moi123
- Snowflake DB: my_snowflake_db
- Enable Local Snapshot Table: Select the check boxTIPWhen Enable Local Snapshot Table is selected, the system caches remote table data to accelerate queries on the tables. The cache is active for the duration of the configured TTL or until the remote tables in the data source are altered.
- Click Connect. Upon successful connection, the system returns the
following
message:
Successfully added data source "snowflakeret".
- Connecting to Hive
-
- In the Add New Data Source screen, click Create Connection in the Hive tile.
- In the drawer that opens, enter the following information in the respective
fields:
- Name: hiveview
- Hive Metastore: file
- Hive Metastore Catalog Dir: file:///data/shared/tmpmetastore
- In Optional Fields, search for the following fields and add the
specified values:
- Hive Max Partitions Per Writers: 10000
- Hive Temporary Staging Directory Enabled: Unselect
- Hive Allow Drop Table: Select
- Enable Local Snapshot Table: Select the check boxTIPWhen Enable Local Snapshot Table is selected, the system caches remote table data to accelerate queries on the tables. The cache is active for the duration of the configured TTL or until the remote tables in the data source are altered.
- Click Connect. Upon successful connection, the system returns the
following
message:
Successfully added data source "hiveview".
C – Select Data Sets from the Data Catalog
In the Data Catalog, select the data sets (tables and views) in each of the data sources that you want to work with.
This tutorial uses the customer tables in the connected mysql and snowflakeret data sources. In the mysql data source, the schema for the customer table is retailstore. In the snowflakeret data source, the schema for the customer table is public.
- In the left navigation bar, select Data Engineering > Data Catalog.
- On the Data Catalog page, click the dropdown next to the mysql and snowflakeret data sources to expose the available schemas in those data sources.
- For the snowflakeret data source select the public schema and for the mysql data source, select the retailstore schemas.
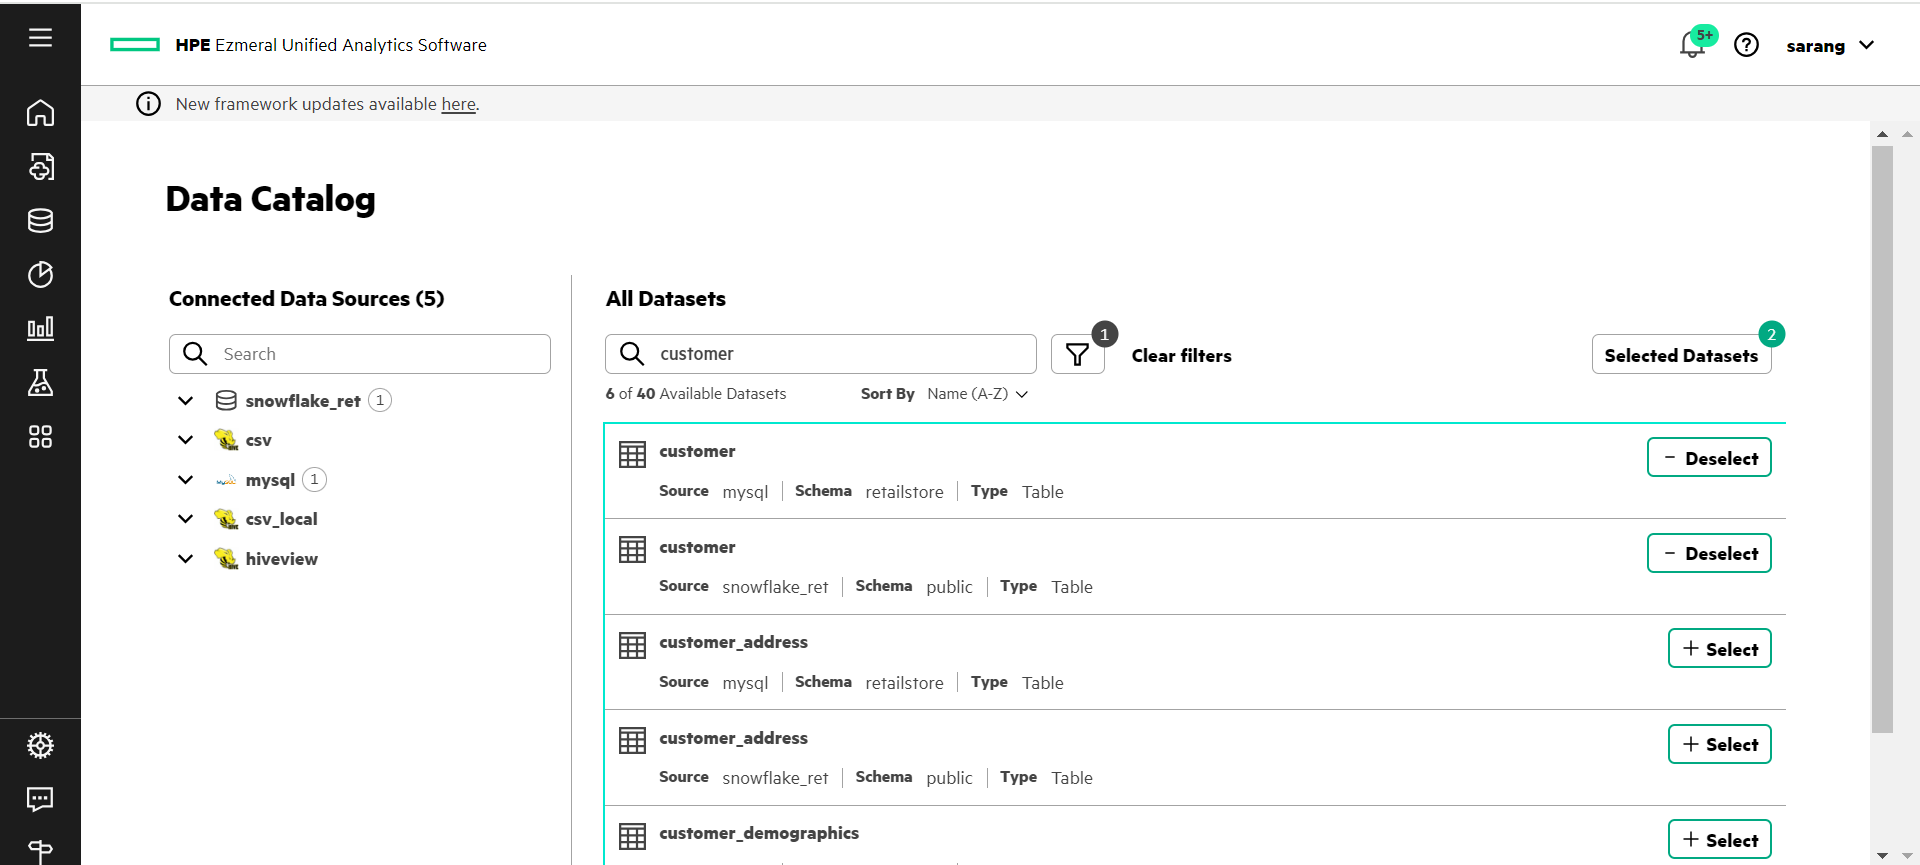
- In the All Datasets search field, enter a search term to limit the number of data sets. This tutorial searches on data sets with the name customer. All the data sets that have customer in the name with public or retailstore schema display.
- Click a customer table and preview its data in the Columns and Data
Preview tabs. NOTEDo not click the browser's back button; doing so takes you to the Data Sources screen and you will have to repeat the previous steps.
- Click Close to return to the data sets.
- Click Select by each of the tables named customer. Selected Datasets should show 2 as the number of data sets selected.
- Click Selected Datasets. The Selected Datasets drawer opens, giving you another opportunity to preview the datasets or discard them. From here, you can either query or cache the selected data sets. For the purpose of this tutorial, we will query the data sets.
- Click Query Editor.
D – Run a JOIN Query on Data Sets and Create a View
The data sets you selected display under Selected Datasets in the Query Editor. Run a JOIN query to join data from the two customer tables and then create a view from the query. The system saves views as cached assets that you can reuse.
- Expand the customer tables in the Selected Datasets section to view the columns in each of the tables.
- In the SQL Query workspace, click + to add a worksheet.
- Copy and paste the following query into the SQL Query field. This query creates
the a new schema in the
hiveviewdata source nameddemoschema:create schema if not exists hiveview.demoschema; - Click Run to run the query. As the query runs, a green light pulsates next to the Query ID in the Query Results section to indicate that the query is in progress. When the query is completed, the Status column displays Succeeded.
- In the SQL Query workspace, click + to add a worksheet.
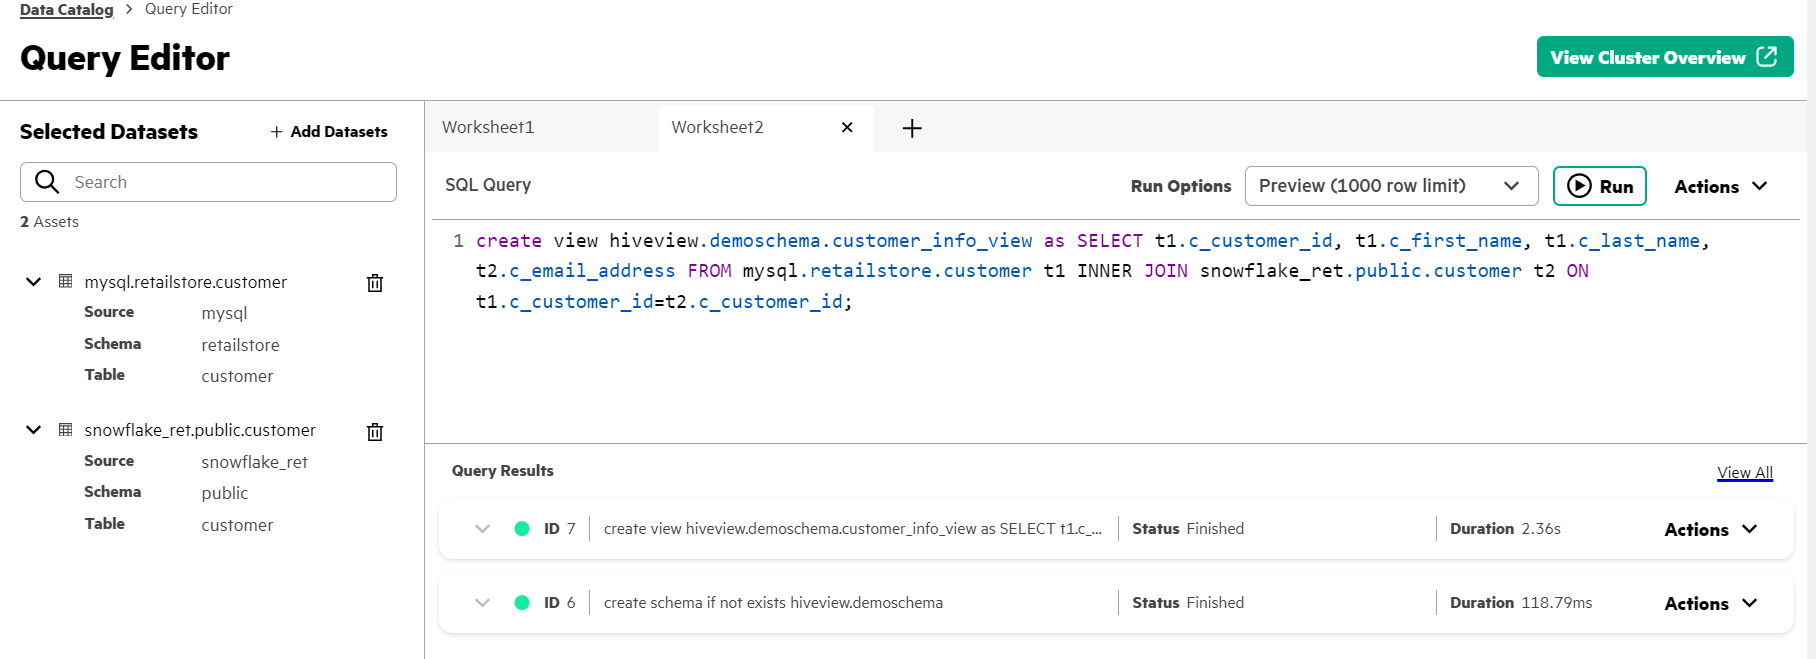
- Copy and paste the following query into the SQL Query field. This query creates
a view (hiveview.demoschema) from a query that joins columns from the two
customer tables (in the mysql and snowflakeret data sources) on the customer
ID.
create view hiveview.demoschema.customer_info_view as SELECT t1.c_customer_id, t1.c_first_name, t1.c_last_name, t2.c_email_address FROM mysql.retailstore.customer t1 INNER JOIN snowflakeret.public.customer t2 ON t1.c_customer_id=t2.c_customer_id - Click Run to run the query.
- In the SQL Query workspace, click + to add a worksheet.
- Copy and paste the following query into the SQL Query field. This runs against
the view you created (hiveview.demoschema) and returns all data in the
view.
SELECT * FROM hiveview.demoschema.customer_info_view; - Click Run to run the query.
- In the Query Results section, expand the Actions option for the query and select View Details to view the query session and resource utilization summary.
- Click Close to exit out of Query Details.
End of Tutorial
You have completed this tutorial. This tutorial demonstrated how easy it is to connect HPE Ezmeral Unified Analytics Software to various data sources for federated access to data through a single interface using standard SQL queries.
You may also be interested in the BI Reporting (Superset) Basics, which shows you how to create a Superset dashboard using the view (customer_info_view) and schema (customer_schema) created in this tutorial.