Creating a New Data Fabric Cluster
Use this procedure when creating a cluster that implements HPE Ezmeral Data Fabric on Kubernetes.
Important:
- If you want Compute (non-Data Fabric) Kubernetes clusters to use HPE Ezmeral Data Fabric on Kubernetes storage, then you must create aData Fabric cluster using the instructions in this article before creating a Compute Kubernetes cluster, as described in Creating a New Kubernetes Cluster. Istio Service Mesh is not supported on HPE Ezmeral Data Fabric on Kubernetes clusters.
-
Before you create a HPE Ezmeral Data Fabric on Kubernetes cluster, ensure that you add Data Fabric nodes as described in Kubernetes Data Fabric Node Installation Overview.
When you create or expand an HPE Ezmeral Data Fabric on Kubernetes cluster, you cannot reuse existing Kubernetes hosts that were added to HPE Ezmeral Runtime Enterprise without specifying the
Datafabrictag. However, you can decommission the hosts from the HPE Ezmeral Runtime Enterprise as described in Decommissioning/Deleting a Kubernetes Host, then add theDatafabrictag to the hosts, and then select the hosts when creating or expanding the Data Fabric cluster. - Ensure that the Requirements for HPE Ezmeral Data Fabric on Kubernetes (for non-production environments only) are met.
- You cannot shrink a Data Fabric cluster.
- If you are using an air-gap configuration (see Kubernetes Air-Gap Requirements and Air Gap Tab), then you must configure these settings before creating any Kubernetes clusters. Otherwise, you will need to delete the clusters and then create them again.
This process consists of the following steps:
- Before Creating the Cluster
- Step 1: Host Configurations
- Step 2: Cluster Configuration
- Step 3: Authentication
- Step 4: Application Configurations
- Step 5: Summary
- Step 6: HPE Ezmeral Data Fabric as Tenant Storage
- Step 7: Fine-Tuning the Cluster
Before Creating the Cluster
Before creating the HPE Ezmeral Data Fabric on Kubernetes cluster, you must first install the nodes that will be part of the cluster, as described in Kubernetes Data Fabric Node Installation Overview.
When adding the nodes, consider the following.
- Master node: Do not set the Datafabric tag.
- Worker node: Be sure to set the
Datafabric tag to either
yes,YES,true, orTRUE.
- Hosts that have Datafabric tag set to
yes,YES,true, orTRUEact as Master Nodes. - Based on the Datafabric settings, on the Step 1: Host Configurations screen, Master and worker nodes will be listed in the Available Hosts column.
Step 1: Host Configurations
Clicking the Create Kubernetes Cluster button in the Kubernetes Clusters screen opens the Step 1: Host Configurations screen.
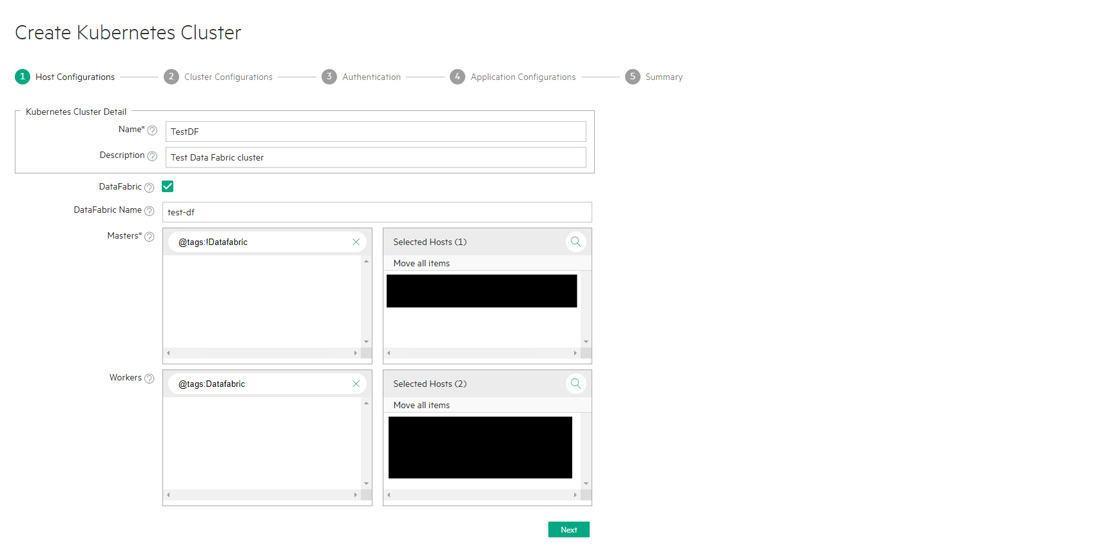
To begin creating a new Data Fabric cluster:
- Enter a name for the new cluster in the Name field.
- Enter a brief description of the new Data Fabric cluster in the Description field.
- Ensure that the DataFabric check box is checked. CAUTIONFailure to select the DataFabric check box will result in creating a new Kubernetes compute-only cluster, as described in Creating a New Kubernetes Cluster.
- Enter a name for the Data Fabric cluster in
the DataFabric Name field. This name is also used as the
name of the Custom Resource and namespace that represent the Data Fabric. The name must be:
- RFC 1123-compliant.
- At least four characters long and no more than 63 characters long.
- Can include alphanumeric characters (lower-case letters only) and hyphens.
- Cannot begin or end with a hyphen.
-
Select the master nodes.
The Master nodes cannot use the
Datafabrictag.You must select an odd number of Master nodes in order to have a quorum (e.g. 3, 5, 7, etc.). Hewlett Packard Enterprise recommends selecting three or more Master nodes to provide High Availability protection for the Data Fabric cluster.
You can search for a node by name, tag, etc. by entering your desired search term in the field and then clicking the Search icon (magnifying glass). Nodes that do not have the
Datafabrictag set toyesare automatically selected and displayed. You can also search for nodes by clicking the Search icon (magnifying glass) above any of the four cells in the Hosts table and then typing any portion of the hostname. The list of nodes automatically refreshes as you type.To select a master node:
-
In the Masters section of the Hosts table, hover the mouse over a node in the Available column.
A right arrow appears.
-
Click the arrow.
The selected node moves from the Available Hosts column to the Selected Hosts column.
To deselect a node, you may hover the mouse over a selected node and then click the left arrow to move it back to the Available Hosts column.
By default, a taint is placed on the Master nodes that prevents them from being able to run pods. You must untaint these nodes if you want them to be available to run pods, as described here (link opens an external web site in a new browser tab/window).
-
-
Select the Worker nodes.
- Worker nodes that will be used for data storage must have the
Datafabric=yestag. This tag may also be set toYES,true, orTRUE. - Worker nodes that do not have the
Datafabrictag will be used for compute functions. - For information about the minimum and recommended number of Worker nodes, see Requirements for HPE Ezmeral Data Fabric on Kubernetes (for non-production environments only).
You can search for a node by name, tag, and so forth by entering your desired search term in the field and then clicking the Search icon (magnifying glass). Nodes that have the
Datafabrictag set toyesare automatically selected and displayed. You can also search for nodes by clicking the Search icon (magnifying glass) above any of the four cells in the Hosts table and then typing any portion of the hostname. The list of nodes automatically refreshes as you type.To select a worker node:
-
In the Workers section of the Hosts table, hover the mouse over a node in the Available column.
A right arrow appears.
-
Click the arrow.
The selected node moves from the Available Hosts column to the Selected Hosts column.
To deselect a node, hover the mouse over a selected node and then click the left arrow to move it back to the Available Hosts column.
- Worker nodes that will be used for data storage must have the
-
Click Next.
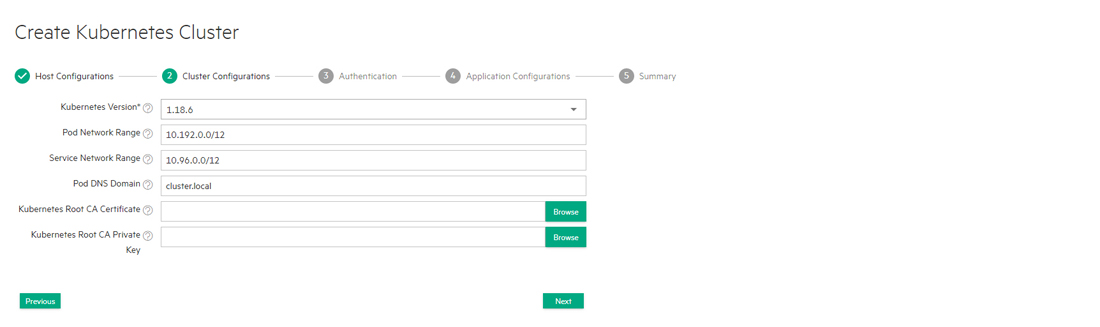
Step 2: Cluster Configuration
The Step 2: Cluster Configuration screen appears.
-
Use the Kubernetes Version pull-down menu to select the version of Kubernetes to install on the new cluster. You may upgrade this version later, as described in Upgrading Kubernetes. By default, the three most recent versions of Kubernetes recommended by the CNCF (Cloud Native Computing Foundation) are provided. This allows you to use the most recent Kubernetes version available here (link opens an external web site in a new browser tab/window). Specific versions of upstream can be onboarded via a manifest stored in a local repository (see Air Gap Tab).
-
Enter the network range and mask) to use for the pods in this cluster in the Port Network Range field. The Calico and Flannel Kubernetes CNI plug ins are pre-installed and configured, and defaults are provided for the Pod CIDR that is within a private range. You need only update these parameters if they conflict with other ranges that are already in use. Check here for additional information (link opens an external web site in a new browser tab/window).
-
Enter the network range and mask to use for the endpoint services in this cluster in the Service Network Range field. The Calico and Flannel Kubernetes CNI plugins are pre-installed and configured, defaults are provided for the Pod CIDR that is within a private range. You need only update these parameters if they conflict with other ranges that are already in use. Check the Choosing IP Address section here for additional information (link opens an external web site in a new browser tab/window).
-
Enter the DNS domain to use for the service endpoints in this cluster in the Pod DNS Domain field.
-
Enter the path to the Kubernetes root CA certificate in the Kubernetes Root CA Certificate field. This is the certificate authority that Kubernetes will use to generate the certificates needed for various Kubernetes components, such as
etcdandauth proxy/front-proxy. Clicking the Browse button opens a standard Open dialog that allows you to navigate to and select the desired file. -
Enter the path to the Kubernetes root CA private key in the Kubernetes Root CA Private Key field. This is the private key portion of the root CA certificate. Clicking the Browse button opens a standard Open dialog that allows you to navigate to and select the desired file.
- If you are satisfied with your changes, then click Next to proceed. Alternatively, you can click Previous to return to the Step 1: Host Configurations screen.
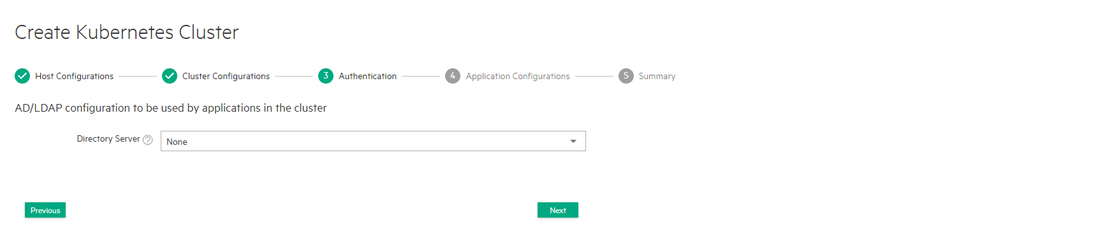
Step 3: Authentication
The Step 3: Authentication screen appears. You may either:
- Use the global HPE Ezmeral Runtime Enterprise user authentication.
- Specify user authentication options on a per-Kubernetes-cluster basis.
This is where you enter the LDAP/AD user authentication configuration that will be
used by the applications running in this cluster. Any information entered in this
screen is posted as a secret in the cluster. For Data Fabric clusters, the Data Fabric bootstrapper finds the Kubernetes secret
and specifies the user-authentication parameters in the form of an
sssd.conf file. The prompt responses to the bootstrapper
indicate an "Existing LDAP option".
- You may either:
- Click Next to use the platform-wide authentication settings.
- Click the Copy from Platform Authentication button to copy the platform-level LDAP/AD authentication to this Data Fabric cluster for further editing, as described in Configuring User Authentication Options.
- Manually enter authentication settings that will only apply to this Data Fabric cluster, as described in Configuring User Authentication Options.
- Click Next to proceed.
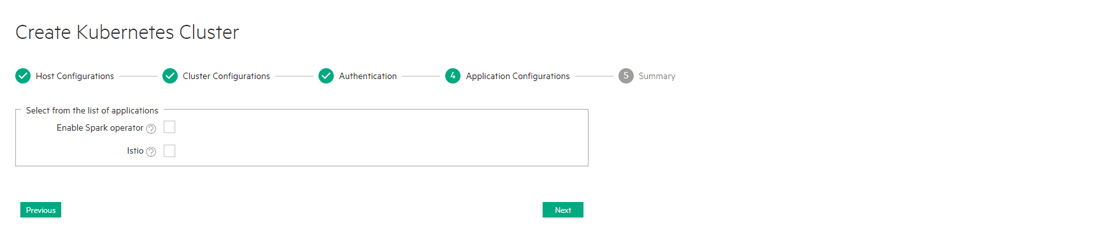
Step 4: Application Configurations
The Step 4: Application Configurations screen appears with a list of available HPE Ezmeral Runtime Enterprise applications that are not specifically related to a Data Fabric cluster. The list of available add-on applications may vary from that shown below.
Do not select the Istio application when creating or editing a Data Fabric cluster. Istio Service Mesh is not supported on HPE Ezmeral Data Fabric on Kubernetes clusters.
-
Verify that all of the hosts in the cluster meet the host requirements and the cumulative requirements for all the applications that will be selected, and then select the check boxes for the applications.
Not all applications are approriate for all clusters. For example, Do not select the Istio application when creating or editing a Data Fabric cluster. Istio Service Mesh is not supported on HPE Ezmeral Data Fabric on Kubernetes clusters.
For information about host requirements, see Kubernetes Host Requirements.
For information about add-on applications, see Add-ons Overview. Requirements are cumulative; for example, if you add two applications, then all the hosts in the cluster must meet the combined requirements of both applications.
- Review your application selections, and then click Next to proceed. Alternatively, you can click Previous to return to the Step 3: Authentication screen.
Step 5: Summary
The Step 5: Summary screen appears.

Review the summary of resources to be assigned to this cluster, and then either click Submit to finish creating the new Data Fabric cluster or click Previous to return to the Step 4: Application Configurations screen. If you need to configure the Open Policy Agent, then see OPA Gatekeeper Policy Configuration.
HPE Ezmeral Runtime Enterprise validates the make-up of the intended Data Fabric cluster and, if validation passes, proceeds to create the cluster. The HPE Ezmeral Runtime Enterprise bootstrap add-on bootstraps the Data Fabric cluster. If this bootstrapping succeeds, then HPE Ezmeral Runtime Enterprise automatically prepares and applies the Data Fabric CR and then waits for the Data Fabric cluster pods and pod-sets to come up.
- The Data Fabric cluster is ready when its status appears as Ready in the Kubernetes Clusters screen. See The Kubernetes Cluster Screen.
- If the Data Fabric cluster is not ready within
the
picasso_cldb_wakeup_timeoutperiod (default is 1500 seconds), then HPE Ezmeral Runtime Enterprise will stop cluster creation with an error. You can configure the timeout period as described in User-Configurable Data Fabric Cluster Parameters.
Step 6: HPE Ezmeral Data Fabric as Tenant Storage
To select from tenant storage options, and to register, see HPE Ezmeral Data Fabric as Tenant/Persistent Storage.
Step 7: Fine-Tuning the Cluster
If desired, you can manually fine-tune the Data Fabric cluster by modifying the cluster Custom Resource file (CR), as described in Manually Creating/Editing a Data Fabric cluster.