Manually Bootstrapping the Environment
HPE Ezmeral Runtime Enterprise versions 5.2 and later automate many of the processes described in this article. See:
This information is presented for educational, maintenance, and debugging by users with advanced knowledge of HPE Ezmeral Data Fabric.
You must run the bootstrap utility with the install directive in your Kubernetes environment to install the operators for creating Data Fabric clusters, tenants, etc. The following diagram depicts:
- Namespaces created by the bootstrap utility (green text).
- Operators installed by the bootstrap utility (yellow boxes).
- Pods created by the bootstrap utility (light green and yellow).
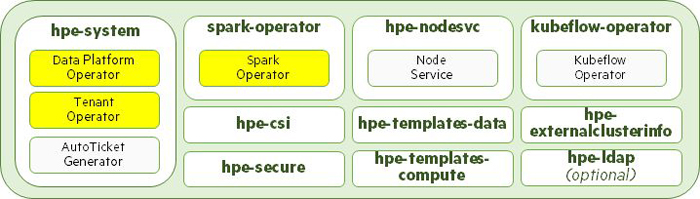
The Kubernetes environment is ready for installing Data Fabric clusters, tenants, and compute engines once bootstrapping process concludes.
This article contains the following sections:
- Overview: Provides a high-level overview of the bootstrap installation process. See Overview.
- Bootstrap Installation Process: Provides detailed bootstrap installation instructions. See Bootstrap Installation Process.
- Bootstrap Upgrade Process: Describes how to use the bootstrap script to upgrade the Kubernetes environment. See Bootstrap Upgrade Process.
- Bootstrap Uninstall Process: Describes using the bootstrap script for uninstallation. See Bootstrap Uninstall Process.
- Bootstrap Log Level: Describes how to set the bootstrap log detail level. See Bootstrap Log Level.
Overview
This section provides an overview of the bootstrap installation process.
Step 1: Prepare for Bootstrapping
Perform the following on the system on which you plan to run the bootstrap.sh utility:
- Have a Linux or Mac environment available. The bootstrap.sh script does not support Windows.
- Verify that
kubectlis installed on your system. - Set the
kubectlcontext to the Kubernetes cluster you are deploying, as described here (link opens an external website in a new browser tab/window). - Download the
.zipfile containing the bootstrap utility and examples. -
Run the
bootstrap.shutility located in thebootstrapdirectory when the cluster is ready for bootstrapping:cd ./boostrap - If not already installed, install Python (either versions 2.7.5 - 2.7.99
or between v3.7.0 and 3.8.99; link opens an external website in a new
browser tab/window). This is required to run
bootstrap.sh. An error message appears if your Python version varies from the ranges prescribed here. - Install pip version 18.0 or later (link opens an external website in a new browser tab/window).
- Install openSSL version v1.0.1 or later (link opens an external website in a new browser tab/window).
-
Install the latest version of the Python virtual environment by executing the following command:
pip install virtualenv
Step 2: Verify Cluster Readiness for Bootstrapping
HPE Ezmeral Data Fabric must be installed on an existing Kubernetes cluster. Perform the following procedure to verify that the Kubernetes cluster is configured and ready for bootstrapping:
-
Verify that
kubectlis installed in your client machine and has CLI access to the Kubernetes cluster by executing the following command:kubectl version - If the Kubernetes cluster is not a GKE cluster, then:
Verify that the Kubernetes cluster is running and that the current-context is set to the IP address of the master node by executing the following command:
kubectl config current-contextIf the current-context is not set to the master node IP address, then execute the following command:
kubectl config set-context
- Execute the command kubectl get nodes, and then verify all of the following:
- The cluster has at least five (5) nodes.
- The correct number of nodes is displayed.
- One node is a
master. - The node status is
ready. - The cluster IP address is displayed and correct.
-
Verify that at least the following default Kubernetes namespaces are active on the cluster by executing the following command:
kubectl get namespacedefault kube-public kube-system -
Ensure that
kubectlis configured with superuser access to the Kubernetes cluster. Your user ID should have Kubernetes Cluster Administrator privileges in order to bootstrap. If needed, execute the following command to provide the permissions:kubectl create clusterrolebinding user-cluster-admin-binding --clusterrole=cluster-admin --user=<USER>
Step 3: Get Help
If needed, you can obtain general or command-specific help by executing the following commands:
-
General: Execute the following command from the bootstrap directory:
$ ./bootstrap.shThis command returns the following:
Bootstrap operations for MapR software Usage: bootstrap.sh COMMAND [OPTIONS] Commands: Install | uninstall | upgrade Run command - must be supplied Options: --help List help for the specified commandExamples:bootstrap.sh install Run installer bootstrap.sh uninstall Run uninstaller bootstrap.sh install --help Get installation options bootstrap.sh uninstall --help Get uninstallation options bootstrap.sh upgradel --help Get bootstrap upgrade options -
Command-specific: Execute the following command to obtain help about that specific command;
bootstrap.sh <command> --help
Step 4: Run the Bootstrap Utility
You can run the bootstrap utility in one of the following modes:
PROMPT Mode
This is the default, interactive mode if you do not specify a --mode
parameter when invoking bootstrap.sh. In this mode, the utility prompts you for
input, as described in Bootstrap
Prompts, below. To run the utility in this mode, execute the following
command:
./bootstrap.sh [install|upgrade|uninstall] [-m|--mode PROMPT_MODE]To bootstrap the Kubernetes environment in PROMPT_MODE:
-
Go to the
bootstrapdirectory by executing the following command:cd bootstrap -
Invoke the
bootstrap.shutility by executing the following command:./bootstrap [install|upgrade|uninstall] - Enter appropriate responses to the prompts, which will vary depending on
how you are invoking
bootstrap.sh:
RECORD Mode
This interactive mode prompts you for input for required settings, as described in
Bootstrap Prompts, below, performs the bootstrapping function including
namespace creation and resource installation, and creates a file containing a record
of the settings that you can use later to invoke bootstrap.sh in
HEADLESS_MODE.
To run the utility in this mode, execute the following command:
./bootstrap.sh [install|upgrade|uninstall] -m|--mode RECORD_MODE -r|--response-file <response_file_name>To bootstrap the Kubernetes environment in RECORD_MODE:
-
Go to the
bootstrapdirectory by executing the following command:cd bootstrap -
Invoke the
bootstrap.shutility by executing the following command:./bootstrap [install|upgrade|uninstall] -m|--mode RECORD_MODE -r|--responsefile <response_file_name> - Enter appropriate responses to the prompts, which will vary depending on
how you are invoking
bootstrap.sh:
You may view sample RECORD_MODE output file by opening bootstrap/sampleresponsefile.txt.
HEADLESS Mode
This non-interactive mode uses a response file that was created either manually (see Bootstrap Install Settings), or automatically when the utility was invoked in RECORD_MODE.
To run the utility in this mode, execute the following command:
./bootstrap.sh [install|upgrade|uninstall] -m|--mode HEADLESS_MODE -r|--response-file <response_file_name>To bootstrap the Kubernetes environment in HEADLESS_MODE:
-
Go to the
bootstrapdirectory by executing the following command:cd bootstrap -
Invoke the
bootstrap.shutility by executing the following command:./bootstrap [install|upgrade|uninstall] -m|--mode HEADLESS_MODE -r|--responsefile <response_file_name>
Step 5: Post-Installation
After running a bootstrap installation, you may either:
- Manually create an HPE Ezmeral Data Fabric on Kubernetes cluster using the Data Fabric Custom Resource, as described in Manually Creating/Editing a Data Fabric cluster.
- Manually create Data Fabric tenants using the Tenant Custom Resource. You can choose to configure tenants to access data on either an existing external (on-prem or another supported environment), or an internalData Fabric cluster. See Manually Creating a New HPE Ezmeral Data Fabric Tenant.
Bootstrap Prompts
The following prompts appear when running boostrap.sh in either
Prompt or Record mode:
-
Begin by going to the
bootstrapdirectory and then run thebootstrap.shutility with the install directive by executing the following commands:cd bootstrap ./bootstrap.sh install -
To install CSI (see Container Storage Interface), enter
yes(this is the default option) at the following prompt:>>> Install MapR CSI driver? (yes/no) [yes]: - Either:
Install the Tenant operator that manages tenants by entering
yes(this is the default option) at the following prompt:>>> Install Computer? (yes/no) [yes]:- Enter
noif you do not want to install the Tenant operator, and then proceed to the next step. See About Tenants for more information.
- Either:
Install the Data Fabric operator that manages internal Data Fabric clusters by entering
yes(this is the default option) at the following prompt:>>> Install Data Platform? (yes/no) [yes]:- Enter
noif you do not want to install the Data Fabric operator, and then proceed to the next step. See About HPE Ezmeral Data Fabric on Kubernetes for additional information.
-
The bootstrap utility validates the Kubernetes environment it is configured to connect to. If there are no issues, you will see:
Looking good... connected to Kubernetes -
Choose the correct user authentication option by entering one of the following:
>>> Choose an option ('EXISTING', 'NONE', 'EXAMPLE') [EXAMPLE]:This is crucial for ensuring proper connectivity between tenants and internal or external storage clusters. The following options are available:EXISTING- Uses an existing LDAP server in your environment (recommended for production). See Adding Certificate Files During Bootstrap Installation. This option prompts you for user and group information, which must match existing user and group accounts that have been pre-configured for use by HPE Ezmeral Data Fabric. The user account prompts request username, password, and user ID. The group prompts request thegroupname, and group ID. The group ID must be for the group in which the user account is configured. You will also be prompted for the following two common LDAP configuration files:ldap.conf- Configures all OpenLDAP clients in the HPE Ezmeral Data Fabric environment.sssd.conf- Configures all SSSD clients in the HPE Ezmeral Data Fabric environment.
None- Choosing this option is not recommended. If you choose this option, the automatic ticket generator does not start, which can affect the ability to run applications such as Spark. This option does not perform any LDAP configuration. Instead, raw local Linux users must be configured everywhere in the HPE Ezmeral Data Fabric environment.EXAMPLE- Use an example OpenLDAP container installed in thehpe-ldapnamespace. Default users and groups are pre-configured in the service, and the Data Fabric Kubernetes environment is configured to use this service. This option is good for testing but not recommended for production usage because it is not secure.
-
If you are using an air-gap Docker registry (see Kubernetes Air-Gap Requirements, Air Gap Tab, and Using an Air-Gapped Docker Registry ), then select yes at the following prompt, otherwise select no, which is the default answer.:
>>> Use Airgapped Docker Registry? (yes/no) [no]: -
As described in Managing Nodes and Disks, you must use the node labeller by answering yes at the following prompt. Answer no exits the script.
>>> Write fake labels to nodes for testing without HCP 5.1? (yes/no) [yes]: -
Enter yes to confirm that you want to start the bootstrapping process:
We are now ready to install the basic components for running the HPE Ezmeral Data Fabric on Kubernetes…
>>> Continue with installation? (yes/no) [yes]:
The utility creates the necessary objects and then indicates the final installation status. For example:
This Kubernetes environment has been successfully bootstrapped for Data Fabric components can now be created via the newly installed operatorsBootstrap Installation Process
The following illustration depicts the bootstrap installation process:
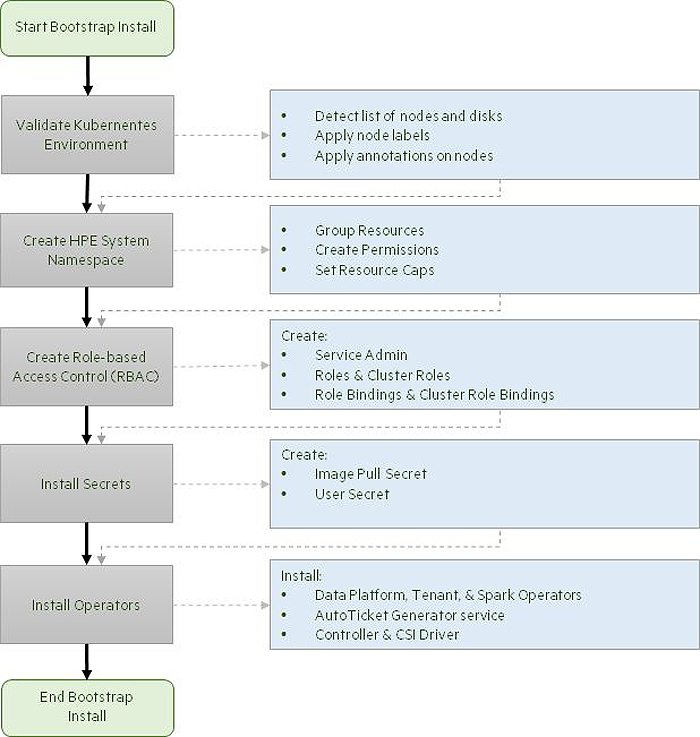
The bootstrap process:
- Validates the nodes in the Kubernetes environment to determine the list of nodes that are available for use, and applies labels and annotations on the available nodes. This validation determines information such as the number of nodes, their sizes, and the number and types of disks available on the nodes.
- Creates several required Kubernetes namespaces (see Namespaces) that host various operators, group resources, Role-Based Access Control (RBAC) support files, and the CSI driver.
- Sets up RBAC files, including:
- A service account named
hpe-dataplatformoperator. - A cluster role named
hpe-dataplatformoperatorthat contains cluster-wide permissions. - A cluster role binding also named
hpe-dataplatformoperatorthat ties cluster roles to users and service accounts. See Using RBAC Authorizations (link opens an external website in a new browser tab/window) and Kubernetes Tenant RBAC.
- A service account named
- Creates a system user secret that holds the sensitive information that you entered earlier. It also creates a pull secret that is used to pull images and operators from the repository and user secret.
- Installs the config maps, operators (combinations of CRDs and Controllers), and creates the pods for the CSI driver.
- Creates PVs and PVCs to allocate storage to the pods.
Bootstrap Install Settings
The following keys can be placed in a manually-generated response file that
will be used to run the bootstrap utility in HEADLESS_MODE for
the install directive:
CREATE_COMPUTE- Specifies whether (yes) or not (no) to install the compute (tenant) components.CREATE_STORAGE- Specifies whether (yes) or not (no) to install the Data Fabric cluster components.INSTALL_CSI- Specifies whether (yes) or not (no) to install the HPE Ezmeral Data Fabric CSI Driver.LDAP_OPTION- Specifies the default authentication type choice for configuring the Data Fabric cluster and tenants. Value can be one of the following:EXTERNAL- Configure and use an external LDAP service as the default for Data Fabric clusters and tenants.NONE- Install non-LDAP settings to use raw (local) Linux users and configure this as the default for Data Fabric clusters and tenants.EXAMPLE- Install the samplehpe-ldapOpenLDAP service and configure this as the default for Data Fabric clusters and tenants.
MAPR_USER- Data Fabric cluster system user name, ifLDAP_OPTIONIs set toEXTERNALorNONE.MAPR_GROUP- Data Fabric cluster system users group name, ifLDAP_OPTIONIs set toEXTERNALorNONE..MAPR_UID- Data Fabric cluster system user ID, ifLDAP_OPTIONIs set toEXTERNALorNONE.MAPR_GID -Data Fabric cluster system user's group ID, ifLDAP_OPTIONIs set toEXTERNALorNONE.USE_AIRGAP- Whether (yes) or not (no) to use the Default docker repository for images or a different repository, such as in a local air-gapped environment.AIRGAP_REGISTRY- Name of the Docker repository, ifUSE_AIRGAPis set toyes. This value should be a URL that is accessible to the bootstrap system.CONTINUE_INSTALL- Whether (yes) or not (no) to continue installation after all applicable information has been entered.
Adding Certificate Files During Bootstrap Installation
During bootstrap installation, setting LDAP_OPTION to EXISTING allows you to specify a common ldap.conf, sssd.conf, and any user-provided certificates
that will be used when initializing pods. The two .conf files allow you to customize aspects of your LDAP and SSSD
configuration.
Example 1
This example sets LDAP_OPTION to EXISTING with the default ldap.conf and sssd.conf files plus a certificate file named vault.pem:
Please choose a user authentication configuration option from the three listed:EXAMPLE ) Use an example OpenLDAP container (not for production use)EXISTING ) Use an existing LDAP server in your environmentNONE ) Use raw Linux users in each container (not recommended)>>> Choose an option ('EXAMPLE', 'EXISTING', 'NONE') [EXAMPLE]: EXISTINGPlease answer the following questions:>>>What admin user account from your authentication provider would you like to create
and register as the data admin during podinitialization? [custadmin]:>>> What is admin user's uid? [7000]:The data fabric uses common ldap.conf, sssd.conf, and any provided certs when
bringing up pods. >>>Please provide an ldap.conf file to import [ldap.conf]: >>>Please provide an sssd.conf file to import [sssd.conf]:Optionally, if your LDAP/SSSD setup is configured to verify TLS certs, enter
individual or bundle CA certificate files to include. Hit Enter (blank file name)
when done.>>> Certificate file to import: vault.pem
cert file added>>> Another certificate file to import:The Certificate file to import prompts allow
you to specify either a path to a file or just the file name if the
file is in your local directory. The certificates are added to the hpe-secure namespace.
Example 2
The following example ldap.conf file specifies TLS_REQCERT as a demand, which means that the CA in the CERTS directory should match the CA supplied by your LDAP server. This is
just one example of a customization that you can implement using the ldap.conf file:
#
# LDAP Defaults
#
# See ldap.conf(5) for details
# This file should be world readable but not world writable.

BASE tlsshot.com

URI ldaps://tlsldap.myldap.com/

#SIZELIMIT    12

#TIMELIMIT    15

#DEREF    never

TLS_CACERTDIR    /etc/openldap/certs
TLS_REQCERT    demand

# Turning this off breaks GSSAPI used with krb5 when rdns = false
SASL_NOCANON    on
Using an Air-Gapped Docker Registry
The bootstrap utility now includes a prompt for using an air-gapped Docker registry rather than the default registry:
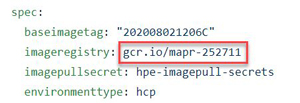
>>> Use Airgapped Docker Registry? (yes/no) [no]:By default, bootstrap pulls Docker images from cr.io/mapr-252711. If
you answer yes to this prompt, then you can choose a different
repository. An air-gapped repository is a local or remote repository that you have
prepared in advance that is physically isolated from the Internet or unsecured
public networks. If you specify an air-gapped repository, then you must supply a URL
or path that is accessible to the bootstrap system. You may also need to update any
CRs that contain an entry for the Docker registry. For example:
Using the Bootstrap Install --setup_only Option
The bootstrap.sh install command includes a --setup_only option that only installs the Python virtualenv components. This option is useful when you want to embed the
bootstrapper in a Docker file, because it only installs the virtual environment
components required for the bootstrapper to run. To use
this option:
- Go to the bootstrap directory
-
Invoke bootstrap.sh with the following options:
./bootstrap.sh install --setup_only
Bootstrap Upgrade Process
The bootstrap upgrade process takes only few minutes to upgrade operators and supporting files by only making changes for which a patch or new version is available. This process can be performed while the cluster is online. In general, you should perform a bootstrap upgrade before updating the Data Fabric cluster configuration.
A bootstrap upgrade is not always needed, such as if you recently installed HPE Ezmeral Runtime Enterprise. However, you should consider an upgrade if:
- You never performed a bootstrap upgrade
- You are unsure when the last bootstrap upgrade was performed.
- You know that new operators are available.
- The Data Fabric cluster is in an invalid state and upgrading the operators might help resolve an issue.
To perform the bootstrap upgrade:
-
Go to the
bootstrapdirectory:cd bootstrap -
Run the upgrade command:
./bootstrap.sh upgrade - The bootstrap script verifies that the current client and server versions are compatible and examines the operators and namespaces.
-
The bootstrap script detects the installed components and upgrades only those components that need upgrading. The script then asks whether (
yes) or not (no; default) you want to use an air-gapped Docker registry:>>> Use Airgapped Docker Registry? (yes/no) [no]: -
The bootstrap script prompts you whether (
yes; default) or not (no) to continue the upgrade:>>> Continue with upgrade? (yes/no) [yes];
If you select yes to continue the upgrade, the bootstrap script begins applying updates, and then displays some of the components that were upgraded. For example:
Gathering Data Fabric cluster information...
Checking namespaces...
Checking operators...
data fabric installed: True
compute installed: True
ldap installed: True
spark installed: True
csi installed: True
Data Platform Operator:
    Pod: dataplatformoperator-b586c667d-24zft
    Image: clusteroperator-1.0.0:202007092203
    Create Time: 2020-07-27T16:55:45Z
    Status: Running
 Tenant Operator:
    Pod: tenantoperator-6c97ffdc5f-fcxz6
    Image: tenantoperator-1.0.0:202007092203
    Create Time: 2020-07-27T16:56:02Z
    Status: Running
 LDAP Pod
    Pod: ldap-0
    Image: ldap-6.2.0:202007092140C
    Create Time: 2020-07-27T16:55:43Z
    Status: Running
 Spark Operator:
    Pod: sparkoperator-686bbb7898-6kxhs
    Image: spark-operator-2.4.4:202006020640
    Create Time: 2020-07-27T16:56:05z
    Status: Running
 This Kubernetes environment has been successfully bootstrapped for the Data
 Fabric. Data Fabric components can now be created via the newly installed
 operators
Bootstrap Uninstall Process
Using the bootstrap script to uninstall HPE Ezmeral Data Fabric frees the resources in the environment and removes:
- All of the components (operators, CRDs, sample YAML files, secrets, and the CSI driver).
- The namespaces created in the Kubernetes environment.
- The service accounts, including the roles and role bindings.
Uninstall mode defaults to PROMPT_MODE, however you can also run
it also in RECORD_MODE or HEADLESS_MODE
if desired.
MAPR-CONFIGURATION-CLUSTERS, WHICH MIGHT CONTAIN
USER-CREATED OBJECTS. IF YOU NEED TO PRESERVE ANY USER-CREATED
OBJECTS, THEN BACK UP THE OBJECTS BEFORE PROCEEDING WITH THE
UNINSTALL.
To uninstall using the bootstrap script:
-
Go to the bootstrap directory and then invoke
bootstrap.shwith theuninstalldirective by executing the following commands:cd bootstrap ./bootstrap.sh uninstall -
Specify whether (
yes) or not (no; default) to proceed with the uninstall:This will uninstall ALL HPE operators from your Kubernetes environment. This will cause all Tenants to be destroyed. They cannot be recovered! >>> Do you agree? (yes/no) [no]: -
Specify whether (
yes) or not (no; default) to uninstall the CSI driver:>>> Remove the HPE CSI driver? (yes/no) [no]: -
Specify whether (
yes) or not (no; default) to uninstall the Data Platform (including any Data Fabric cluster):>>> Remove Data Platform? (yes/no) [no]: -
Specify whether (
yes) or not (no; default) to uninstall the templates data:>>> Remove the Data Platform Templates? (yes/no) [no]: -
Specify whether (
yes) or not (no; default) to uninstall the external cluster data:>>> Remove the External Cluster Info? (yes/no) [no]: -
Specify whether (
yes) or not (no; default) to uninstall thehpe-securedata:>>> Remove the Secure Namespace? (yes/no) [no]: -
Specify whether (
yes) or not (no; default) to uninstall the compute components (including tenants):>>> Remove Compute? (yes/no) [no]: -
Specify whether (
yes) or not (no; default) to uninstall the compute templates data:>>> Remove the Compute Templates? (yes/no) [no]:
The utility deletes the necessary objects and indicates the status of the uninstallation. For example:
This Kubernetes environment has the Data Fabric cluster successfully uninstalled
Bootstrap Uninstall Settings
The following key names can be automatically or manually placed in a response file for running the bootstrap utility in HEADLESS_MODE for the uninstall directive:
AGREEMENT- Whether (yes) or not (no; this is the default option, which terminates the script) to perform the uninstall operation.REMOVE_COMPUTE- Whether (yes) or not (no) to uninstall the compute (tenant) components.REMOVE_COMPUTE_TEMPLATES- Whether (yes) or not (no) to uninstall secrets and configmaps in the compute templates namespace.REMOVE_CSI- Whether (yes) or not (no) to uninstall the Data Fabric CSI driver.REMOVE_EXTERNAL_INFO- Whether (yes) or not (no) to uninstall the secrets and configmaps in the external info namespace.REMOVE_SECURE- Whether (yes) or not (no) to uninstall the secrets and configmaps in thehpe-securenamespace.REMOVE_STORAGE- Whether (yes) or not (no) to uninstall the Data Fabric components.REMOVE_STORAGE_TEMPLATES- Whether (yes) or not (no) you want to uninstall secrets and configmaps in the storage templates namespace.
Bootstrap Log Level
If needed, you can use the bootstrap log located in
<bootstrap_dir>/src/common/mapr_conf/logger.yaml to
troubleshoot bootstrapping issues. You can also adjust the level of detail provided
by the log, as follows:
- Open
<bootstrap_dir>/src/common/mapr_conf/logger.yamlfor editing. - In the
handlers/logFileHandlersection, find the level setting. - Change the log level to one of these values:
Level:
                                !!python/name:logging.DEBUG
(most detailed logs)Level: !!python/name:logging.INFOLevel: !!python/name:logging.CODELevel: !!python/name:logging.ERROR(least detailed logs)